crwdns2933423:0crwdne2933423:0

Canon PowerShot A620 Camera Housing Replacement

crwdns2942213:0crwdne2942213:0

  1. Canon PowerShot A620 Camera Housing Replacement, Open Battery Door: crwdns2935265:01crwdnd2935265:01crwdnd2935265:03crwdne2935265:0 Canon PowerShot A620 Camera Housing Replacement, Open Battery Door: crwdns2935265:01crwdnd2935265:02crwdnd2935265:03crwdne2935265:0 Canon PowerShot A620 Camera Housing Replacement, Open Battery Door: crwdns2935265:01crwdnd2935265:03crwdnd2935265:03crwdne2935265:0
    • Slide the tab on the battery door while pushing the battery door away from you. The battery door should pop open.

  2. Canon PowerShot A620 Camera Housing Replacement, Insert Batteries: crwdns2935265:02crwdnd2935265:01crwdnd2935265:02crwdne2935265:0 Canon PowerShot A620 Camera Housing Replacement, Insert Batteries: crwdns2935265:02crwdnd2935265:02crwdnd2935265:02crwdne2935265:0
    • Insert AA batteries according to the diagram printed on the camera.

    • Close the battery door.

  3. Canon PowerShot A620 Camera Housing Replacement, Side Panel: crwdns2935265:03crwdnd2935265:01crwdnd2935265:03crwdne2935265:0 Canon PowerShot A620 Camera Housing Replacement, Side Panel: crwdns2935265:03crwdnd2935265:02crwdnd2935265:03crwdne2935265:0 Canon PowerShot A620 Camera Housing Replacement, Side Panel: crwdns2935265:03crwdnd2935265:03crwdnd2935265:03crwdne2935265:0
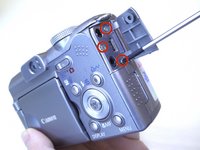
    • Unscrew the three Phillips #00 1.6x3mm screws on the side.

    • Lift loose panel from the case.

    • Unscrew the two Phillips #00 1.6x3mm screws that were previously hidden beneath the panel.

  4. Canon PowerShot A620 Camera Housing Replacement, Bottom Panel: crwdns2935265:04crwdnd2935265:01crwdnd2935265:01crwdne2935265:0
    • Unscrew the two Phillips #00 1.6x3mm screws on the bottom panel.

  5. Canon PowerShot A620 Camera Housing Replacement, Battery Compartment: crwdns2935265:05crwdnd2935265:01crwdnd2935265:01crwdne2935265:0
    • Open the battery door.

    • Unscrew the four Phillips #00 1.6x3mm screws in the battery compartment.

  6. Canon PowerShot A620 Camera Housing Replacement, Terminal Cover: crwdns2935265:06crwdnd2935265:01crwdnd2935265:02crwdne2935265:0 Canon PowerShot A620 Camera Housing Replacement, Terminal Cover: crwdns2935265:06crwdnd2935265:02crwdnd2935265:02crwdne2935265:0
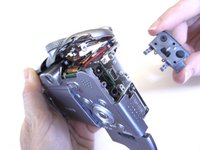
    • Lift the terminal cover on the side of the camera.

    • Unscrew the three Phillips #00 1.6x3mm screws beneath the terminal cover.

  7. Canon PowerShot A620 Camera Housing Replacement, Top Panel: crwdns2935265:07crwdnd2935265:01crwdnd2935265:01crwdne2935265:0
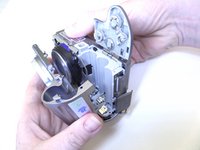
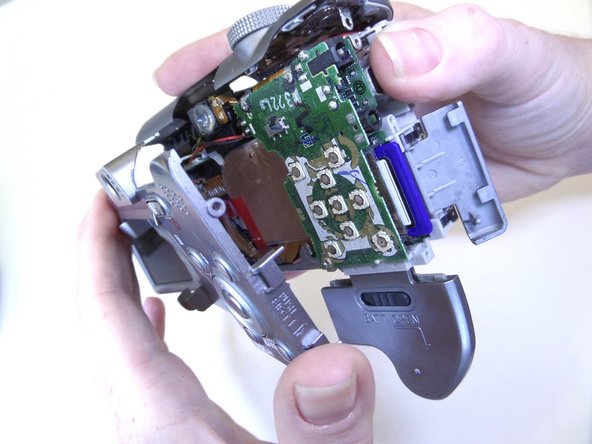
    • Gently pull the top panel to separate it from the case.

    • Although the top panel will now be free from the rest of the case, it will still be attached to the camera by a ribbon cable.

  8. Canon PowerShot A620 Camera Housing Replacement, Front Panel: crwdns2935265:08crwdnd2935265:01crwdnd2935265:02crwdne2935265:0 Canon PowerShot A620 Camera Housing Replacement, Front Panel: crwdns2935265:08crwdnd2935265:02crwdnd2935265:02crwdne2935265:0
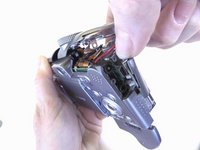
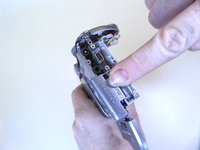
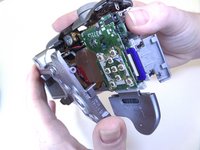
    • Gently pull the front panel to separate it from the camera.

    • The battery terminals are easy to access from this step.

  9. Canon PowerShot A620 Camera Housing Replacement, Terminal Cover: crwdns2935265:09crwdnd2935265:01crwdnd2935265:02crwdne2935265:0 Canon PowerShot A620 Camera Housing Replacement, Terminal Cover: crwdns2935265:09crwdnd2935265:02crwdnd2935265:02crwdne2935265:0
    • Gently pull the terminal cover to separate it from the camera.

  10. Canon PowerShot A620 Camera Housing Replacement, Memory Card Cover: crwdns2935265:010crwdnd2935265:01crwdnd2935265:02crwdne2935265:0 Canon PowerShot A620 Camera Housing Replacement, Memory Card Cover: crwdns2935265:010crwdnd2935265:02crwdnd2935265:02crwdne2935265:0
    • Slide the memory card cover down.

    • Unscrew the Phillips #00 1.6x3mm screw beneath the memory card cover.

  11. Canon PowerShot A620 Camera Housing Replacement, Back Panel: crwdns2935265:011crwdnd2935265:01crwdnd2935265:02crwdne2935265:0 Canon PowerShot A620 Camera Housing Replacement, Back Panel: crwdns2935265:011crwdnd2935265:02crwdnd2935265:02crwdne2935265:0
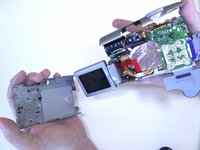
    • Gently pull the back panel to separate it from the camera.

crwdns2915888:0crwdne2915888:0

To reassemble your device, follow these instructions in reverse order.

crwdns2935229:02crwdne2935229:0

Jaime Abraham

crwdns2935283:009/08/14crwdne2935283:0

350 crwdns2915208:0crwdne2915208:0

crwdns2935297:03crwdne2935297:0

crwdns2915084:0crwdne2915084:0

CSU Fullerton, Team 1-1, Bruce Fall 2014 crwdns2935289:0CSU Fullerton, Team 1-1, Bruce Fall 2014crwdne2935289:0

CSUF-BRUCE-F14S1G1

crwdns2931471:03crwdne2931471:0

crwdns2935297:06crwdne2935297:0

crwdns2917034:0crwdne2917034:0

Ottima spiegazione: é tutto facile quando la spiegazione é semplice ed univoca. Ma redigere istruzioni semplici é un'arte che non tutti possiedono.

Paolo Ravera - crwdns2934203:0crwdne2934203:0

crwdns2917038:0crwdne2917038:0

crwdns2936625:0crwdne2936625:0:

crwdns2936751:024crwdne2936751:0 2

crwdns2936753:07crwdne2936753:0 11

crwdns2936753:030crwdne2936753:0 23

crwdns2942667:0crwdne2942667:0 1,534