crwdns2915892:0crwdne2915892:0
This guide walks the reader through how to disassemble the Canon PowerShot A2300 in order to replace the display screen. It is necessary to first remove the front and back covers before reaching the screen.
crwdns2942213:0crwdne2942213:0
-
-
Open the A/V Out Digital port cover on the function button side to reveal a screw.
-
-
-
Remove all 6 screws(2.70 mm), 2 on each side and 2 on the bottom.
-
-
-
Open the card/battery latch by sliding the cover away from the camera in the direction indicated by the arrow.
-
-
-
Gently lift the bottom of the front cover to roughly a 30 degree angle.
-
-
-
Pull the top of the front cover away from the camera by gripping the top of the front cover by the corners where the cover is still attached to the body.
-
-
-
Hold the camera in your hands with both thumbs on the screen with the screen faced up.
-
-
-
-
Pull the the bottom left corner of the cover up about an inch to the point shown in the picture.
-
-
-
Pry the top off by sliding the spudger under the On/Off button.
-
-
-
Slide the cover to the right and off the camera.
-
-
-
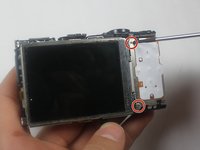
Remove the 2 screws(1.95 mm) by the top right and bottom right of the screen.
-
-
-
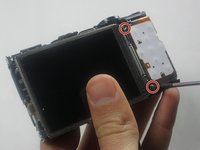
Remove the screw(3.57 mm) next to the A/V OUT Digital port.
-
-
-
Raise the screen by wedging the spudger between the bottom of the screen and the mount hole.
-
-
-
Remove the metal sheet that is under the screen.
-
-
-
Wedge the flat end of the spudger between the camera and the function buttons plate to push the plate out from under the hooks that attach the left side of the plate.
-
-
crwdns2935267:0crwdne2935267:0Tweezers$4.99
-
Raise the bottom of the function button plate with your thumb.
-
Use one side of the tweezers to raise the black retaining flap that holds the orange ribbon cable to the zero insertion force (ZIF) connector.
-
-
-
Gently remove the ribbon cable from the ZIF connector using the tweezers
-
-
-
With the bottom of the function button plate still raised pull the screen out to the left until the ribbon cable is out from underneath the function button plate.
-


To reassemble your device, follow these instructions in reverse order.
To reassemble your device, follow these instructions in reverse order.
crwdns2935221:0crwdne2935221:0
crwdns2935229:03crwdne2935229:0

crwdns2915084:0crwdne2915084:0

Baylor, Team 7-14, Williams Spring 2015 crwdns2935289:0Baylor, Team 7-14, Williams Spring 2015crwdne2935289:0
BU-WILLIAMS-S15S7G14
crwdns2931471:04crwdne2931471:0
crwdns2935297:010crwdne2935297:0
crwdns2947412:02crwdne2947412:0
Camera does not turn on after screen replacement. Not sure if I damaged anything or maybe the battery latch has something to do with it.
Where you able to fix it?