crwdns2933423:0crwdne2933423:0

Canon ImageCLASS MF4350d Remove Front Paneling

crwdns2862623:0crwdne2862623:0
crwdns2942641:0crwdne2942641:0

crwdns2942213:0crwdne2942213:0

  1. Canon ImageCLASS MF4350d Remove Front Paneling, Canon ImageCLASS MF4350d Remove Front Paneling: crwdns2935265:01crwdnd2935265:01crwdnd2935265:01crwdne2935265:0
    • Lift the printer lid up as shown in the photo.

  2. Canon ImageCLASS MF4350d Remove Front Paneling: crwdns2935265:02crwdnd2935265:01crwdnd2935265:02crwdne2935265:0 Canon ImageCLASS MF4350d Remove Front Paneling: crwdns2935265:02crwdnd2935265:02crwdnd2935265:02crwdne2935265:0
    • Locate and remove the two 10mm side screws. There is one on each side.

  3. Canon ImageCLASS MF4350d Remove Front Paneling: crwdns2935265:03crwdnd2935265:01crwdnd2935265:02crwdne2935265:0 Canon ImageCLASS MF4350d Remove Front Paneling: crwdns2935265:03crwdnd2935265:02crwdnd2935265:02crwdne2935265:0
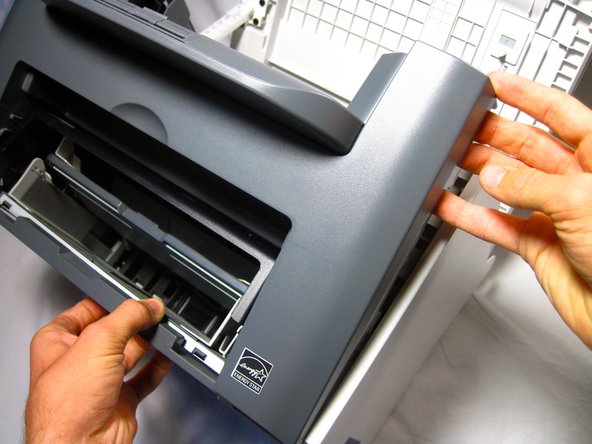
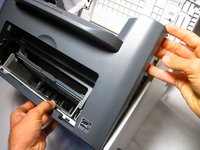
    • Unhook the plastic panel from the printer starting from the top.

    • You may need to wiggle the panel a bit to loosen it.

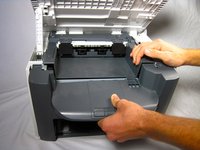
    • To remove the bottom part of the paneling gently lay the printer on its back.

    • The scanner lid needs to be supported when moving the printer

crwdns2915888:0crwdne2915888:0

To reassemble your device, follow these instructions in reverse order.

Helena Yanez

crwdns2935283:009/29/13crwdne2935283:0

458 crwdns2915208:0crwdne2915208:0

crwdns2935297:04crwdne2935297:0

crwdns2915084:0crwdne2915084:0

Cal Poly, Team 13-1, Forte Fall 2013 crwdns2935289:0Cal Poly, Team 13-1, Forte Fall 2013crwdne2935289:0

CPSU-FORTE-F13S13G1

crwdns2931471:05crwdne2931471:0

crwdns2935297:016crwdne2935297:0

crwdns2947412:00crwdne2947412:0

crwdns2917038:0crwdne2917038:0

crwdns2936625:0crwdne2936625:0:

crwdns2936751:024crwdne2936751:0 0

crwdns2936753:07crwdne2936753:0 0

crwdns2936753:030crwdne2936753:0 24

crwdns2942667:0crwdne2942667:0 100