crwdns2933423:0crwdne2933423:0
crwdns2947577:0crwdnd2947577:0crwdne2947577:0

Canon EOS Rebel G Back Panel Replacement

crwdns2942213:0crwdne2942213:0

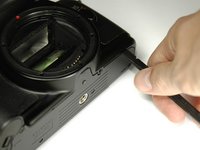
    1. Canon EOS Rebel G Back Panel Replacement, Front Panel: crwdns2935265:01crwdnd2935265:01crwdnd2935265:01crwdne2935265:0
      • Using a #00 Phillips screw driver, remove three 4.4 mm Phillips screws as indicated by the red circles.

      crwdns2952109:0crwdne2952109:0

      crwdns2917038:0crwdne2917038:0

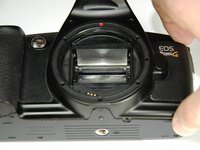
    2. Canon EOS Rebel G Back Panel Replacement: crwdns2935265:02crwdnd2935265:01crwdnd2935265:02crwdne2935265:0 Canon EOS Rebel G Back Panel Replacement: crwdns2935265:02crwdnd2935265:02crwdnd2935265:02crwdne2935265:0
      • Using your finger, peel back the textured grip so the components are separated.

      crwdns2952109:0crwdne2952109:0

      crwdns2917038:0crwdne2917038:0

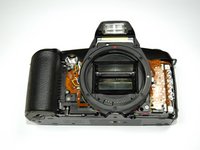
    3. Canon EOS Rebel G Back Panel Replacement: crwdns2935265:03crwdnd2935265:01crwdnd2935265:03crwdne2935265:0 Canon EOS Rebel G Back Panel Replacement: crwdns2935265:03crwdnd2935265:02crwdnd2935265:03crwdne2935265:0 Canon EOS Rebel G Back Panel Replacement: crwdns2935265:03crwdnd2935265:03crwdnd2935265:03crwdne2935265:0
      • Using the flat end of a spudger, loosen the connection between the front panel and the device.

      • Remove the front panel using your hands.

      crwdns2952109:0crwdne2952109:0

      crwdns2917038:0crwdne2917038:0

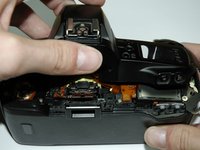
    1. Canon EOS Rebel G Back Panel Replacement, Top Panel: crwdns2935265:04crwdnd2935265:01crwdnd2935265:01crwdne2935265:0
      • Turn Camera over.

      • Using a #00 Phillips screw driver, unscrew the two 4.9 mm Phillips screws located on either side of the viewfinder.

      crwdns2952109:0crwdne2952109:0

      crwdns2917038:0crwdne2917038:0

    2. Canon EOS Rebel G Back Panel Replacement: crwdns2935265:05crwdnd2935265:01crwdnd2935265:01crwdne2935265:0
      • Using a #00 Phillips screw driver, unscrew the one 5.7 mm Phillips screw located next to the LCD screen.

      crwdns2952109:0crwdne2952109:0

      crwdns2917038:0crwdne2917038:0

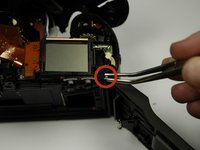
    3. Canon EOS Rebel G Back Panel Replacement: crwdns2935265:06crwdnd2935265:01crwdnd2935265:01crwdne2935265:0
      • Lay the camera on its back.

      • Unsolder the flash connection from the motherboard as noted by the blue circle.

      crwdns2952109:0crwdne2952109:0

      crwdns2917038:0crwdne2917038:0

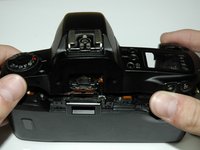
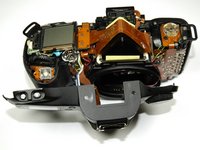
    4. Canon EOS Rebel G Back Panel Replacement: crwdns2935265:07crwdnd2935265:01crwdnd2935265:03crwdne2935265:0 Canon EOS Rebel G Back Panel Replacement: crwdns2935265:07crwdnd2935265:02crwdnd2935265:03crwdne2935265:0 Canon EOS Rebel G Back Panel Replacement: crwdns2935265:07crwdnd2935265:03crwdnd2935265:03crwdne2935265:0
      • Remove the top panel by lifting it from the back, pushing it forward over the camera and letting it rotate down in front of the camera.

      crwdns2952109:0crwdne2952109:0

      crwdns2917038:0crwdne2917038:0

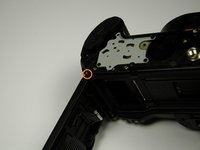
    1. Canon EOS Rebel G Back Panel Replacement, Back Panel: crwdns2935265:08crwdnd2935265:01crwdnd2935265:01crwdne2935265:0
      • Using a #00 Philllips screw driver, unscrew the 6.8 mm Phillips screw that holds the strap anchor noted by the red circle.

      • Remove the strap anchor.

      crwdns2952109:0crwdne2952109:0

      crwdns2917038:0crwdne2917038:0

    2. Canon EOS Rebel G Back Panel Replacement: crwdns2935265:09crwdnd2935265:01crwdnd2935265:01crwdne2935265:0
      • Unlatch the back panel.

      • Using a #00 Phillips screw driver, unscrew the six screws on the bottom of the camera.

      • One 7.4 mm Phillips screw

      • Two 6.0 mm Phillips screws

      • Two 4.4 mm Phillips screws

      • One 3.9 mm Phillips screw

      crwdns2952109:0crwdne2952109:0

      crwdns2917038:0crwdne2917038:0

    3. Canon EOS Rebel G Back Panel Replacement: crwdns2935265:010crwdnd2935265:01crwdnd2935265:03crwdne2935265:0 Canon EOS Rebel G Back Panel Replacement: crwdns2935265:010crwdnd2935265:02crwdnd2935265:03crwdne2935265:0 Canon EOS Rebel G Back Panel Replacement: crwdns2935265:010crwdnd2935265:03crwdnd2935265:03crwdne2935265:0
      crwdns2935267:0crwdne2935267:0
      Tweezers
      $4.99
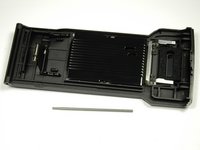
      • From the bottom of the camera push the hinge rod in with your finger.

      • Return the camera to its upright position.

      • Use pliers (or tweezers) to pull the rod out from the top.

      crwdns2952109:0crwdne2952109:0

      crwdns2917038:0crwdne2917038:0

crwdns2915888:0crwdne2915888:0

To reassemble your device, follow these instructions in reverse order.

crwdns2935221:0crwdne2935221:0

Zach

crwdns2935283:004/04/12crwdne2935283:0

46 crwdns2915208:0crwdne2915208:0

crwdns2935297:08crwdne2935297:0

crwdns2935287:0crwdne2935287:0

Cal Poly, Team 14-9, Forte Spring 2012 crwdns2935289:0Cal Poly, Team 14-9, Forte Spring 2012crwdne2935289:0

CPSU-FORTE-S12S14G9

crwdns2931471:05crwdne2931471:0

crwdns2935297:0144crwdne2935297:0

crwdns2947412:00crwdne2947412:0

crwdns2917038:0crwdne2917038:0

crwdns2936625:0crwdne2936625:0:

crwdns2936751:024crwdne2936751:0 5

crwdns2936753:07crwdne2936753:0 27

crwdns2936753:030crwdne2936753:0 47

crwdns2942667:0crwdne2942667:0 2,490