crwdns2933423:0crwdne2933423:0

Canon EOS 60D Left-Side Port Cover Replacement

crwdns2942213:0crwdne2942213:0

  1. Canon EOS 60D Left-Side Port Cover Replacement, Rubber grips: crwdns2935265:01crwdnd2935265:01crwdnd2935265:01crwdne2935265:0
    • Use a thin piece of plastic, spudger, or fingernail (if you have them) to lift up the edge of the grip, and pull up slowly.

    • Repeat for the other two grips

    • The large one on the battery-side is the easiest to start with. This is required to remove the front & back panels

    • The small one on the back is a bit difficult to get started, but not really difficult to remove.

    • The one on the AV panel will be easier if you open up the AV port cover.

    • Remove the adhesive like you would rubber cement, just rub your finger against it, it will come off.

    • Optionally throw the balled up adhesive at people pretending its a booger :)

  2. Canon EOS 60D Left-Side Port Cover Replacement, Left-Side Port Cover: crwdns2935265:02crwdnd2935265:01crwdnd2935265:01crwdne2935265:0
    • Remove 3 screws

    • Remove the small Screw under the Flip cover too

  3. Canon EOS 60D Left-Side Port Cover Replacement: crwdns2935265:04crwdnd2935265:01crwdnd2935265:01crwdne2935265:0
    • Using a Spudger, fingernail, or other thin plastic tool to wedge the panel off of the camera

    • Start at the camera's front. Pulling on the rubber av-cover may be enough to get it to move off the body

    • Only pull about 1/4" (3-5mm). There is a tab that will need to slide out

  4. Canon EOS 60D Left-Side Port Cover Replacement: crwdns2935265:05crwdnd2935265:01crwdnd2935265:01crwdne2935265:0
    • Slide the rear part of the cover out.

  5. Canon EOS 60D Left-Side Port Cover Replacement: crwdns2935265:06crwdnd2935265:01crwdnd2935265:02crwdne2935265:0 Canon EOS 60D Left-Side Port Cover Replacement: crwdns2935265:06crwdnd2935265:02crwdnd2935265:02crwdne2935265:0
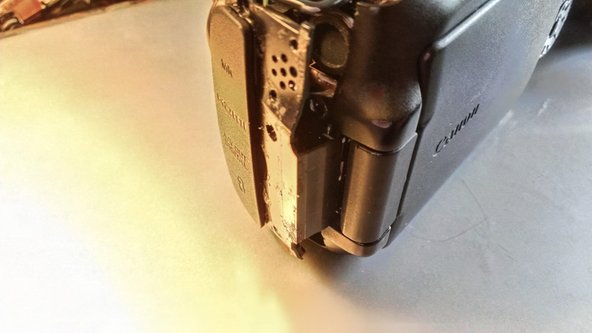
    • At this point, the only thing holding on is the dust-cover is hooked onto the front panel

    • Slide down to remove without damaging the cover. (see photo with cover removed)

    • You can see how the cover, and side piece fit together in the second image.

crwdns2915888:0crwdne2915888:0

To reassemble your device, follow these instructions in reverse order.

crwdns2935229:07crwdne2935229:0

Eric D

crwdns2935283:011/13/12crwdne2935283:0

1,284 crwdns2915208:0crwdne2915208:0

crwdns2935297:05crwdne2935297:0

crwdns2944067:00crwdne2944067:0

crwdns2917038:0crwdne2917038:0

crwdns2936625:0crwdne2936625:0:

crwdns2936751:024crwdne2936751:0 3

crwdns2936753:07crwdne2936753:0 15

crwdns2936753:030crwdne2936753:0 30

crwdns2942667:0crwdne2942667:0 7,298