crwdns2933423:0crwdne2933423:0

Canon EOS 20D Secondary Control Board (C-Board 010) Replacement

crwdns2942213:0crwdne2942213:0

  1. Canon EOS 20D Secondary Control Board (C-Board 010) Replacement, Remove the eyepiece cap: crwdns2935265:01crwdnd2935265:01crwdnd2935265:02crwdne2935265:0 Canon EOS 20D Secondary Control Board (C-Board 010) Replacement, Remove the eyepiece cap: crwdns2935265:01crwdnd2935265:02crwdnd2935265:02crwdne2935265:0
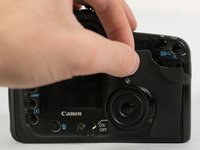
    • Pull up on both sides of the the eyepiece cap. It should come off with little pressure.

  2. Canon EOS 20D Secondary Control Board (C-Board 010) Replacement, Remove screws from under the eyepiece cap: crwdns2935265:02crwdnd2935265:01crwdnd2935265:01crwdne2935265:0
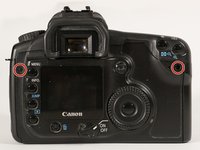
    • Remove the two screws hidden under the viewfinder eyepiece cap.

  3. Canon EOS 20D Secondary Control Board (C-Board 010) Replacement, Remove hidden screw and other visible screw: crwdns2935265:03crwdnd2935265:01crwdnd2935265:03crwdne2935265:0 Canon EOS 20D Secondary Control Board (C-Board 010) Replacement, Remove hidden screw and other visible screw: crwdns2935265:03crwdnd2935265:02crwdnd2935265:03crwdne2935265:0 Canon EOS 20D Secondary Control Board (C-Board 010) Replacement, Remove hidden screw and other visible screw: crwdns2935265:03crwdnd2935265:03crwdnd2935265:03crwdne2935265:0
    • Peel off the rubber grip on the back by grasping one of the corners and pulling it away from the camera body.

    • Once removed, a hidden screw is revealed.

    • Remove both screws from the rear of the camera.

  4. Canon EOS 20D Secondary Control Board (C-Board 010) Replacement, Remove bottom screws: crwdns2935265:04crwdnd2935265:01crwdnd2935265:01crwdne2935265:0
    • Remove the two indicated screws from the bottom of the camera.

  5. Canon EOS 20D Secondary Control Board (C-Board 010) Replacement, Lift and remove the rear panel: crwdns2935265:05crwdnd2935265:01crwdnd2935265:03crwdne2935265:0 Canon EOS 20D Secondary Control Board (C-Board 010) Replacement, Lift and remove the rear panel: crwdns2935265:05crwdnd2935265:02crwdnd2935265:03crwdne2935265:0 Canon EOS 20D Secondary Control Board (C-Board 010) Replacement, Lift and remove the rear panel: crwdns2935265:05crwdnd2935265:03crwdnd2935265:03crwdne2935265:0
    • When lifting the panel, make sure not to lift it too high, since you'll run the risk of tearing the cable, or damaging the connector on the board.

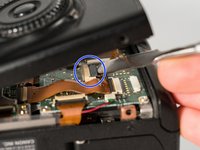
    • Flip the lock on the flex cable connector up with a spudger.

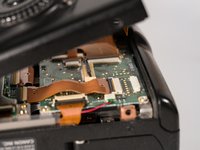
    • The front panel should pop off, now that the cable has been disconnected.

    • When reassembling the device, make sure to insert the left side of the front panel first, since it has a small lip that needs to fit under the left part of the camera case.

  6. Canon EOS 20D Secondary Control Board (C-Board 010) Replacement, Disconnect all the labeled cables: crwdns2935265:06crwdnd2935265:01crwdnd2935265:03crwdne2935265:0 Canon EOS 20D Secondary Control Board (C-Board 010) Replacement, Disconnect all the labeled cables: crwdns2935265:06crwdnd2935265:02crwdnd2935265:03crwdne2935265:0 Canon EOS 20D Secondary Control Board (C-Board 010) Replacement, Disconnect all the labeled cables: crwdns2935265:06crwdnd2935265:03crwdnd2935265:03crwdne2935265:0
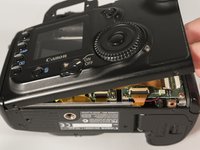
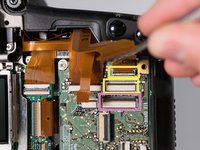
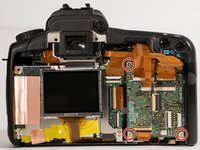
    • Disconnect all the indicated connectors by opening their latches.

    • Remove the flex cable that connects the logic board to the secondary control board.

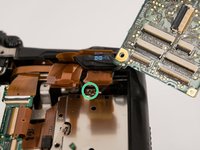
    • Pull the small green connector out of its socket. Be careful when removing it, as it is possible to tear the tiny wires running into the connector.

    • Disconnect the two hidden connectors under the top connector indicated in pink.

    • Disconnect the third hidden connector.

  7. Canon EOS 20D Secondary Control Board (C-Board 010) Replacement, Remove the secondary control board: crwdns2935265:07crwdnd2935265:01crwdnd2935265:02crwdne2935265:0 Canon EOS 20D Secondary Control Board (C-Board 010) Replacement, Remove the secondary control board: crwdns2935265:07crwdnd2935265:02crwdnd2935265:02crwdne2935265:0
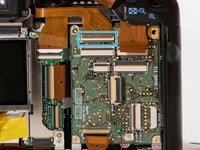
    • Remove the three screws from the edges of the board.

    • Flip the board up and out so that the ground connection can be unscrewed.

crwdns2915888:0crwdne2915888:0

To reassemble your device, follow these instructions in reverse order.

crwdns2935229:02crwdne2935229:0

Alec M

crwdns2935283:005/08/16crwdne2935283:0

1,309 crwdns2915208:0crwdne2915208:0

crwdns2935297:05crwdne2935297:0

crwdns2944067:00crwdne2944067:0

crwdns2917038:0crwdne2917038:0

crwdns2936625:0crwdne2936625:0:

crwdns2936751:024crwdne2936751:0 0

crwdns2936753:07crwdne2936753:0 4

crwdns2936753:030crwdne2936753:0 18

crwdns2942667:0crwdne2942667:0 1,160