crwdns2933423:0crwdne2933423:0

Canature 95MTS Series Control Valve Piston Assembly / Seal and Spacers Replacement

crwdns2942213:0crwdne2942213:0

  1. Canature 95MTS Series Control Valve Piston Assembly / Seal and Spacers Replacement, Place valve into Backwash: crwdns2935265:01crwdnd2935265:01crwdnd2935265:03crwdne2935265:0 Canature 95MTS Series Control Valve Piston Assembly / Seal and Spacers Replacement, Place valve into Backwash: crwdns2935265:01crwdnd2935265:02crwdnd2935265:03crwdne2935265:0 Canature 95MTS Series Control Valve Piston Assembly / Seal and Spacers Replacement, Place valve into Backwash: crwdns2935265:01crwdnd2935265:03crwdnd2935265:03crwdne2935265:0
    • Press and hold the red button (red) down while moving the gear (blue).

    • Using an 8mm Allen wrench, turn the gear until the arrow (yellow) is pointing to the "BW" cycle (green).

  2. Canature 95MTS Series Control Valve Piston Assembly / Seal and Spacers Replacement, Remove Housing Locking Bars: crwdns2935265:02crwdnd2935265:01crwdnd2935265:03crwdne2935265:0 Canature 95MTS Series Control Valve Piston Assembly / Seal and Spacers Replacement, Remove Housing Locking Bars: crwdns2935265:02crwdnd2935265:02crwdnd2935265:03crwdne2935265:0 Canature 95MTS Series Control Valve Piston Assembly / Seal and Spacers Replacement, Remove Housing Locking Bars: crwdns2935265:02crwdnd2935265:03crwdnd2935265:03crwdne2935265:0
    • To remove the red housing locking bars keeping the powerhead in place, pull back slightly then up.

  3. Canature 95MTS Series Control Valve Piston Assembly / Seal and Spacers Replacement, Remove Brine Valve Connector: crwdns2935265:03crwdnd2935265:01crwdnd2935265:03crwdne2935265:0 Canature 95MTS Series Control Valve Piston Assembly / Seal and Spacers Replacement, Remove Brine Valve Connector: crwdns2935265:03crwdnd2935265:02crwdnd2935265:03crwdne2935265:0 Canature 95MTS Series Control Valve Piston Assembly / Seal and Spacers Replacement, Remove Brine Valve Connector: crwdns2935265:03crwdnd2935265:03crwdnd2935265:03crwdne2935265:0
    • Pinch the Brine Valve Connector to unlock and pull out to remove.

  4. Canature 95MTS Series Control Valve Piston Assembly / Seal and Spacers Replacement, Remove Meter Cable: crwdns2935265:04crwdnd2935265:01crwdnd2935265:03crwdne2935265:0 Canature 95MTS Series Control Valve Piston Assembly / Seal and Spacers Replacement, Remove Meter Cable: crwdns2935265:04crwdnd2935265:02crwdnd2935265:03crwdne2935265:0 Canature 95MTS Series Control Valve Piston Assembly / Seal and Spacers Replacement, Remove Meter Cable: crwdns2935265:04crwdnd2935265:03crwdnd2935265:03crwdne2935265:0
    • Unlock the meter cable and pull it free from it's mount to prevent accidental damage.

  5. Canature 95MTS Series Control Valve Piston Assembly / Seal and Spacers Replacement, Remove Powerhead: crwdns2935265:05crwdnd2935265:01crwdnd2935265:02crwdne2935265:0 Canature 95MTS Series Control Valve Piston Assembly / Seal and Spacers Replacement, Remove Powerhead: crwdns2935265:05crwdnd2935265:02crwdnd2935265:02crwdne2935265:0
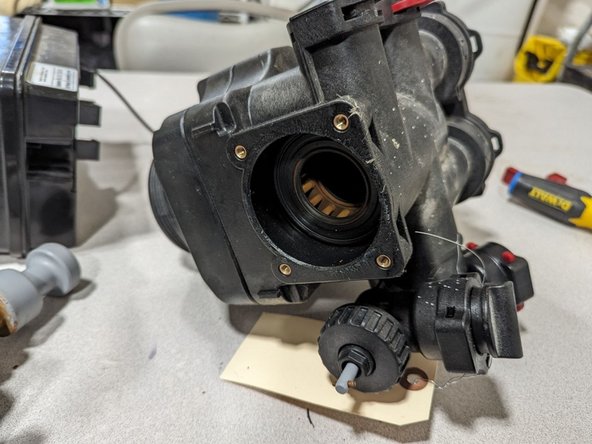
    • Firmly grasp the powerhead and pull it away from the valvebody.

  6. Canature 95MTS Series Control Valve Piston Assembly / Seal and Spacers Replacement, Remove Piston Assembly: crwdns2935265:06crwdnd2935265:01crwdnd2935265:03crwdne2935265:0 Canature 95MTS Series Control Valve Piston Assembly / Seal and Spacers Replacement, Remove Piston Assembly: crwdns2935265:06crwdnd2935265:02crwdnd2935265:03crwdne2935265:0 Canature 95MTS Series Control Valve Piston Assembly / Seal and Spacers Replacement, Remove Piston Assembly: crwdns2935265:06crwdnd2935265:03crwdnd2935265:03crwdne2935265:0
    • Using a #2 Phillips screwdriver, remove the four screws securing the piston assembly

  7. Canature 95MTS Series Control Valve Piston Assembly / Seal and Spacers Replacement, Remove Seals and Spacers: crwdns2935265:07crwdnd2935265:01crwdnd2935265:01crwdne2935265:0
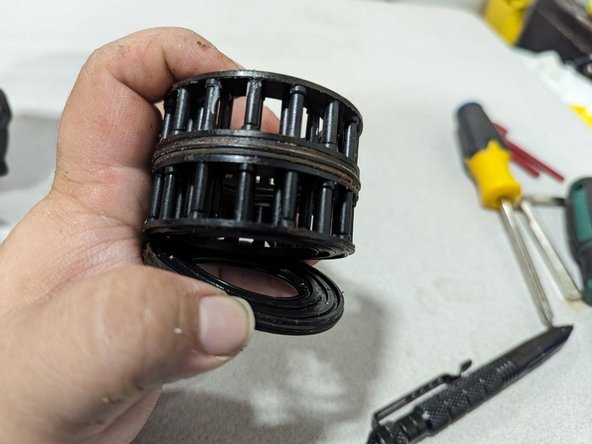
    • Using your fingers, pull the seals and spacers out of the valve body.

  8. Canature 95MTS Series Control Valve Piston Assembly / Seal and Spacers Replacement, Lubricate New Seals and Spacers: crwdns2935265:08crwdnd2935265:01crwdnd2935265:02crwdne2935265:0 Canature 95MTS Series Control Valve Piston Assembly / Seal and Spacers Replacement, Lubricate New Seals and Spacers: crwdns2935265:08crwdnd2935265:02crwdnd2935265:02crwdne2935265:0
    • Lubricate the center and outer edge of each seal and spacer using a food-grade silicone lubricant

    • Use of another lubricant can cause swelling and failure of components.

  9. Canature 95MTS Series Control Valve Piston Assembly / Seal and Spacers Replacement, Insert New Seals and Spacers: crwdns2935265:09crwdnd2935265:01crwdnd2935265:02crwdne2935265:0 Canature 95MTS Series Control Valve Piston Assembly / Seal and Spacers Replacement, Insert New Seals and Spacers: crwdns2935265:09crwdnd2935265:02crwdnd2935265:02crwdne2935265:0
    • Insert the new seals and spacers into the valve body.

    • Install in the following order: seal then spacer.

    • The first one in will be a seal and the last one in before the piston will be a seal.

  10. Canature 95MTS Series Control Valve Piston Assembly / Seal and Spacers Replacement, Install New Piston Assembly: crwdns2935265:010crwdnd2935265:01crwdnd2935265:03crwdne2935265:0 Canature 95MTS Series Control Valve Piston Assembly / Seal and Spacers Replacement, Install New Piston Assembly: crwdns2935265:010crwdnd2935265:02crwdnd2935265:03crwdne2935265:0 Canature 95MTS Series Control Valve Piston Assembly / Seal and Spacers Replacement, Install New Piston Assembly: crwdns2935265:010crwdnd2935265:03crwdnd2935265:03crwdne2935265:0
    • Lubricate the new piston assembly with a FOOD GRADE SILICONE LUBRICANT.

    • Slide the piston into the hole at the center of the seals and spacers.

    • Using a #2 phillips screwdriver reinstall the 4 screws securing the piston assembly to the valve body.

  11. Canature 95MTS Series Control Valve Piston Assembly / Seal and Spacers Replacement, Lubricate O-Ring: crwdns2935265:011crwdnd2935265:01crwdnd2935265:02crwdne2935265:0 Canature 95MTS Series Control Valve Piston Assembly / Seal and Spacers Replacement, Lubricate O-Ring: crwdns2935265:011crwdnd2935265:02crwdnd2935265:02crwdne2935265:0
    • Lubricate the new o-ring (Ø28×2.65) that came with the new piston.

  12. Canature 95MTS Series Control Valve Piston Assembly / Seal and Spacers Replacement, Reinstall Powerhead: crwdns2935265:012crwdnd2935265:01crwdnd2935265:03crwdne2935265:0 Canature 95MTS Series Control Valve Piston Assembly / Seal and Spacers Replacement, Reinstall Powerhead: crwdns2935265:012crwdnd2935265:02crwdnd2935265:03crwdne2935265:0 Canature 95MTS Series Control Valve Piston Assembly / Seal and Spacers Replacement, Reinstall Powerhead: crwdns2935265:012crwdnd2935265:03crwdnd2935265:03crwdne2935265:0
    • Align the tab on the piston with the slot on the back of the powerhead and push in to install.

  13. Canature 95MTS Series Control Valve Piston Assembly / Seal and Spacers Replacement, Reinstall Brine Valve Connector: crwdns2935265:013crwdnd2935265:01crwdnd2935265:03crwdne2935265:0 Canature 95MTS Series Control Valve Piston Assembly / Seal and Spacers Replacement, Reinstall Brine Valve Connector: crwdns2935265:013crwdnd2935265:02crwdnd2935265:03crwdne2935265:0 Canature 95MTS Series Control Valve Piston Assembly / Seal and Spacers Replacement, Reinstall Brine Valve Connector: crwdns2935265:013crwdnd2935265:03crwdnd2935265:03crwdne2935265:0
    • Align the pin on the brine piston with the slot on the brine valve connector.

    • Push the brine valve connector down and to the front to secure it in place.

  14. Canature 95MTS Series Control Valve Piston Assembly / Seal and Spacers Replacement, Reinsert Housing Locking Bars: crwdns2935265:014crwdnd2935265:01crwdnd2935265:01crwdne2935265:0
    • Press down to reinsert.

    • The Housing Locking Bars will only slide in the correct orientation.

  15. Canature 95MTS Series Control Valve Piston Assembly / Seal and Spacers Replacement, Reinstall Meter Cable: crwdns2935265:015crwdnd2935265:01crwdnd2935265:03crwdne2935265:0 Canature 95MTS Series Control Valve Piston Assembly / Seal and Spacers Replacement, Reinstall Meter Cable: crwdns2935265:015crwdnd2935265:02crwdnd2935265:03crwdne2935265:0 Canature 95MTS Series Control Valve Piston Assembly / Seal and Spacers Replacement, Reinstall Meter Cable: crwdns2935265:015crwdnd2935265:03crwdnd2935265:03crwdne2935265:0
    • Slide the meter sensor into the valve body.

    • The meter cable will only slide in the correct orientation.

crwdns2915888:0crwdne2915888:0

Reconnect power to the valve and open the bypass to allow water into the valve. Take care to look for leaks.

You've now replaced the piston and seals/spacers in a Canature WaterGroup 95 valve, party on dudes!

N. T. Crotser

crwdns2935283:006/13/22crwdne2935283:0

844 crwdns2915208:0crwdne2915208:0

crwdns2935297:05crwdne2935297:0

crwdns2944067:00crwdne2944067:0

crwdns2917038:0crwdne2917038:0

crwdns2936625:0crwdne2936625:0:

crwdns2936751:024crwdne2936751:0 0

crwdns2936753:07crwdne2936753:0 2

crwdns2936753:030crwdne2936753:0 12

crwdns2942667:0crwdne2942667:0 91