crwdns2933423:0crwdne2933423:0

Cambridge SoundWorks OontZ Angle Plus Motherboard Replacement

crwdns2942213:0crwdne2942213:0

  1. Cambridge SoundWorks OontZ Angle Plus Motherboard  Replacement, Lower Casing: crwdns2935265:01crwdnd2935265:01crwdnd2935265:02crwdne2935265:0 Cambridge SoundWorks OontZ Angle Plus Motherboard  Replacement, Lower Casing: crwdns2935265:01crwdnd2935265:02crwdnd2935265:02crwdne2935265:0
    • Pull back the six screw covers on the bottom of the device.

    • Starting from the screw covers, peel the casing away from the bottom plate.

  2. Cambridge SoundWorks OontZ Angle Plus Motherboard  Replacement, Battery: crwdns2935265:02crwdnd2935265:01crwdnd2935265:01crwdne2935265:0
    • Unscrew the five 11.5mm Phillips screws on the bottom plate.

  3. Cambridge SoundWorks OontZ Angle Plus Motherboard  Replacement: crwdns2935265:03crwdnd2935265:01crwdnd2935265:01crwdne2935265:0
    • Carefully pull apart the bottom plate and the top plate, using the blue plastic opening tool.

  4. Cambridge SoundWorks OontZ Angle Plus Motherboard  Replacement: crwdns2935265:04crwdnd2935265:01crwdnd2935265:01crwdne2935265:0
    • Once the bottom plate and the top plate are separated, slowly pull the back plate away from the top plate.

    • There are wires connected to both plates so do this step with care.

  5. Cambridge SoundWorks OontZ Angle Plus Motherboard  Replacement: crwdns2935265:05crwdnd2935265:01crwdnd2935265:01crwdne2935265:0
    • Unscrew the two 10 mm Phillips screws on the brace holding down the battery.

    • Remove the brace that holds the battery in place.

  6. Cambridge SoundWorks OontZ Angle Plus Motherboard  Replacement: crwdns2935265:06crwdnd2935265:01crwdnd2935265:01crwdne2935265:0
    • Separate the battery from the bottom plate and set the bottom plate aside.

  7. Cambridge SoundWorks OontZ Angle Plus Motherboard  Replacement: crwdns2935265:07crwdnd2935265:01crwdnd2935265:01crwdne2935265:0
    • With some force, push the motherboard straight in toward the center of the device.

  8. Cambridge SoundWorks OontZ Angle Plus Motherboard  Replacement: crwdns2935265:08crwdnd2935265:01crwdnd2935265:01crwdne2935265:0
    • Pull the motherboard straight out of the device.

    • There is some adhesive on the motherboard that holds it in place. This make the motherboard fit in the groove rather tight.

  9. Cambridge SoundWorks OontZ Angle Plus Motherboard  Replacement: crwdns2935265:09crwdnd2935265:01crwdnd2935265:01crwdne2935265:0
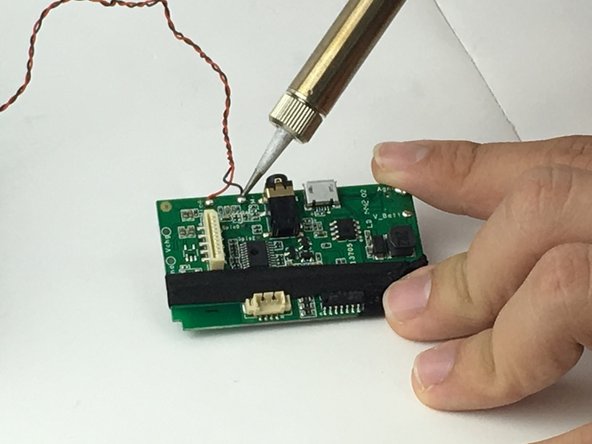
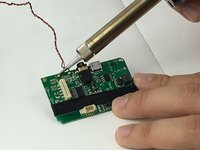
    • Desolder the wires that connect the battery to the motherboard, negative (black wire) and positive (red wire).

  10. Cambridge SoundWorks OontZ Angle Plus Motherboard  Replacement, Motherboard: crwdns2935265:010crwdnd2935265:01crwdnd2935265:01crwdne2935265:0
    • Unplug the wires that connect the speakers to the motherboard.

  11. Cambridge SoundWorks OontZ Angle Plus Motherboard  Replacement: crwdns2935265:011crwdnd2935265:01crwdnd2935265:01crwdne2935265:0
    • Unplug the thin white cable connected to the buttons.

  12. Cambridge SoundWorks OontZ Angle Plus Motherboard  Replacement: crwdns2935265:012crwdnd2935265:01crwdnd2935265:02crwdne2935265:0 Cambridge SoundWorks OontZ Angle Plus Motherboard  Replacement: crwdns2935265:012crwdnd2935265:02crwdnd2935265:02crwdne2935265:0
    • Desolder the wires that connect the LED to the motherboard.

crwdns2915888:0crwdne2915888:0

To reassemble your device, follow these instructions in reverse order.

Farshad Mohebban

crwdns2935283:002/10/16crwdne2935283:0

524 crwdns2915208:0crwdne2915208:0

crwdns2935297:04crwdne2935297:0

crwdns2915084:0crwdne2915084:0

USF Tampa, Team 1-1, Nance Spring 2016 crwdns2935289:0USF Tampa, Team 1-1, Nance Spring 2016crwdne2935289:0

USFT-NANCE-S16S1G1

crwdns2931471:04crwdne2931471:0

crwdns2935297:06crwdne2935297:0

crwdns2944067:00crwdne2944067:0

crwdns2917038:0crwdne2917038:0

crwdns2936625:0crwdne2936625:0:

crwdns2936751:024crwdne2936751:0 1

crwdns2936753:07crwdne2936753:0 2

crwdns2936753:030crwdne2936753:0 2

crwdns2942667:0crwdne2942667:0 1,858