crwdns2933423:0crwdne2933423:0
crwdns2947577:0crwdnd2947577:0crwdne2947577:0

CMS Switch Replacement

crwdns2942213:0crwdne2942213:0

  1. CMS Switch Replacement, Open the handle: crwdns2935265:01crwdnd2935265:01crwdnd2935265:03crwdne2935265:0 CMS Switch Replacement, Open the handle: crwdns2935265:01crwdnd2935265:02crwdnd2935265:03crwdne2935265:0 CMS Switch Replacement, Open the handle: crwdns2935265:01crwdnd2935265:03crwdnd2935265:03crwdne2935265:0
    • Unscrew the 5 screws shown in the first image

    • Unscrew the 4 screws shown in the second image

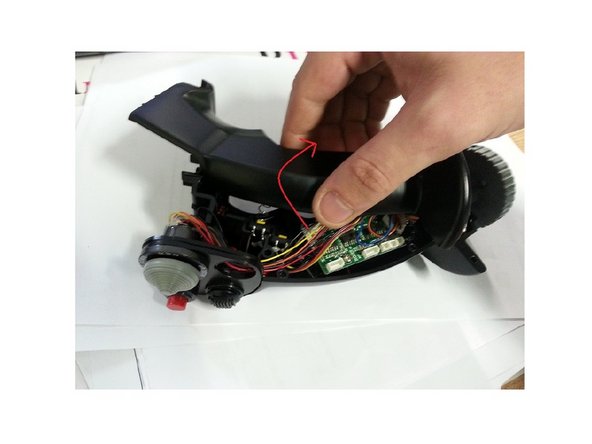
    • Turn the handle over and remove the black cover shown in the 3rd image.

    crwdns2952109:0crwdne2952109:0

    crwdns2917038:0crwdne2917038:0

  2. CMS Switch Replacement, Open the handle: crwdns2935265:02crwdnd2935265:01crwdnd2935265:02crwdne2935265:0 CMS Switch Replacement, Open the handle: crwdns2935265:02crwdnd2935265:02crwdnd2935265:02crwdne2935265:0
    • Slowly pull the top half of the stick and rotate it. (Be careful not to damage the wires inside).

    • The red trigger can pop out due to tension from springs, so be careful.

    crwdns2952109:0crwdne2952109:0

    crwdns2917038:0crwdne2917038:0

  3. CMS Switch Replacement, Inspect the insides: crwdns2935265:03crwdnd2935265:01crwdnd2935265:01crwdne2935265:0
    • Check the internal connections.

    • Optionally, you can tighten the screw shown in the picture, as it can sometimes be the cause of looseness in the joystick handle and the large gray nut.

    crwdns2952109:0crwdne2952109:0

    crwdns2917038:0crwdne2917038:0

  4. CMS Switch Replacement, Remove the connector: crwdns2935265:04crwdnd2935265:01crwdnd2935265:02crwdne2935265:0 CMS Switch Replacement, Remove the connector: crwdns2935265:04crwdnd2935265:02crwdnd2935265:02crwdne2935265:0
    • Disconnect the wires from CMS connector, they are highlighted in red.

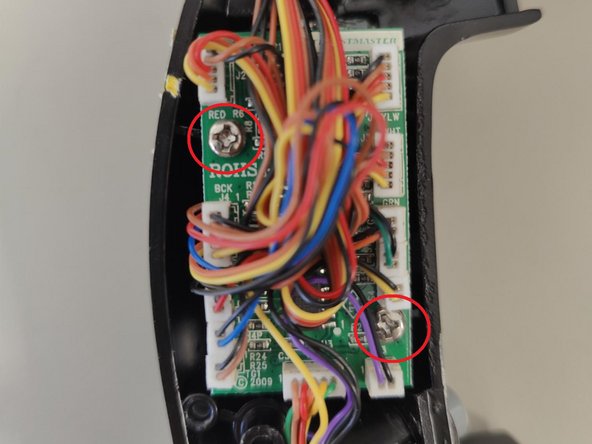
    • Remove the screws so that you could detach the PCB.

    crwdns2952109:0crwdne2952109:0

    crwdns2917038:0crwdne2917038:0

  5. CMS Switch Replacement, Remove the old CMS: crwdns2935265:05crwdnd2935265:01crwdnd2935265:01crwdne2935265:0
    • Hold down the CMS clip which will allow you to remove the switch. If necessary, you can force it out or brake it.

    • Once the old CMS is removed, you can insert the new one

    crwdns2952109:0crwdne2952109:0

    crwdns2917038:0crwdne2917038:0

crwdns2915888:0crwdne2915888:0

To reassemble your device, follow these instructions in reverse order. Be careful not to damage the wires when reattaching the two halves of the joystick handle.

crwdns2935221:0crwdne2935221:0

crwdns2935227:0crwdne2935227:0

crwdns2934873:0crwdne2934873:0

fr en

100%

crwdns2934885:0crwdne2934885:0 crwdns2934875:0crwdne2934875:0
crwdns2934877:0crwdne2934877:0 ›

crwdns2935103:0crwdne2935103:0

Avrila

crwdns2935283:007/25/24crwdne2935283:0

1.362 crwdns2915208:0crwdne2915208:0

crwdns2935297:05crwdne2935297:0

crwdns2947412:02crwdne2947412:0

Merci pour ces tuto qui peuvent se révéler bien pratique, mais une question demeure, où trouver les pièces de rechanges ! rien sur le site de TM ! ;)

Kervinou - crwdns2934203:0crwdne2934203:0 crwdns2950251:0crwdne2950251:0

if anyone needs this part, contact thrustmaster support with photos of the joystick and serial number. the support team will reach out about purchasing a new part

Donk - crwdns2934203:0crwdne2934203:0 crwdns2950251:0crwdne2950251:0

crwdns2917038:0crwdne2917038:0

crwdns2936625:0crwdne2936625:0:

crwdns2936751:024crwdne2936751:0 1

crwdns2936753:07crwdne2936753:0 8

crwdns2936753:030crwdne2936753:0 38

crwdns2942667:0crwdne2942667:0 1,006