crwdns2933423:0crwdne2933423:0
crwdns2947577:0crwdnd2947577:0crwdne2947577:0
CHI Original Circuit Board Replacement

CHI Original Circuit Board Replacement

Eric Knigga

crwdns2944107:0crwdnd2944107:0Eric Kniggacrwdnd2944107:0crwdnd2944107:0crwdnd2944107:02crwdnd2944107:0crwdne2944107:0

crwdns2944111:0N'w 15, 2017crwdne2944111:0

1 - 2 crwdns2931253:0crwdne2931253:0
crwdns2937803:0crwdne2937803:0
crwdns2862611:0crwdne2862611:0

crwdns2915892:0crwdne2915892:0

crwdns2942287:0crwdne2942287:0

This guide will show you the steps necessary to deconstruct and replace the circuit board for this part.

crwdns2942213:0crwdne2942213:0

crwdns2943215:0crwdne2943215:0

crwdns2944105:0crwdne2944105:0

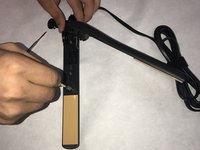
  1. CHI Original Circuit Board Replacement, Hinge Spring: crwdns2935265:01crwdnd2935265:01crwdnd2935265:02crwdne2935265:0 CHI Original Circuit Board Replacement, Hinge Spring: crwdns2935265:01crwdnd2935265:02crwdnd2935265:02crwdne2935265:0
    • Insert a nylon or metal spudger under the plastic CHI spring covers. Pry them up to pop them off. Do this for each side.

    Where do I find a new power cord?

    ElenaStar* - crwdns2934203:0crwdne2934203:0

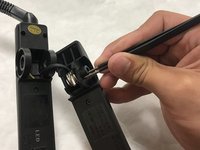
  2. CHI Original Circuit Board Replacement: crwdns2935265:02crwdnd2935265:01crwdnd2935265:01crwdne2935265:0
    • Remove the .53" long screw from the hinge pin.

    This picture is out of order

    fixitman - crwdns2934203:0crwdne2934203:0

    You should only have to remove the back two screws and not any screws near the switch.

    fixitman - crwdns2934203:0crwdne2934203:0

  3. CHI Original Circuit Board Replacement: crwdns2935265:03crwdnd2935265:01crwdnd2935265:01crwdne2935265:0
    • Remove the hinge pin.

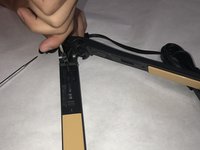
  4. CHI Original Circuit Board Replacement: crwdns2935265:04crwdnd2935265:01crwdnd2935265:01crwdne2935265:0
    • Separate the two halves of the CHI Original.

  5. CHI Original Circuit Board Replacement: crwdns2935265:05crwdnd2935265:01crwdnd2935265:02crwdne2935265:0 CHI Original Circuit Board Replacement: crwdns2935265:05crwdnd2935265:02crwdnd2935265:02crwdne2935265:0
    crwdns2935267:0crwdne2935267:0
    Tweezers
    $4.99
    • Remove the spring pin with a pair of pliers or tweezers.

    • Remove the spring.

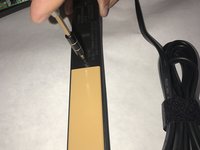
  6. CHI Original Circuit Board Replacement, Power Cord: crwdns2935265:06crwdnd2935265:01crwdnd2935265:02crwdne2935265:0 CHI Original Circuit Board Replacement, Power Cord: crwdns2935265:06crwdnd2935265:02crwdnd2935265:02crwdne2935265:0
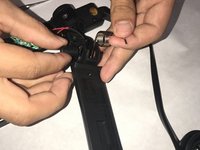
    • Remove (2) .31" Phillips head screws from back cover.

    • Remove cover.

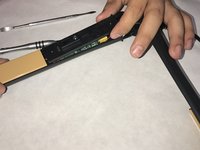
  7. CHI Original Circuit Board Replacement: crwdns2935265:07crwdnd2935265:01crwdnd2935265:01crwdne2935265:0
    • Gently pull upwards on the connection point and disconnect the power cord.

    What is part this person is holding in his right hand then clear part

    Rafael - crwdns2934203:0crwdne2934203:0

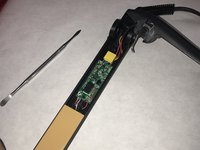
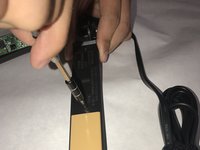
  8. CHI Original Circuit Board Replacement, Circuit Board: crwdns2935265:08crwdnd2935265:01crwdnd2935265:03crwdne2935265:0 CHI Original Circuit Board Replacement, Circuit Board: crwdns2935265:08crwdnd2935265:02crwdnd2935265:03crwdne2935265:0 CHI Original Circuit Board Replacement, Circuit Board: crwdns2935265:08crwdnd2935265:03crwdnd2935265:03crwdne2935265:0
    • Remove the (2) .27" Phillips head screws on each half of the CHI Original.

  9. CHI Original Circuit Board Replacement: crwdns2935265:09crwdnd2935265:01crwdnd2935265:03crwdne2935265:0 CHI Original Circuit Board Replacement: crwdns2935265:09crwdnd2935265:02crwdnd2935265:03crwdne2935265:0 CHI Original Circuit Board Replacement: crwdns2935265:09crwdnd2935265:03crwdnd2935265:03crwdne2935265:0
    • Remove the covers on both halves.

  10. CHI Original Circuit Board Replacement: crwdns2935265:010crwdnd2935265:01crwdnd2935265:01crwdne2935265:0
    • Remove (2) .15" Phillips screws from the circuit board.

  11. CHI Original Circuit Board Replacement: crwdns2935265:011crwdnd2935265:01crwdnd2935265:02crwdne2935265:0 CHI Original Circuit Board Replacement: crwdns2935265:011crwdnd2935265:02crwdnd2935265:02crwdne2935265:0
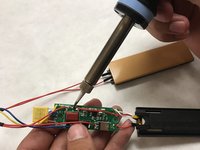
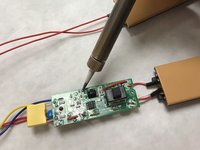
    • Desolder all points of contact between the circuit board and wires on the ceramic heating elements.

crwdns2915888:0crwdne2915888:0

To reassemble your device, follow these instructions in reverse order.

crwdns2935229:03crwdne2935229:0

crwdns2947821:0crwdne2947821:0

crwdns2947823:0crwdne2947823:0

Eric Knigga

crwdns2935283:008/23/17crwdne2935283:0

248 crwdns2915208:0crwdne2915208:0

crwdns2935297:02crwdne2935297:0

crwdns2915084:0crwdne2915084:0

IUPUI, Team S1-G2, Freund Fall 2017 crwdns2935289:0IUPUI, Team S1-G2, Freund Fall 2017crwdne2935289:0

IUPUI-FREUND-F17S1G2

crwdns2931471:04crwdne2931471:0

crwdns2935297:05crwdne2935297:0

crwdns2947410:01crwdne2947410:0

I used most of this guide through step 10 after dropping this in water; I didn't take out the power cord. I left the partially disassembled straightener in a container with desiccant overnight to remove the moisture. There was some corrosion on the switch that prevented the device from turning off that I cleaned up with isopropyl alcohol . I confirmed the switch behavior before and after cleaning with a multimeter to check continuity. On my device, the contact closest to the heating element was supposed to be disconnected from the other two contacts when off; when on, they were all showing contact. Before cleaning, there was continuity between all contacts. Thanks for the guide.

bnh8 - crwdns2934203:0crwdne2934203:0

crwdns2917038:0crwdne2917038:0

crwdns2936625:0crwdne2936625:0:

crwdns2936751:024crwdne2936751:0 3

crwdns2936753:07crwdne2936753:0 19

crwdns2936753:030crwdne2936753:0 60

crwdns2942667:0crwdne2942667:0 3,627