crwdns2915892:0crwdne2915892:0
This fast-fix teaches you how to repair a loose or "broken" C-shaped shower door handle, also called “back to back” or "C-pulls."
Many C-shaped handles are secured to the shower door by flat plastic washers. When these washers shift or warp, they can loosen the handle over time, causing it to eventually fall completely off the door.
This repair can seem intimidating because the handle design appears to be soldered on, and the installation screws are not clearly visible. However, the repair is quite quick and easy with some simple tools and inexpensive parts.
Note: Some shower handles require different sizes of washers and may have slightly larger or smaller installation (socket head cap) screws. While this fix specifies a 2.5 mm Allen wrench and 3/4" plastic washers, you should confirm the size of the tools and parts you will need for your specific shower handle before beginning.
crwdns2942213:0crwdne2942213:0
-
-
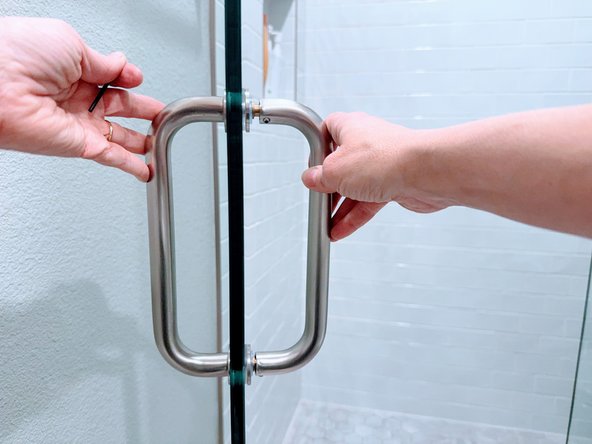
Locate the socket head cap screw on the bottom arm of one door handle.
-
Insert the Allen wrench into the cap screw hole.
-
Rotate the Allen wrench counterclockwise to loosen the screw.
-
-
-
Once the screw has been loosened, gently pull the handle away from the door.
-
-
-
Repeat steps 1 and 2 for the top of the handle.
-
Carefully remove the handle.
-
-
-
On the remaining handle, insert the Phillips #2 screwdriver into the bottom screw.
-
Turn the screwdriver counterclockwise to loosen the screw.
-
Remove the screw cap, screw, and washer.
-
-
-
-
Disassemble the screw and washer set.
-
Remove the old or damaged interior plastic washer and discard.
-
-
-
Slide the new plastic washer onto the screw.
-
After you have threaded the new washer, reassemble the remaining parts of the screw set in reverse order.
-
-
-
Insert the threaded screw set back through the shower door and handle.
-
Tighten the screw with the Phillips screwdriver, taking care not to overtighten or strip the screw.
-
-
-
Once both screws are tightened, slide the other handle back onto the screws.
-
-
-
Tighten the cap screw on the top part of the handle with the Allen wrench.
-
-
-
Test both sides of the handle by gripping each one and gently pulling them back and forth.
-


crwdns2935221:0crwdne2935221:0
crwdns2935227:0crwdne2935227:0

crwdns2935287:0crwdne2935287:0

University of North Texas, Team 1-14, Friess Fall 2024 crwdns2935289:0University of North Texas, Team 1-14, Friess Fall 2024crwdne2935289:0
UNT-FRIESS-F24S1G14
crwdns2934841:01crwdne2934841:0
crwdns2935303:01crwdne2935303:0