crwdns2933423:0crwdne2933423:0

Brother MFC-J4420DW Power supply replacement

  1. Brother MFC-J4420DW Power supply replacement, Removing hood holder: crwdns2935265:01crwdnd2935265:01crwdnd2935265:03crwdne2935265:0 Brother MFC-J4420DW Power supply replacement, Removing hood holder: crwdns2935265:01crwdnd2935265:02crwdnd2935265:03crwdne2935265:0 Brother MFC-J4420DW Power supply replacement, Removing hood holder: crwdns2935265:01crwdnd2935265:03crwdnd2935265:03crwdne2935265:0
    • Disconnect the power cord of the printer

    • Open the printer as you would to access the USB port.

    • Pull out the rear end of the hood holder (see picture two). After that you can remove the top part of the hood holder.

    • Now remove the hood holder completely.

    • It is quite useful to put the printer near something so that you can lean the top against something, for example a wall.

  2. Brother MFC-J4420DW Power supply replacement, Removing cables connected to the top part of the printer: crwdns2935265:02crwdnd2935265:01crwdnd2935265:03crwdne2935265:0 Brother MFC-J4420DW Power supply replacement, Removing cables connected to the top part of the printer: crwdns2935265:02crwdnd2935265:02crwdnd2935265:03crwdne2935265:0 Brother MFC-J4420DW Power supply replacement, Removing cables connected to the top part of the printer: crwdns2935265:02crwdnd2935265:03crwdnd2935265:03crwdne2935265:0
    • Next remove the cover on the left side of the printer (lift the right side of the cover first).

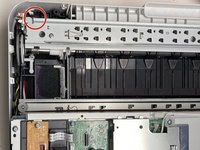
    • Unplug the black ribbon cable, the blue and the white plugs from its sockets and unscrew the cable which is attached with a screw (see second image)

    • Remove the red and white plugs from its sockets as shown in picture three.

  3. Brother MFC-J4420DW Power supply replacement, Remove the top part of the printer: crwdns2935265:03crwdnd2935265:01crwdnd2935265:03crwdne2935265:0 Brother MFC-J4420DW Power supply replacement, Remove the top part of the printer: crwdns2935265:03crwdnd2935265:02crwdnd2935265:03crwdne2935265:0 Brother MFC-J4420DW Power supply replacement, Remove the top part of the printer: crwdns2935265:03crwdnd2935265:03crwdnd2935265:03crwdne2935265:0
    • Flip the plastic part shown in picture one up to the top part of the printer

    • Now you can easily remove the top of the printer by pushing it away from the printer (not up).

  4. Brother MFC-J4420DW Power supply replacement, Remove cover: crwdns2935265:04crwdnd2935265:01crwdnd2935265:02crwdne2935265:0 Brother MFC-J4420DW Power supply replacement, Remove cover: crwdns2935265:04crwdnd2935265:02crwdnd2935265:02crwdne2935265:0
    • Remove the screws connecting the black plastic cover to the printer (see image)

    • Remove the cover

    • The following steps are based on the Brother Inkjet DCP/MFC Service Manual MODELS: DCP-J4120DW MFC-J4320DW/J4420DW MFC-J4520DW MFC-J4620DW/J4625DW. In particular, step 9.29 “Power Supply PCB ASSY”.

  5. Brother MFC-J4420DW Power supply replacement, Disconnect the cable: crwdns2935265:06crwdnd2935265:01crwdnd2935265:01crwdne2935265:0
    • Remove the connector with the many red cables. (Already removed in the picture. The other plugs do not need to be removed.)

  6. Brother MFC-J4420DW Power supply replacement, Remove screws: crwdns2935265:07crwdnd2935265:01crwdnd2935265:02crwdne2935265:0 Brother MFC-J4420DW Power supply replacement, Remove screws: crwdns2935265:07crwdnd2935265:02crwdnd2935265:02crwdne2935265:0
    • There are two screws that need to be removed.

  7. Brother MFC-J4420DW Power supply replacement, Remove the power supply unit: crwdns2935265:08crwdnd2935265:01crwdnd2935265:01crwdne2935265:0
    • Release the clip so that the power supply unit can be removed downwards.

  8. Brother MFC-J4420DW Power supply replacement, Power supply: crwdns2935265:09crwdnd2935265:01crwdnd2935265:01crwdne2935265:0
    • This is what the power supply looks like.

    • It is labeled B57U152-2 LF1

    • A possible starting point here is the soldered fuse F1. According to the circuit board, “250V T2.5AH”.

    • However, the fuse may only be a symptom and not the cause. See for example the article https://www.mikrocontroller.net/topic/50...

crwdns2915888:0crwdne2915888:0

Follow the steps in reverse order to reassemble your device.

crwdns2934873:0crwdne2934873:0

de en

100%

crwdns2934883:0oldturkey03crwdne2934883:0 crwdns2934875:0crwdne2934875:0
crwdns2934877:0crwdne2934877:0 ›

FeLa

crwdns2935283:009/26/24crwdne2935283:0

121 crwdns2915208:0crwdne2915208:0

crwdns2935295:0crwdne2935295:0

crwdns2947412:00crwdne2947412:0

crwdns2917038:0crwdne2917038:0

crwdns2936625:0crwdne2936625:0:

crwdns2936751:024crwdne2936751:0 3

crwdns2936753:07crwdne2936753:0 34

crwdns2936753:030crwdne2936753:0 138

crwdns2942667:0crwdne2942667:0 1,326