crwdns2942213:0crwdne2942213:0
-
-
Fold down the trim head
-
Remove the trim head by gently pulling
-
-
-
Unscrew the 2 screws at the front under the blade.
-
Use tweezers to remove the clip.
-
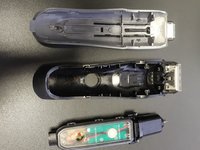
Push the part of plastic body in an upwards direction to separate the case.
Hello, can you share the batteries you purchased for the replacement? I have the rest of the tools. Thanks
-
-
-
Use the iFixit picks or a similar tool to run along the edge between the top and bottom pieces to loosen the retaining clips.
-
Slide the whole plastic body up (towards the trim head) to open it.
-
-
-
-
With gentle pressure from the opposite side, you can carefully remove the inner module and motor from the housing.
-
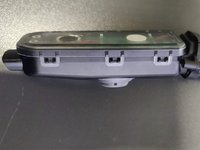
Use a small flat screwdriver to loosen the 6 clips on the module
-
Remove the cover by pulling straight up
-
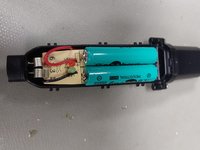
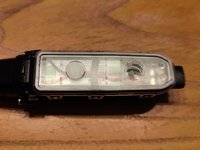
Carefully bend the two pieces of metal that make contact with the charger upwards.
-
-
-
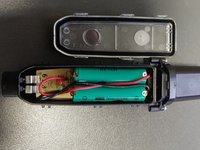
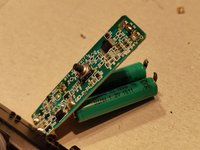
Carefully lever the PCB up and out. The PCB is held by 2 small hooks approximately in the middle. Spread the housing slightly while you carefully lift out the PCB, e.g. using a small screwdriver on the batteries.
-
If you unscrew the motor, you have two openings that you can lever across. Take care not to damage the 2 cables to the motor.
-
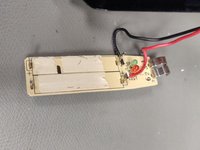
Desolder the old batteries from the PCB. These can also be snipped off as far up as possible with a side cutter
-
Solder the new batteries to the lugs on the PCB where the old batteries were previously soldered.
Das Entnehmen des PCBs ist extrem kritisch, bei mir ist er bei dem Versuch in der Mitte eingeknickt. Game over…
Der Trick wäre gewesen, das Gehäuse in der Mitte auseinanderzuziehen, während man den PCB von vorne und hinten (den Motor sollte man ebenfalls auf jeden Fall schnell abschrauben) vorsichtig anhebt. Hätte mich vor dem Knick bewahrt…
-
-
-
If your replacement batteries does not come with its own flags, you still have to unsolder the original flags from the batteries. That doesn't work so well. It is better to use new ones.
-
Use desoldering braid to remove the solder from the solder joints.
-
Be careful not to damage other components
-
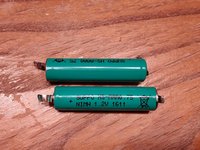
Each of the original batteries is a NiMH battery, 1.2V
-
The spare battery pack used here is a 950mAh, 2.4V, NiMH (AAA)
-
-
-
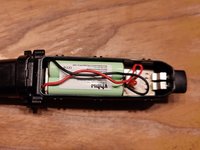
Lay the cables to the motor past the LEDs
-
Glue the small foam spacer back onto the cables
-
Carefully reseal the housing, making sure the gasket is seated properly and the clips are all fully engaged.
-


To reassemble your device, follow these instructions in reverse order.
To reassemble your device, follow these instructions in reverse order.
crwdns2935221:0crwdne2935221:0
crwdns2935229:021crwdne2935229:0
crwdns2934873:0crwdne2934873:0
100%

crwdns2934885:0crwdne2934885:0 crwdns2934875:0crwdne2934875:0
crwdns2934877:0crwdne2934877:0 ›

crwdns2947412:015crwdne2947412:0
Danke für die gute Anleitung. Es wäre noch schön zu lesen gewesen, ob es sich um “Micro” (AAA; HR6) oder “Mignon” (AA, HR3) Akkus handelt und welche mAh-Kapazität mindest erfordert wird und welche maximale Kapazität sinnvoll ist.
Hallo,
diese Infos habe Ich leider auch nicht. Ich habe folgende Akkus verwendet:
https://www.pollin.de/p/nimh-micro-akku-...
Viele Grüße
Beim Entfernen des Deckels ist es günstig von hinten (wo der Netzstecker sitzt) zu beginnen. Etwas Druck unter den Deckel mit eine Hebel geben ( Küchenmesser stumpf). Nun jeweils die beiden (linken und rechten) Clips lösen von unten nach oben zum Motor hin ;-)
Achtung, im Deckel sitzt eine Dichtung. Diese nicht beschädigen!!!
Zum entlöten der Kontaktfahnen am besten noch Entlötlitze benutzten! So wird verhindert, das Lötperlen irgendwo hin tropfen wo sie nicht hingehören.
Hallo Lutz, danke für deinen Kommentar und die Hinweise! Bei unseren Anleitungen ist es wie bei Wikipedia, alle können sich einbringen. Du kannst deine Hinweise also auch direkt in die Anleitung schreiben. Nur als Info. ;)
Hello gentleman. How do I remove the batteries? I heated the metal terminals that connect to the batteries but the little spot welds do not melt away. Is there a way to do this simply or is it better to just cut it as high as I can as mentioned? Thank you!
Die Batterien werden am besten dadurch entfernt, dass man die Fahnen direkt vom Board ablötet. Anschließend werden die Fahnen von der Batterie abgelötet und an die frischen Batterien angelötet. Jetzt die frischen Batterien mit ihren Fahnen wieder an das Board anlöten. Fertig!
Hat super funktioniert. Kann mir jetzt wieder mit nachhaltigem Gewissen Bart und Haare stutzen. :-)
Hallo, besten Dank für das Info. Hat mir einen neuen Rasierer gespart. mfg
Ich fand es hilfreich die alte Akkus zuerst von denen Fähnchen zu trennen und zu entfernen bevor ich die Stellen entlötete. Dass beugt vor, dass die ganze Wärme sich in den Akkus verteilt anstatt die Lötstelle zu Erhitzen.
Können in diesem Gerät Lithiumbatterien anstelle von NiMH verwendet werden?
@hknarik Lithium batteries use a different charging algorithm. Your charging circuit is designed for NiMH batteries, so I would stick with those.
Translation
@hknarik Lithiumbatterien verwenden einen anderen Ladealgorithmus. Dein Ladestromkreis ist für NiMH-Akkus ausgelegt, also würde ich bei diesen bleiben.
Der obere Deckel besitzt eine Lasche, die hinten unter den unteren Deckel führt. Beginnt man hinten, bricht die Lasche ab. Auf jeden Fall zuerst die Metallklammer unter dem Scherkopf mit einer Zange abziehen.
Die Akkus sind NiMH-Akkus 1,2V mit Lötfahnen. Bei mir war der Ladeteil durch falschen Akku vom Philips Rasierer verbrannt. Insofern lohnte der Ersatz der Akkus nicht.
Alles sehr schön ...fachgerecht..beschrieben .
Habe es als Radio/Fs-Techniker auch so nach Anleitung durchgeführt. Suuuper
W Kemke
I’ve been using a Braun BT 5090 Precision Beard Trimmer for over ten years, and it performed flawlessly until two weeks ago. Despite showing a full charge with a green indicator after an overnight charge, it failed to start, and the battery light turned red when I attempted to use it. I looked into replacing the batteries, but it appeared to be quite a complicated process. While the trimmer was still in its charging station, I decided to power it on, and surprisingly, it sprang to life, I let it run for about three minutes. After removing it from the charger, it continued to operate. I was able to use it to trim my moustache with no problems. So, before you invest in new batteries and the effort in replacing them. I recommend trying to run your device while it’s in the charging station first.
Danke für die Anleitung!
Ich finde es nervig, dass das Gerät auch mit Netzkabel nicht mehr richtig funktioniert, wenn der Akku sein Lebensende erreicht hat.
Kann man den Akku ausbauen und das Gerät nur noch mit dem Netzkabel betreiben?