crwdns2933423:0crwdne2933423:0

Bose SoundTouch 10 Back panel Replacement

crwdns2942213:0crwdne2942213:0

  1. Bose SoundTouch 10 Back panel Replacement, Front Panel: crwdns2935265:01crwdnd2935265:01crwdnd2935265:01crwdne2935265:0
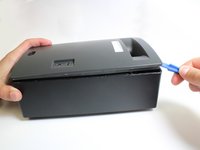
    • Turn the speaker over so that the rubber strips along the bottom are facing you.

    • Use the iFixit Opening Tool to peel back the rubber strip on the bottom-front edge.

  2. Bose SoundTouch 10 Back panel Replacement: crwdns2935265:02crwdnd2935265:01crwdnd2935265:01crwdne2935265:0
    • Use a #2 Phillips screwdriver to remove each of the three 20mm screws on the bottom front edge of the speaker.

  3. Bose SoundTouch 10 Back panel Replacement: crwdns2935265:03crwdnd2935265:01crwdnd2935265:02crwdne2935265:0 Bose SoundTouch 10 Back panel Replacement: crwdns2935265:03crwdnd2935265:02crwdnd2935265:02crwdne2935265:0
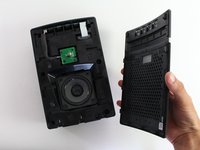
    • Slide the front panel with the mesh covering downwards to disconnect it from the SoundTouch 10 body.

    • Lift the panel away to reveal the speaker head.

  4. Bose SoundTouch 10 Back panel Replacement, Back panel: crwdns2935265:04crwdnd2935265:01crwdnd2935265:01crwdne2935265:0
    • Use a #2 Phillips screwdriver to remove each of the six 20mm screws located underneath the front panel.

  5. Bose SoundTouch 10 Back panel Replacement: crwdns2935265:05crwdnd2935265:01crwdnd2935265:01crwdne2935265:0
    • Flip the speaker onto its back.

    • Loosen the adhesive by sliding a Metal Spudger under the edge where the back panel meets the speaker's body.

  6. Bose SoundTouch 10 Back panel Replacement: crwdns2935265:06crwdnd2935265:01crwdnd2935265:02crwdne2935265:0 Bose SoundTouch 10 Back panel Replacement: crwdns2935265:06crwdnd2935265:02crwdnd2935265:02crwdne2935265:0
    • Use force with an iFixit Plastic Opening Tool to pry the back panel up from the speaker frame.

    • If the panel does not come free easily, a heat gun may be needed to weaken the adhesive.

    • Once the panel has been disconnected, it should fall open revealing the motherboard.

  7. Bose SoundTouch 10 Back panel Replacement: crwdns2935265:07crwdnd2935265:01crwdnd2935265:02crwdne2935265:0 Bose SoundTouch 10 Back panel Replacement: crwdns2935265:07crwdnd2935265:02crwdnd2935265:02crwdne2935265:0
    crwdns2935267:0crwdne2935267:0
    Tweezers
    $4.99
    crwdns2942207:0crwdne2942207:0
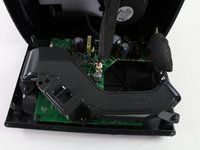
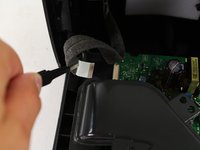
    • Use ESD Safe Tweezers (Blunt Nose) to pull out the wire ribbon at the end of the motherboard.

  8. Bose SoundTouch 10 Back panel Replacement: crwdns2935265:08crwdnd2935265:01crwdnd2935265:02crwdne2935265:0 Bose SoundTouch 10 Back panel Replacement: crwdns2935265:08crwdnd2935265:02crwdnd2935265:02crwdne2935265:0
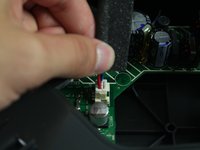
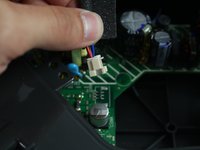
    • The motherboard contains capacitors (shown as cylinders in the upper right of the picture) which can hold a charge even when the speaker is powered off. Do not touch them as doing so may result in a shock.

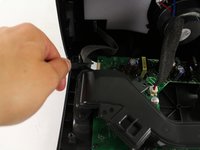
    • Pull up on the base of the speaker wire plug to disconnect it from the motherboard.

crwdns2915888:0crwdne2915888:0

To reassemble your device, follow these instructions in reverse order.

crwdns2935229:04crwdne2935229:0

James Asbury

crwdns2935283:004/10/17crwdne2935283:0

898 crwdns2915208:0crwdne2915208:0

crwdns2935297:05crwdne2935297:0

crwdns2915084:0crwdne2915084:0

Cal Poly, Team S13-G1, Forte Spring 2017 crwdns2935289:0Cal Poly, Team S13-G1, Forte Spring 2017crwdne2935289:0

CPSU-FORTE-S17S13G1

crwdns2931471:04crwdne2931471:0

crwdns2935297:05crwdne2935297:0

crwdns2917034:0crwdne2917034:0

How can I install a 12v battery?
Quique - crwdns2934203:0crwdne2934203:0

crwdns2917038:0crwdne2917038:0

crwdns2936625:0crwdne2936625:0:

crwdns2936751:024crwdne2936751:0 0

crwdns2936753:07crwdne2936753:0 8

crwdns2936753:030crwdne2936753:0 37

crwdns2942667:0crwdne2942667:0 6,599