crwdns2933423:0crwdne2933423:0

Bosch Maxx WFL2455 Washing-Machine Front panel disassembly

crwdns2942213:0crwdne2942213:0

  1. Bosch Maxx WFL2455 Washing-Machine Front panel disassembly, Lower cover: crwdns2935265:01crwdnd2935265:01crwdnd2935265:02crwdne2935265:0 Bosch Maxx WFL2455 Washing-Machine Front panel disassembly, Lower cover: crwdns2935265:01crwdnd2935265:02crwdnd2935265:02crwdne2935265:0
    • Unplug your device.

    • Remove the cover hiding the drain hole.

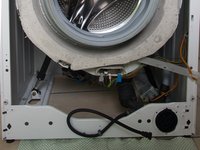
    • Remove the T20 Torx screw which is holding the lower cover.

    • Remove the lower cover by sliding it to the right.

  2. Bosch Maxx WFL2455 Washing-Machine Front panel disassembly, Detergent dispenser: crwdns2935265:02crwdnd2935265:01crwdnd2935265:01crwdne2935265:0
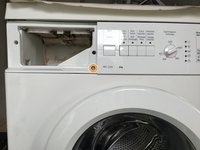
    • Remove the detergent dispenser by opening it then by pressing on the notch with your finger.

  3. Bosch Maxx WFL2455 Washing-Machine Front panel disassembly, Drum gasket ring: crwdns2935265:03crwdnd2935265:01crwdnd2935265:02crwdne2935265:0 Bosch Maxx WFL2455 Washing-Machine Front panel disassembly, Drum gasket ring: crwdns2935265:03crwdnd2935265:02crwdnd2935265:02crwdne2935265:0
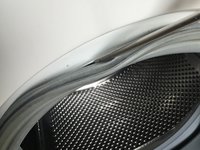
    • Remove the ring holding the drum gasket.

    • Start with the spring located near the window hinge.

    • Avoid using sharp or cutting tools to avoid damaging the gasket.

  4. Bosch Maxx WFL2455 Washing-Machine Front panel disassembly, Drum gasket: crwdns2935265:04crwdnd2935265:01crwdnd2935265:02crwdne2935265:0 Bosch Maxx WFL2455 Washing-Machine Front panel disassembly, Drum gasket: crwdns2935265:04crwdnd2935265:02crwdnd2935265:02crwdne2935265:0
    • Insérez ici votre traduction

    • Insérez ici votre traduction

    • Move the gasket to the inside of the drum so that it won't bother when you'll be removing the front panel.

    • Avoid using sharp or cutting tools to avoid damaging the gasket.

  5. Bosch Maxx WFL2455 Washing-Machine Front panel disassembly, Front panel mounting screws: crwdns2935265:05crwdnd2935265:01crwdnd2935265:02crwdne2935265:0 Bosch Maxx WFL2455 Washing-Machine Front panel disassembly, Front panel mounting screws: crwdns2935265:05crwdnd2935265:02crwdnd2935265:02crwdne2935265:0
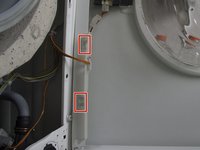
    • Remove the two T20 Torx screws located below the front panel.

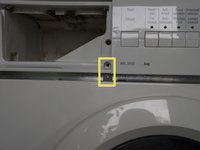
    • Remove the T20 Torx screw located in the detergent dispenser slot.

  6. Bosch Maxx WFL2455 Washing-Machine Front panel disassembly, Removing the front panel: crwdns2935265:06crwdnd2935265:01crwdnd2935265:02crwdne2935265:0 Bosch Maxx WFL2455 Washing-Machine Front panel disassembly, Removing the front panel: crwdns2935265:06crwdnd2935265:02crwdnd2935265:02crwdne2935265:0
    • The front panel is held in place by a strip, held by the previously removed screw of the detergent dispenser slot.

    • To remove the front panel, start by sliding it downwards (it should normally fall under its own weight).
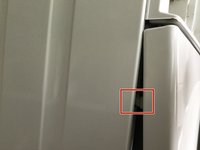
    • Insérez ici votre traduction

    • Insérez ici votre traduction

    • Insérez ici votre traduction

  7. Bosch Maxx WFL2455 Washing-Machine Front panel disassembly, Front panel's connections: crwdns2935265:07crwdnd2935265:01crwdnd2935265:02crwdne2935265:0 Bosch Maxx WFL2455 Washing-Machine Front panel disassembly, Front panel's connections: crwdns2935265:07crwdnd2935265:02crwdnd2935265:02crwdne2935265:0
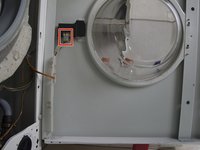
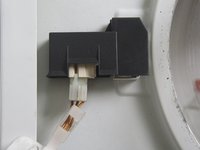
    • There's an electrical connection between the body of the device and the front panel (probably a window sensor).

    • Disconnect the window sensor by lifting the connector's tab and by pulling it down firmy.

    • On the second picture, the connector is shown partially disconnected.

  8. Bosch Maxx WFL2455 Washing-Machine Front panel disassembly, Wire guide: crwdns2935265:08crwdnd2935265:01crwdnd2935265:03crwdne2935265:0 Bosch Maxx WFL2455 Washing-Machine Front panel disassembly, Wire guide: crwdns2935265:08crwdnd2935265:02crwdnd2935265:03crwdne2935265:0 Bosch Maxx WFL2455 Washing-Machine Front panel disassembly, Wire guide: crwdns2935265:08crwdnd2935265:03crwdnd2935265:03crwdne2935265:0
    • Remove the guide from the front panel.

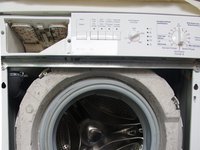
    • And voila, the front panel is disassembled!

crwdns2915888:0crwdne2915888:0

To reassemble your device, follow the above steps in reverse order.

crwdns2935229:04crwdne2935229:0

crwdns2934873:0crwdne2934873:0

fr en

100%

crwdns2934883:0Haithamcrwdne2934883:0 crwdns2934875:0crwdne2934875:0
crwdns2934877:0crwdne2934877:0 ›

Haitham

crwdns2935283:012/04/09crwdne2935283:0

329 crwdns2915208:0crwdne2915208:0

crwdns2935297:02crwdne2935297:0

crwdns2944067:00crwdne2944067:0

crwdns2917038:0crwdne2917038:0

crwdns2936625:0crwdne2936625:0:

crwdns2936751:024crwdne2936751:0 9

crwdns2936753:07crwdne2936753:0 86

crwdns2936753:030crwdne2936753:0 387

crwdns2942667:0crwdne2942667:0 12,246