crwdns2933423:0crwdne2933423:0

Blu Studio 5.5 Camera Replacement

crwdns2942213:0crwdne2942213:0

  1. crwdns2944590:01crwdnd2944590:02crwdnd2944590:0crwdnd2944590:0crwdne2944590:0

    Blu Studio 5.5 Camera Replacement, Battery: crwdns2935265:01crwdnd2935265:01crwdnd2935265:01crwdne2935265:0
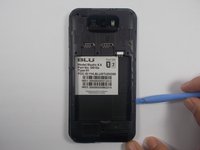
    • Flip over your Studio 5.5 so the back is facing you.

    • Use either the spudger or your fingernail to pull up on the slot in the lower left corner and remove the back cover.

  2. Blu Studio 5.5 Camera Replacement: crwdns2935265:02crwdnd2935265:01crwdnd2935265:02crwdne2935265:0 Blu Studio 5.5 Camera Replacement: crwdns2935265:02crwdnd2935265:02crwdnd2935265:02crwdne2935265:0
    • Place your finger in the small groove beneath the battery.

    • Push the battery toward the top of the phone and lift it out.

  3. Blu Studio 5.5 Camera Replacement, Camera: crwdns2935265:03crwdnd2935265:01crwdnd2935265:01crwdne2935265:0
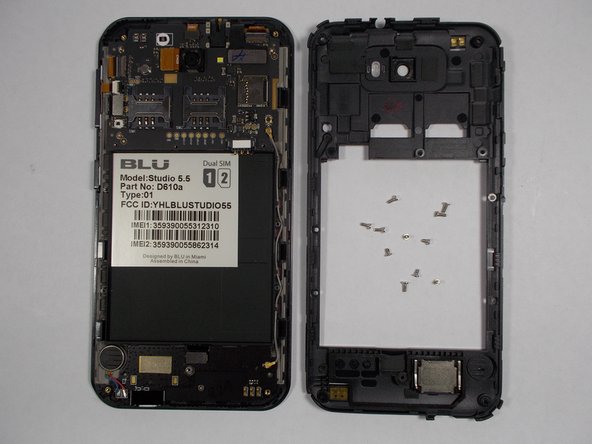
    • Begin by removing the 12 3.5mm screws along the back of the device.

    • 1 of these screws will be underneath a white sticker. Just press the screwdriver through it and remove it normally.

  4. Blu Studio 5.5 Camera Replacement: crwdns2935265:04crwdnd2935265:01crwdnd2935265:02crwdne2935265:0 Blu Studio 5.5 Camera Replacement: crwdns2935265:04crwdnd2935265:02crwdnd2935265:02crwdne2935265:0
    • Using your plastic opening tool, begin carefully prying the plastic shell from the phone.

    • Make your way around the edge slowly and lift the shell off when you have made a full circuit.

  5. Blu Studio 5.5 Camera Replacement: crwdns2935265:05crwdnd2935265:01crwdnd2935265:01crwdne2935265:0
    • Locate and unplug seven connectors on the motherboard.

    • Those marked in red are pulled straight up, away from the phone.

    • The connector marked in orange is pulled out horizontally.

  6. Blu Studio 5.5 Camera Replacement: crwdns2935265:06crwdnd2935265:01crwdnd2935265:01crwdne2935265:0
    • Unscrew the three 3.5mm screws securing the motherboard in place.

  7. Blu Studio 5.5 Camera Replacement: crwdns2935265:07crwdnd2935265:01crwdnd2935265:01crwdne2935265:0
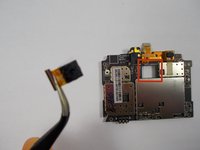
    • Using the plastic opening tool, you can now lift the motherboard straight up and out.

  8. Blu Studio 5.5 Camera Replacement: crwdns2935265:08crwdnd2935265:01crwdnd2935265:01crwdne2935265:0
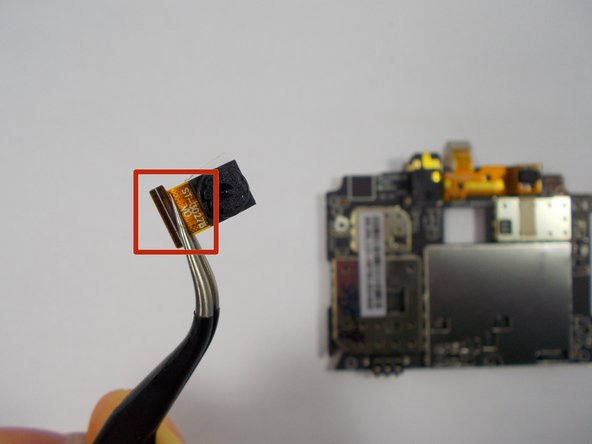
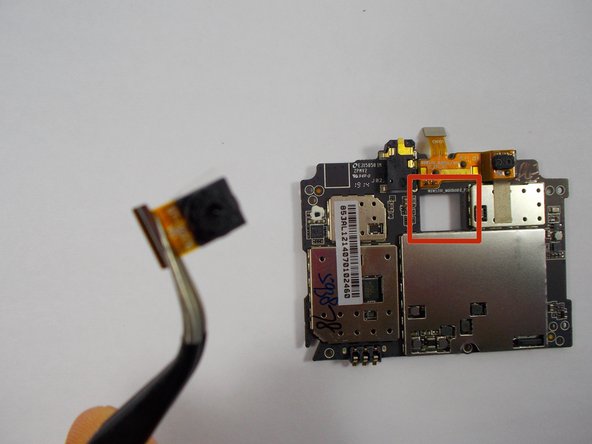
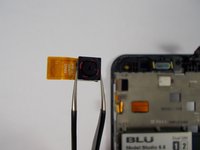
    • Carefully wedge the plastic remover tool underneath the corner of the camera module and slowly pry until it comes free.

  9. Blu Studio 5.5 Camera Replacement: crwdns2935265:09crwdnd2935265:01crwdnd2935265:03crwdne2935265:0 Blu Studio 5.5 Camera Replacement: crwdns2935265:09crwdnd2935265:02crwdnd2935265:03crwdne2935265:0 Blu Studio 5.5 Camera Replacement: crwdns2935265:09crwdnd2935265:03crwdnd2935265:03crwdne2935265:0
    crwdns2935267:0crwdne2935267:0
    Tweezers
    $4.99
    crwdns2942207:0crwdne2942207:0
    • Use tweezers to lift the camera module out, taking care not to get any fingerprints on it.

    • During reassembly, make sure the ribbon attached to the camera goes up and through the square hole on the motherboard so it is able to reconnect properly.

crwdns2915888:0crwdne2915888:0

To reassemble your device, follow these instructions in reverse order.

crwdns2935229:03crwdne2935229:0

Brian Sullivan

crwdns2935283:010/22/14crwdne2935283:0

647 crwdns2915208:0crwdne2915208:0

crwdns2935297:03crwdne2935297:0

crwdns2915084:0crwdne2915084:0

UMass Dartmouth, Team 1-2, Shastany Fall 2014 crwdns2935289:0UMass Dartmouth, Team 1-2, Shastany Fall 2014crwdne2935289:0

UMASSD-SHASTANY-F14S1G2

crwdns2931471:03crwdne2931471:0

crwdns2935297:03crwdne2935297:0

crwdns2944067:00crwdne2944067:0

crwdns2917038:0crwdne2917038:0

crwdns2936625:0crwdne2936625:0:

crwdns2936751:024crwdne2936751:0 0

crwdns2936753:07crwdne2936753:0 1

crwdns2936753:030crwdne2936753:0 3

crwdns2942667:0crwdne2942667:0 1,093