crwdns2915892:0crwdne2915892:0
This guide provides instructions for the replacement of your Black and Decker TR1278B toaster circuit board.
crwdns2942213:0crwdne2942213:0
-
-
Remove the carriage lever by pulling it away from the toaster.
-
-
-
Turn the toaster upside down.
-
Unscrew all four 4mm screws on the bottom using a Phillip's head #2 (PH2) screwdriver.
-
Or a slightly different model has six screws that require an allen wrench (hex key). Ones that have a ball end will not work. I had to use one that had more of a Star of David, pointy pattern to it.
-
-
-
Detach the bottom from the front cover using the plastic opening tool.
-
-
-
-
Turn the toaster right side up.
-
Lift the front cover.
-
-
-
Detach the bundled cable connector from the toaster by carefully pulling it away from the circuit board.
-
-
-
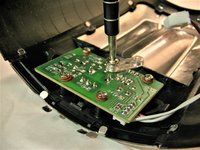
Locate the circuit board inside front cover.
-
-
-
Use a Phillips head #2 screwdriver to unscrew all five screws that attach the circuit board to the top cover.
-
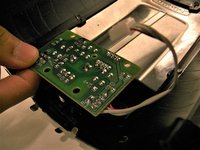
Remove the circuit board.
-
-
-
Inspect the circuit board for any burnt or otherwise damaged components.
-
Use a soldering kit to unsolder the damaged component.
-
Once the damaged component has been unsoldered from the circuit board, remove (and replace) it.
-


To reassemble your device, follow these instructions in reverse order.
To reassemble your device, follow these instructions in reverse order.
crwdns2915084:0crwdne2915084:0

USF Tampa, Team 8-1, Eyestone Spring 2017 crwdns2935289:0USF Tampa, Team 8-1, Eyestone Spring 2017crwdne2935289:0
USFT-EYESTONE-S17S8G1
crwdns2931471:03crwdne2931471:0
crwdns2935297:05crwdne2935297:0
crwdns2947410:01crwdne2947410:0
These instructions are wrong. The screw and clear plastic piece seen in step 7 doesn't go there it actually secures the power wire at the base of the toaster and technically isn't needed. The 5th hole is for the plastic catch of the heat selector knob.