crwdns2933423:0crwdne2933423:0

Black and Decker BL3000S Circuit Board

crwdns2942213:0crwdne2942213:0

  1. Black and Decker BL3000S Circuit Board, Blender Base: crwdns2935265:01crwdnd2935265:01crwdnd2935265:02crwdne2935265:0 Black and Decker BL3000S Circuit Board, Blender Base: crwdns2935265:01crwdnd2935265:02crwdnd2935265:02crwdne2935265:0
    • Before disassembling the blender base, make sure the blender disconnected from any power outlet.

    • Lift the jar straight up from the base without tilting the jar.

  2. Black and Decker BL3000S Circuit Board: crwdns2935265:02crwdnd2935265:01crwdnd2935265:01crwdne2935265:0
    • Remove the top three 1/4 inch base screws using a Philip's head screwdriver.

  3. Black and Decker BL3000S Circuit Board: crwdns2935265:03crwdnd2935265:01crwdnd2935265:02crwdne2935265:0 Black and Decker BL3000S Circuit Board: crwdns2935265:03crwdnd2935265:02crwdnd2935265:02crwdne2935265:0
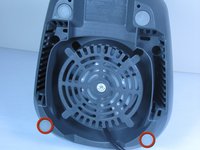
    • Remove the two base leg covers next to the power cord using pliers or a flat-head screwdriver.

    • This provides access to the base screws beneath.

  4. Black and Decker BL3000S Circuit Board: crwdns2935265:04crwdnd2935265:01crwdnd2935265:01crwdne2935265:0
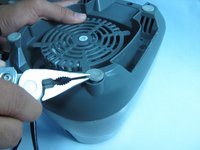
    • Remove the following screws that secure the top and bottom halves of the base.

    • One 1/4 Phillips screw

    • One TA-20 screw

    • Both screwdrivers must have a minimum of a three inch shank (length).

    • Screwdrivers with extenders will not fit down the access holes.

  5. Black and Decker BL3000S Circuit Board: crwdns2935265:05crwdnd2935265:01crwdnd2935265:01crwdne2935265:0
    • Lift the top half of the base from the bottom half of the base to reveal the internal mechanism.

  6. Black and Decker BL3000S Circuit Board, Circuit Board: crwdns2935265:06crwdnd2935265:01crwdnd2935265:01crwdne2935265:0
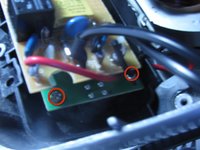
    • Once you have the base removed, the circuit board should be clearly visible inside.

  7. Black and Decker BL3000S Circuit Board: crwdns2935265:07crwdnd2935265:01crwdnd2935265:02crwdne2935265:0 Black and Decker BL3000S Circuit Board: crwdns2935265:07crwdnd2935265:02crwdnd2935265:02crwdne2935265:0
    • Remove the four screws located on the circuit board.

    • Two are on the left side.

    • Two are on the right side.

  8. Black and Decker BL3000S Circuit Board: crwdns2935265:08crwdnd2935265:01crwdnd2935265:01crwdne2935265:0
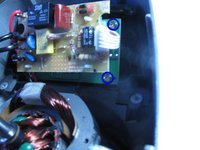
    • Remove the following soldered connections with a soldering iron:

    • Motor wires

    • Power cord wires

  9. Black and Decker BL3000S Circuit Board: crwdns2935265:09crwdnd2935265:01crwdnd2935265:01crwdne2935265:0
    • Lift the circuit board straight up to remove it from the base.

crwdns2915888:0crwdne2915888:0

To reassemble your device, follow these instructions in reverse order.

crwdns2935227:0crwdne2935227:0

Andrew

crwdns2935283:010/04/12crwdne2935283:0

209 crwdns2915208:0crwdne2915208:0

crwdns2935297:04crwdne2935297:0

crwdns2915084:0crwdne2915084:0

Cal Poly, Team 6-34, Regan Fall 2012 crwdns2935289:0Cal Poly, Team 6-34, Regan Fall 2012crwdne2935289:0

CPSU-REGAN-F12S6G34

crwdns2931471:04crwdne2931471:0

crwdns2935297:06crwdne2935297:0

crwdns2944067:00crwdne2944067:0

crwdns2917038:0crwdne2917038:0

crwdns2936625:0crwdne2936625:0:

crwdns2936751:024crwdne2936751:0 0

crwdns2936753:07crwdne2936753:0 9

crwdns2936753:030crwdne2936753:0 34

crwdns2942667:0crwdne2942667:0 4,671