crwdns2933423:0crwdne2933423:0

Bem Wireless HL2739B Charging base motherboard Replacement

crwdns2942213:0crwdne2942213:0

  1. Bem Wireless HL2739B Charging base motherboard Replacement, Charging Base Battery: crwdns2935265:01crwdnd2935265:01crwdnd2935265:01crwdne2935265:0
    • Peel the rubber cover back from the corner of the auxiliary charging base to reveal the screw.

  2. Bem Wireless HL2739B Charging base motherboard Replacement: crwdns2935265:02crwdnd2935265:01crwdnd2935265:02crwdne2935265:0 Bem Wireless HL2739B Charging base motherboard Replacement: crwdns2935265:02crwdnd2935265:02crwdnd2935265:02crwdne2935265:0
    • Use the J1 bit attached to the screwdriver to remove the four 10mm screws from the bottom of the auxiliary charging base.

  3. Bem Wireless HL2739B Charging base motherboard Replacement: crwdns2935265:03crwdnd2935265:01crwdnd2935265:01crwdne2935265:0
    • Lift the bottom cover away from the rest of the auxiliary charging base.

    • There are wires connecting the battery and cover to the rest of the auxiliary charging base. Be careful when removing the auxiliary charging base cover.

  4. Bem Wireless HL2739B Charging base motherboard Replacement: crwdns2935265:04crwdnd2935265:01crwdnd2935265:02crwdne2935265:0 Bem Wireless HL2739B Charging base motherboard Replacement: crwdns2935265:04crwdnd2935265:02crwdnd2935265:02crwdne2935265:0
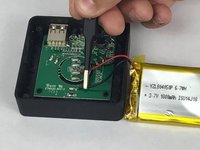
    • Using the tweezers, pull the wires from the auxiliary charging base's internal chip.

    • Be careful not to damage the chip when you remove the wires.

    • It will likely require soldering to reassemble the auxiliary charging base after this step.

  5. Bem Wireless HL2739B Charging base motherboard Replacement, Charging Base Motherboard: crwdns2935265:05crwdnd2935265:01crwdnd2935265:01crwdne2935265:0
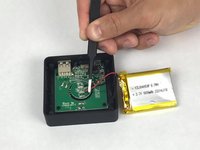
    • Using tweezers, remove the black wire from the motherboard

  6. Bem Wireless HL2739B Charging base motherboard Replacement: crwdns2935265:06crwdnd2935265:01crwdnd2935265:01crwdne2935265:0
    • Using the plastic opening tool, gently pry the motherboard up and remove it from the charging base.

    • There are no screws to be removed from the motherboard.

crwdns2915888:0crwdne2915888:0

To reassemble your device, follow these instructions in reverse order.

Ryan McQueeney

crwdns2935283:002/28/17crwdne2935283:0

446 crwdns2915208:0crwdne2915208:0

crwdns2935297:04crwdne2935297:0

crwdns2915084:0crwdne2915084:0

USF Tampa, Team S2-G4, Nance Spring 2017 crwdns2935289:0USF Tampa, Team S2-G4, Nance Spring 2017crwdne2935289:0

USFT-NANCE-S17S2G4

crwdns2931471:04crwdne2931471:0

crwdns2935297:05crwdne2935297:0

crwdns2944067:00crwdne2944067:0

crwdns2917038:0crwdne2917038:0

crwdns2936625:0crwdne2936625:0:

crwdns2936751:024crwdne2936751:0 0

crwdns2936753:07crwdne2936753:0 0

crwdns2936753:030crwdne2936753:0 3

crwdns2942667:0crwdne2942667:0 525