crwdns2915892:0crwdne2915892:0
Involves opening up the Beats Pill XL and removing the X-clamps holding the batteries in place. Disconnect the battery from the logic board and remove it from the device. You'll need to disconnect a ribbon cable to easily remove the battery.
crwdns2942213:0crwdne2942213:0
-
-
Using a plastic opening tool, pry the casing from the rest of the device.
-
Pry all the way around the edge and then pull apart.
 crwdns2952109:0crwdne2952109:0
-
-
-
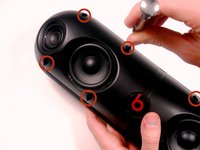
Using your thumb, remove the 8 rubber plugs in order to get to the screws.
-
Simply rub them towards the speakers and they will slide out enough to grip the edge and pull them out.
-
-
-
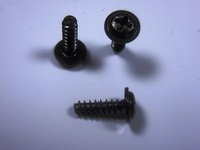
Using a Phillips #2 screwdriver, remove the 8 (10mm maxi-loc Phillips #2) screws that hold the casing together.
-
-
-
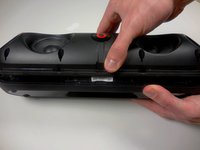
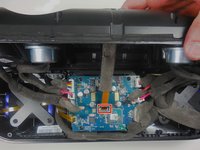
Pull apart the front casing from the back casing, slowly. Try to avoid any tension on any of the connected cables.
-
-
-
-
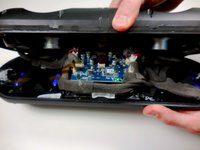
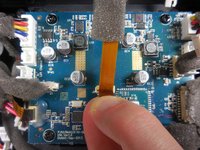
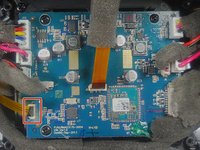
Gently pull on the plastic tab at the base of the ribbon cable to remove it from the motherboard.
-
-
-
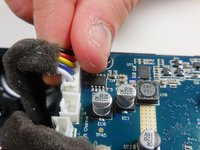
Using your thumb and index finger, pull upwards on the base of the the power cable to remove it from the motherboard.
-
-
-
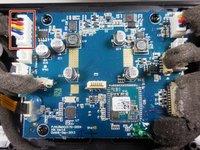
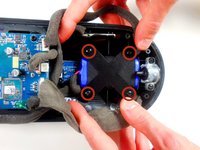
Using a Phillips #2 screwdriver, remove the 8 (11mm pan head Phillips #2) screws holding down the the X-clamps.
-
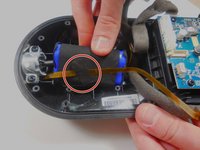
Remove the X-clamps by simply lifting upwards.
-
-
-
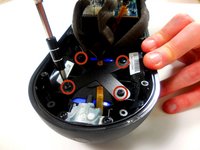
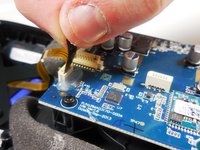
Gently pull up on the plastic tab at the base of the ribbon cable to remove it from the motherboard.
-
-
-
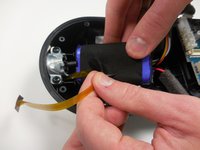
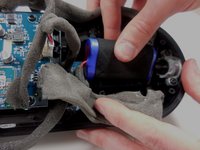
Remove the padded sticker holding down the ribbon cable to one of the batteries.
-
-
-
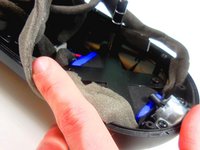
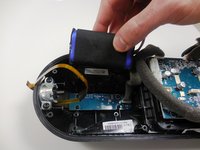
Lift straight up from the casing to remove each batteries from their tight spaces.
-


To reassemble your device, follow these instructions in reverse order.
crwdns2935221:0crwdne2935221:0
crwdns2935229:022crwdne2935229:0
crwdns2935287:0crwdne2935287:0

Colorado Springs, Team 9-2, Panko Spring 2015 crwdns2935289:0Colorado Springs, Team 9-2, Panko Spring 2015crwdne2935289:0
UCCS-PANKO-S15S9G2
crwdns2931471:03crwdne2931471:0
crwdns2935297:07crwdne2935297:0
crwdns2947412:07crwdne2947412:0
como saber se o problema da minha caixa e a bateria, ela nao esta carregando nem liga, a bateria porem nao esta dando 12v medicao, uma por sinal esta com carga negativa. no aguardo
marcosallexandre - crwdns2934203:0crwdne2934203:0 crwdns2950251:0crwdne2950251:0
Where can i buy these replacement batteries?
Edgar Zuniga - crwdns2934203:0crwdne2934203:0 crwdns2950251:0crwdne2950251:0
From here you can find a replacement battery
lisi - crwdns2934203:0crwdne2934203:0 crwdns2950251:0crwdne2950251:0
It's under recall https://www.apple.com/support/beats-pill...
mayer - crwdns2934203:0crwdne2934203:0 crwdns2950251:0crwdne2950251:0
i think it's better to change a battery than buy a new one. And i was luck to find a replacement battery.lol
Jailene - crwdns2934203:0crwdne2934203:0 crwdns2950251:0crwdne2950251:0