crwdns2933423:0crwdne2933423:0

Battery Disconnection

crwdns2862623:0crwdne2862623:0
crwdns2942641:0crwdne2942641:0

crwdns2942213:0crwdne2942213:0

  1. Battery Disconnection, Heat the edge: crwdns2935265:01crwdnd2935265:01crwdnd2935265:01crwdne2935265:0
    • Discharge your battery to 25% or lower and power off your phone before you begin.

    • Heat an iOpener and apply it to the edge of the back cover with the SIM card slot for two minutes.

    • A hair dryer or heat gun may also be used, but be careful not to overheat the phone—the display and internal battery are both susceptible to heat damage.

  2. Battery Disconnection, Insert an opening pick: crwdns2935265:02crwdnd2935265:01crwdnd2935265:03crwdne2935265:0 Battery Disconnection, Insert an opening pick: crwdns2935265:02crwdnd2935265:02crwdnd2935265:03crwdne2935265:0 Battery Disconnection, Insert an opening pick: crwdns2935265:02crwdnd2935265:03crwdnd2935265:03crwdne2935265:0
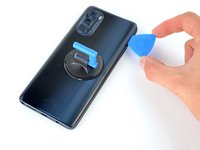
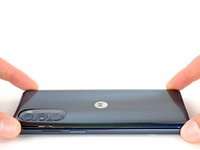
    • Apply a suction cup to the back cover, as close to the center of the right edge as possible.

    • Pull up on the suction cup with strong, steady force to create a gap between the cover and the frame.

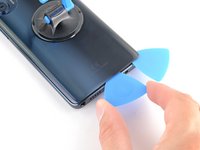
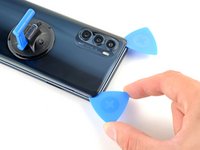
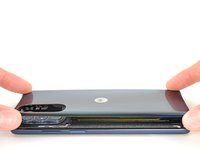
    • Insert an opening pick into the gap.

  3. Battery Disconnection, Slice the right adhesive: crwdns2935265:03crwdnd2935265:01crwdnd2935265:03crwdne2935265:0 Battery Disconnection, Slice the right adhesive: crwdns2935265:03crwdnd2935265:02crwdnd2935265:03crwdne2935265:0 Battery Disconnection, Slice the right adhesive: crwdns2935265:03crwdnd2935265:03crwdnd2935265:03crwdne2935265:0
    • Slide your opening pick back and forth along the right edge to slice through the adhesive.

    • Leave the pick in at the bottom right corner to prevent the adhesive from resealing.

  4. Battery Disconnection, Slice the bottom adhesive: crwdns2935265:04crwdnd2935265:01crwdnd2935265:02crwdne2935265:0 Battery Disconnection, Slice the bottom adhesive: crwdns2935265:04crwdnd2935265:02crwdnd2935265:02crwdne2935265:0
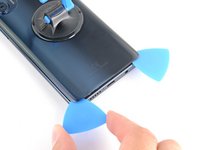
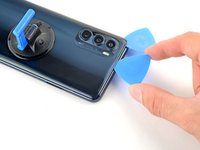
    • Insert a second opening pick into the bottom right corner.

    • Slide this opening pick along the bottom edge to the bottom left corner to slice through the adhesive.

    • Leave the pick inserted to prevent the bottom edge from resealing.

  5. Battery Disconnection, Slice the left adhesive: crwdns2935265:05crwdnd2935265:01crwdnd2935265:03crwdne2935265:0 Battery Disconnection, Slice the left adhesive: crwdns2935265:05crwdnd2935265:02crwdnd2935265:03crwdne2935265:0 Battery Disconnection, Slice the left adhesive: crwdns2935265:05crwdnd2935265:03crwdnd2935265:03crwdne2935265:0
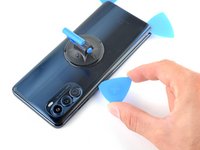
    • Insert a third opening pick into the bottom right corner.

    • Slide this opening pick along the left edge to slice the adhesive.

    • Don't worry about slicing under the camera bezel. It's separate from the back cover and will be removed later.

    • Leave the pick inserted in the top left corner to prevent the left edge from resealing.

  6. Battery Disconnection, Slice the top adhesive: crwdns2935265:06crwdnd2935265:01crwdnd2935265:02crwdne2935265:0 Battery Disconnection, Slice the top adhesive: crwdns2935265:06crwdnd2935265:02crwdnd2935265:02crwdne2935265:0
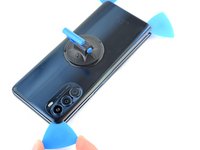
    • Insert a fourth pick into the top left corner.

    • Slide the pick to the top right corner to slice the top adhesive.

  7. Battery Disconnection, Slice around the camera bezel: crwdns2935265:07crwdnd2935265:01crwdnd2935265:01crwdne2935265:0
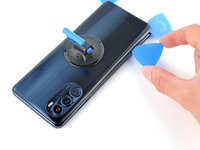
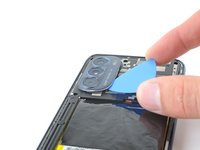
    • Slide an opening pick between the camera bezel and the back cover.

    • The back cover's adhesive is particularly strong around the camera bezel.

    • Slide the opening pick around the camera bezel to separate the back cover from the frame.

  8. Battery Disconnection, Remove the back cover: crwdns2935265:08crwdnd2935265:01crwdnd2935265:03crwdne2935265:0 Battery Disconnection, Remove the back cover: crwdns2935265:08crwdnd2935265:02crwdnd2935265:03crwdne2935265:0 Battery Disconnection, Remove the back cover: crwdns2935265:08crwdnd2935265:03crwdnd2935265:03crwdne2935265:0
    • Grab and remove the back cover by lifting it away from the phone.

    • If your back cover is still sticking to the frame, slide the pick around the edges of the phone to slice through any remaining adhesive.

    • Reassembly notes:

    • To adhere the back cover with custom-cut adhesives, follow this guide.

    • To adhere the back cover with tape, follow this guide.

  9. Battery Disconnection, Heat the camera bezel: crwdns2935265:09crwdnd2935265:01crwdnd2935265:01crwdne2935265:0
    • Heat an iOpener and apply it to the camera bezel for two minutes.

    • A hair dryer or heat gun may also be used, but be careful not to overheat the phone—the display and internal battery are both susceptible to heat damage.

  10. Battery Disconnection, Slice the adhesive: crwdns2935265:010crwdnd2935265:01crwdnd2935265:03crwdne2935265:0 Battery Disconnection, Slice the adhesive: crwdns2935265:010crwdnd2935265:02crwdnd2935265:03crwdne2935265:0 Battery Disconnection, Slice the adhesive: crwdns2935265:010crwdnd2935265:03crwdnd2935265:03crwdne2935265:0
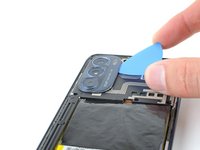
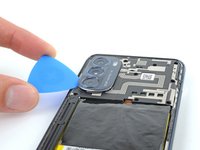
    • Insert an opening pick under the camera bezel.

    • Slide the pick around the perimeter of the bezel to slice the adhesive.

    • If it feels stuck, apply more heat to further loosen the adhesive.

  11. Battery Disconnection, Remove the camera bezel: crwdns2935265:011crwdnd2935265:01crwdnd2935265:03crwdne2935265:0 Battery Disconnection, Remove the camera bezel: crwdns2935265:011crwdnd2935265:02crwdnd2935265:03crwdne2935265:0 Battery Disconnection, Remove the camera bezel: crwdns2935265:011crwdnd2935265:03crwdnd2935265:03crwdne2935265:0
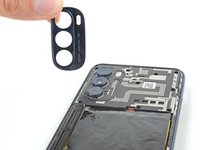
    • Grab and remove the camera bezel.

    • Reassembly notes:

    • This is a good point to test your phone before sealing it up. Follow this guide to perform a hardware test. Be sure to power your phone back down completely before you continue working.

    • To adhere the camera bezel with custom-cut adhesives, follow this guide.

    • To adhere the camera bezel with tape, follow this guide.

  12. Battery Disconnection, Unfasten the motherboard cover: crwdns2935265:012crwdnd2935265:01crwdnd2935265:01crwdne2935265:0
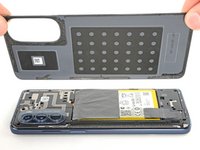
    • Use a Phillips screwdriver to remove the eleven 4.1 mm-long screws securing the motherboard cover.

    • If you can't find all the screws, check under any leftover adhesive residue.

  13. Battery Disconnection, Unclip the right edge: crwdns2935265:013crwdnd2935265:01crwdnd2935265:03crwdne2935265:0 Battery Disconnection, Unclip the right edge: crwdns2935265:013crwdnd2935265:02crwdnd2935265:03crwdne2935265:0 Battery Disconnection, Unclip the right edge: crwdns2935265:013crwdnd2935265:03crwdnd2935265:03crwdne2935265:0
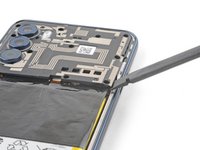
    • Insert a spudger between the bottom right corner of the cover and the frame.

    • Pry up to release the clips securing the cover.

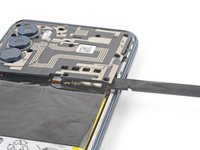
    • Slide the spudger toward the top of the cover and pry to release the right edge.

  14. Battery Disconnection, Remove the motherboard cover: crwdns2935265:014crwdnd2935265:01crwdnd2935265:02crwdne2935265:0 Battery Disconnection, Remove the motherboard cover: crwdns2935265:014crwdnd2935265:02crwdnd2935265:02crwdne2935265:0
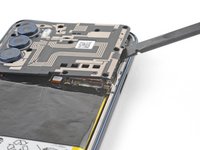
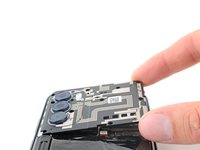
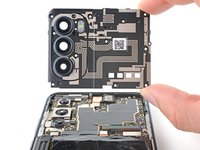
    • Grip the right edge of the cover and pull it off the motherboard.

  15. Battery Disconnection, Disconnect the battery: crwdns2935265:015crwdnd2935265:01crwdnd2935265:02crwdne2935265:0 Battery Disconnection, Disconnect the battery: crwdns2935265:015crwdnd2935265:02crwdnd2935265:02crwdne2935265:0
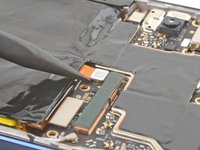
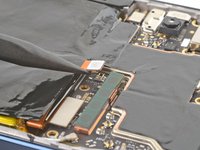
    • Use the point of a spudger to pry up the battery's press connector.

    • When you disconnect connectors like these, be careful not to dislodge the small surface-mounted components surrounding the socket.

    • To re-attach press connectors, carefully align and press down on one side until it clicks into place, then repeat on the other side. Don't press down on the middle. If the connector is misaligned, the pins can bend, causing permanent damage.

crwdns2915888:0crwdne2915888:0

To reassemble your device, follow these instructions in reverse order.

Clay Eickemeyer

crwdns2935283:009/19/22crwdne2935283:0

82 974 crwdns2915208:0crwdne2915208:0

crwdns2935297:0455crwdne2935297:0

crwdns2915084:0crwdne2915084:0

Guide Team crwdns2935289:0Guide Teamcrwdne2935289:0

Staff

crwdns2931471:09crwdne2931471:0

crwdns2935297:011 691crwdne2935297:0

crwdns2947412:00crwdne2947412:0

crwdns2917038:0crwdne2917038:0

crwdns2936625:0crwdne2936625:0:

crwdns2936751:024crwdne2936751:0 3

crwdns2936753:07crwdne2936753:0 3

crwdns2936753:030crwdne2936753:0 12

crwdns2942667:0crwdne2942667:0 58