crwdns2933423:0crwdne2933423:0

Battery Disconnection

crwdns2862623:0crwdne2862623:0
crwdns2942641:0crwdne2942641:0

crwdns2942213:0crwdne2942213:0

  1. Battery Disconnection, Remove the screws securing the lower case: crwdns2935265:01crwdnd2935265:01crwdnd2935265:01crwdne2935265:0
    crwdns2935267:0crwdne2935267:0
    Magnetic Project Mat
    $19.95
    • Before starting this procedure, you should disable your Mac's Auto Boot feature. Auto Boot powers on your Mac when you open the lid, and may be accidentally triggered during disassembly. Use this guide to disable Auto Boot.

    • If your MacBook is running Big Sur v11.1 or later, disabling Auto Boot may not work. You can proceed normally, but make sure to disconnect the battery as soon as you're inside.

    • Completely power off and unplug your MacBook Air before you start. Close the display and flip the entire laptop upside-down.

    • Use a P5 driver to remove the following screws:

    • Two 7.9 mm screws

    • Two 7.1 mm screws

    • Six 2.6 mm screws

    • Throughout this repair, keep track of each screw and make sure it goes back exactly where it came from to avoid damaging your MacBook.

  2. Battery Disconnection, Remove the lower case: crwdns2935265:02crwdnd2935265:01crwdnd2935265:03crwdne2935265:0 Battery Disconnection, Remove the lower case: crwdns2935265:02crwdnd2935265:02crwdnd2935265:03crwdne2935265:0 Battery Disconnection, Remove the lower case: crwdns2935265:02crwdnd2935265:03crwdnd2935265:03crwdne2935265:0
    • Wedge your fingers between the display and the lower case and pull upward to pop the lower case off the Air.

    • Remove the lower case.

    • To reinstall the lower case:

    • Set it in place and press firmly to engage the two hidden clips underneath. You should feel and hear them snap into place.

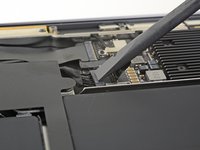
  3. Battery Disconnection, Disconnect the battery: crwdns2935265:03crwdnd2935265:01crwdnd2935265:01crwdne2935265:0
    • Peel back the tape covering the battery connector enough to reveal the connector underneath.

  4. Battery Disconnection: crwdns2935265:04crwdnd2935265:01crwdnd2935265:02crwdne2935265:0 Battery Disconnection: crwdns2935265:04crwdnd2935265:02crwdnd2935265:02crwdne2935265:0
    • Use a spudger to slide the battery connector parallel to the logic board and out of its socket on the logic board.

crwdns2915888:0crwdne2915888:0

To reassemble your device, follow these instructions in reverse order.

Carsten Frauenheim

crwdns2935283:003/10/20crwdne2935283:0

138,199 crwdns2915208:0crwdne2915208:0

crwdns2935297:0379crwdne2935297:0

crwdns2915084:0crwdne2915084:0

iFixit crwdns2935289:0iFixitcrwdne2935289:0

Staff

crwdns2931471:0121crwdne2931471:0

crwdns2935297:019,763crwdne2935297:0

crwdns2947412:00crwdne2947412:0

crwdns2917038:0crwdne2917038:0

crwdns2936625:0crwdne2936625:0:

crwdns2936751:024crwdne2936751:0 0

crwdns2936753:07crwdne2936753:0 1

crwdns2936753:030crwdne2936753:0 12

crwdns2942667:0crwdne2942667:0 87