crwdns2915892:0crwdne2915892:0
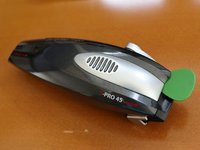
This guide will teach you how to open up a BaByliss i-Pro 45 to change its batteries.
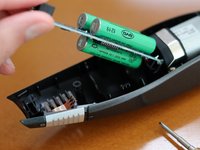
3x AAA 1.2V batteries with U-lips are required to be soldered onto the motherboard.
Opening up the device is an ideal opportunity to thoroughly clean it. Under the head/blades, some hairs may be stuck.
crwdns2942213:0crwdne2942213:0
-
-
Remove the rubber plug hiding the screw
-
Remove the screw under the plug
-
Remove two screws below the blades with a long Philips screwdriver
-
-
-
Remove the screws at the bottom of the blade
-
Remove the blade
Removing the blade isn’t required. The device can be easily opened without removing the blade.
Strictly seeing it is not necessary, that’s true. Thank you for your contribution.
Btw. did you actually open it and manage to change the batteries? If yes, can you take a photo of the lower side of the IC (the side where there is only a single battery)? Back then I forgot to document that.
I did open up the shaver, but haven’t replaced the batteries yet; just wanted to ensure they’re identical to this guide (they were :-)).
The batteries I want are out of stock currently; I’ve set an alert when they become available. Meanwhile the shaver is closed (and fully operational, with short battery life) again. If I don’t forget, I’ll take a picture of the other side of the mainboard.
Thanks. I had some difficulties installing the batteries and was wondering later, if I maybe soldered something incorrectly, hence I would be really glad about a detailed photo.
Back then I also had to wait for the batteries to arrive, that’s when I created this guide. Feel free to upload some additional instructions for the battery changing as well. Btw. the original batteries are connected with (narrow) pins. I bought the same batteries as you intend, but had a tough time to cut the pads to “shape”. I am curious how you will solve the problem.
Stanky -
Thanks for guide. Funny is, that in my machine are only two these batteries:) Surprise. They seems to be ready. Problem of slow motion must be different.
I have a question for blade installation. The two spring pins must be installed into the plastic small holes or in holes directly in steel blade? There is big difference between pushing power and motor power transmission then.
-
-
-
-
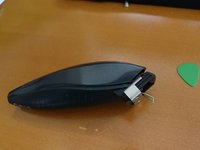
Gently open the housing
-
-
-
open the plastic parts holding the circuit in place
-
start lifting from the tail
-


To reassemble your device, follow these instructions in reverse order.
To reassemble your device, follow these instructions in reverse order.
crwdns2935221:0crwdne2935221:0
crwdns2935229:014crwdne2935229:0
crwdns2947412:014crwdne2947412:0
Use low self-discharge NiMHs and it will make you angry many years.
Design of this cutter is faulty - it tugs your hair when you try to cut too much or too fast.
Personally, I have been using this hair clipper for many years and it works perfectly well. Today I have to replace the battery. Can anyone tell me what the battery model is and if I need to use a soldering iron to replace it?
It is mentioned above:
3x AAA 1.2V batteries with U-lips are required to be soldered onto the motherboard.
So yes, a soldering iron is required, and the battery must have lips (i.e. not the standard AAA batteries you can find in any shop).
Fuss -
Thanks @fuss for your answer and for this additional information :)
So it needs a soldering iron…
So bad you don't show all the manipulation.
It's the principal difficulty I think, all the disassembly is almost nothing, you should have made a tutorial mainly for the battery replacement.
Thank you.
Just disassembled mine BaByliss Pro 45, and what a surprise - it has only 2 batteries...)
Here's a YT video for the soldering part. https://www.youtube.com/watch?v=oh-QY6KT...
Thank you, just what I needed to complete this task! 👍
I must admitt, I am a little overstrained by changing the batteries... The old batteries are glued on the board with hot glue and some components are glueded to them too. How you guys handel this? Heating the board with hot air while soldering out the batteries? (at what temperature?) Cutting the lips and removing the hot batteries before unsoldering the rest of the lips? But there is hardly any room for cutting. Perhaps with a dremel and a cutting disc?
Thanks for any advice :)
Sokkel
Can someone tell the value of the NTC glued to battery 1?
Unfortunately mine is broken. Probably has been from the start, the way it looks like but I'd like to replace it.
ریش تراش من موتورش خیلی کند میچرخه موتور را جداگانه امتحان کردم درست است ولی داخل مدار بسیار ضعیفه مشکل از کجاست؟
Indeed, the AAA battery with tabs is much more expensive than the normal AAA you can get at 5€ for 4 in the supermarket. And then I thought of my TV hero from the 80's: MacGyver. Surely he could solve anything with a paper clip. And I managed to solder pieces of paperclip on the + and - pole. You just have to use a narrow file to file the paperclip, plus and minus a bit so the solder sticks easier. Greetings from Gunnar W from Belgium.