crwdns2915892:0crwdne2915892:0
This guide goes over the steps needed to remove the subwoofer from the device.
crwdns2942213:0crwdne2942213:0
-
-
Remove the four 15.5 mm PH2 screws securing the base plate to the device.
-
-
-
Remove the six 15.5mm PH2 screws securing the grille and rear panel to the device.
-
-
-
Remove the grille and rear panel by grabbing the corners and pulling upwards and outwards.
-
-
-
Remove all four 15.5 mm PH2 screws holding the power supply down.
-
-
-
-
Disconnect the three cables from the power supply by squeezing the white tabs if present and gently pulling.
-
Pick up the power supply and remove the fourth cable from the underside of the power supply.
-
Remove the power supply.
-
-
-
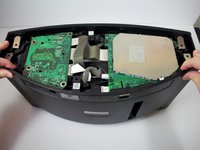
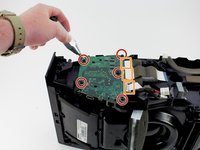
Remove the five 15.5 mm PH2 screws holding the motherboard down.
-
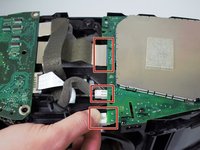
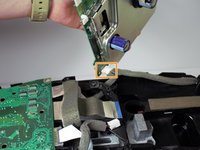
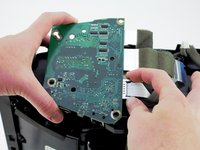
Remove the three cables from the side of the motherboard by squeezing the grey tabs if present and gently pulling.
-
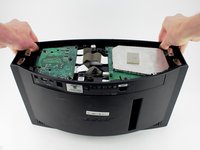
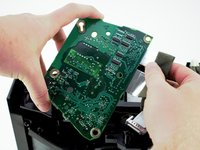
Remove the motherboard.
-
-
-
Remove the eight 15.5 mm PH2 screws holding the plastic insert down.
-
Remove the plastic insert.
-
-
-
Remove the three 15.5 mm PH2 screws holding the metal insert down.
-
Remove the metal insert.
-
-
-
Remove the three 19 mm PH2 screws holding the metal subwoofer cover down.
-
Remove the subwoofer cover.
-
-
-
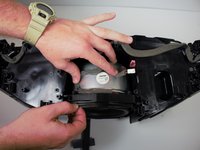
Remove the four 19 mm PH2 screws holding the subwoofer in place.
-
-
-
Remove the subwoofer by pulling towards the back of the device while tucking the wire under the plastic enclosure.
-


To reassemble your device, follow these instructions in reverse order.
To reassemble your device, follow these instructions in reverse order.
crwdns2935221:0crwdne2935221:0
crwdns2935229:02crwdne2935229:0
crwdns2915084:0crwdne2915084:0

Cal Poly, Team S16-G2, Livingston Spring 2018 crwdns2935289:0Cal Poly, Team S16-G2, Livingston Spring 2018crwdne2935289:0
CPSU-LIVINGSTON-S18S16G2
crwdns2931471:04crwdne2931471:0
crwdns2935297:07crwdne2935297:0