crwdns2933423:0crwdne2933423:0

Auto-Feeder Disengagement

crwdns2862623:0crwdne2862623:0
crwdns2942641:0crwdne2942641:0
  1. Auto-Feeder Disengagement, Remove the Guide Spring: crwdns2935265:01crwdnd2935265:01crwdnd2935265:03crwdne2935265:0 Auto-Feeder Disengagement, Remove the Guide Spring: crwdns2935265:01crwdnd2935265:02crwdnd2935265:03crwdne2935265:0 Auto-Feeder Disengagement, Remove the Guide Spring: crwdns2935265:01crwdnd2935265:03crwdnd2935265:03crwdne2935265:0
    • Unplug your drain cleaner before starting this guide. Because this device may have been used in a septic setting, it should be cleaned and disinfected as much as possible before disassembly.

    • Wear gloves to protect your hands from injury when handling the cable.

    • Ensure the cable is completely retracted into the auto-feeder.

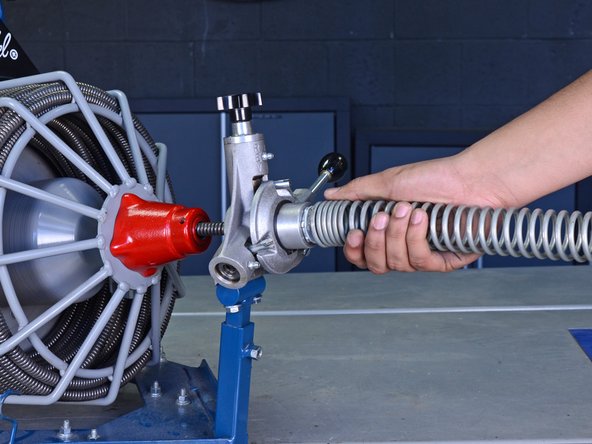
    • Twist the guide spring counter-clockwise to unscrew it from the auto-feeder.

    • Remove the guide spring.

  2. Auto-Feeder Disengagement, Release the Tension Spring: crwdns2935265:02crwdnd2935265:01crwdnd2935265:03crwdne2935265:0 Auto-Feeder Disengagement, Release the Tension Spring: crwdns2935265:02crwdnd2935265:02crwdnd2935265:03crwdne2935265:0 Auto-Feeder Disengagement, Release the Tension Spring: crwdns2935265:02crwdnd2935265:03crwdnd2935265:03crwdne2935265:0
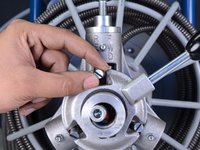
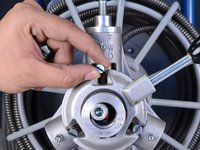
    • Unscrew the tension knob to loosen the tension spring in the top feeder assembly.

  3. Auto-Feeder Disengagement, Set the Feeder in Neutral Position: crwdns2935265:03crwdnd2935265:01crwdnd2935265:03crwdne2935265:0 Auto-Feeder Disengagement, Set the Feeder in Neutral Position: crwdns2935265:03crwdnd2935265:02crwdnd2935265:03crwdne2935265:0 Auto-Feeder Disengagement, Set the Feeder in Neutral Position: crwdns2935265:03crwdnd2935265:03crwdnd2935265:03crwdne2935265:0
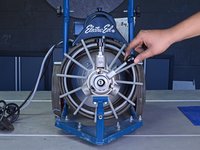
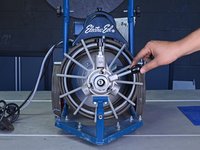
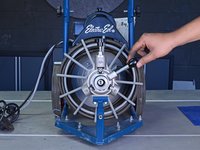
    • Set the feeder adjustment knob in the neutral position, in between the "FWD" and "REV" positions.

  4. Auto-Feeder Disengagement, Disengage the Top Bearing: crwdns2935265:04crwdnd2935265:01crwdnd2935265:02crwdne2935265:0 Auto-Feeder Disengagement, Disengage the Top Bearing: crwdns2935265:04crwdnd2935265:02crwdnd2935265:02crwdne2935265:0
    • Push the top control finger up as far as possible.

    • This disengages the top feeder assembly and allows the cable to freely move through the feeder. The finger may fall back down on its own and restrict cable movement. If this occurs, simply push the finger back up.

crwdns2915888:0crwdne2915888:0

To reassemble your device, follow these instructions in reverse order.

Tarun Thiruma

crwdns2935283:011/20/19crwdne2935283:0

38,116 crwdns2915208:0crwdne2915208:0

crwdns2935297:0134crwdne2935297:0

crwdns2947412:00crwdne2947412:0

crwdns2917038:0crwdne2917038:0

crwdns2936625:0crwdne2936625:0:

crwdns2936751:024crwdne2936751:0 0

crwdns2936753:07crwdne2936753:0 0

crwdns2936753:030crwdne2936753:0 2

crwdns2942667:0crwdne2942667:0 38