crwdns2915892:0crwdne2915892:0
Do not forget to eject the navigation CD-ROM before you disconnect the unit.
This guide does not show you how to remove the unit from the car.
This guide contains the least amount of steps to clean the lens. In case you drop the white plastic disk that holds the CD-ROM down (step 2), you have to take apart the unit.
Follow this guide in case that has happened to you.
crwdns2942213:0crwdne2942213:0
-
-
Use the flat edge of a metal spudger and/or a flat head screwdriver to pry open the top cover.
-
When closing the cover, make sure the cover is completely locked as shown in the third picture.
-
-
-
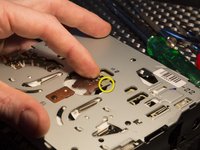
Remove one gold colored Phillips screw located in the center.
-
-
-
crwdns2935267:0crwdne2935267:0Tweezers$4.99
-
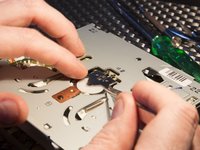
It is advisable to grab an old CD and push it half way into the CD-ROM drive until it is visible through the hole marked in the first picture. This will prevent the part that has to be removed in this step to fall down into the unit, with the risk of damaging the laser.
-
The metal plate slides forward as shown in the first picture.
I started folowing this guide but after step 3 my CD looked different:
http://postimg.org/image/4c0deo53v/
I removed the PH screw and tied the white plastic ring. Tried to remove it but it didn't came out: the hole was too small. So I lowered it in the drive and thus gained access to the lens:
http://postimg.org/image/3l7n8w2qj/
It was quite backwards than that in this manual:
I have the same problem. I couldn't remove the white plastic ring because the hole was too small. So I have a few questions.
1. Did you have problem with removing the screw (holding the white plastic ring)? Because I wasn't able to do this.
2. How did you separate this metal part from the white plastic ring? Is it necesary to tie the white plastic ring?
3. In the picture where there is the white plastic ring, I see a CD in the CD drive. While you were moving the white plastic ring to the left side a CD was still in the drive?
4. Does the RNS-D work after that operation?
Sorry for my english, I hope you will reply.
Michael -
Finally I found why there is a difference: my unit is the older version known as RNS-C. Part number is 8D0 035 192 C. Main difference is that device works only with NON DX CD ROMs. So cleaning will not help: such disks are not available long time ago and there are no images of them on the web
Stefan -
It turned out that my unit is the older version, so called RNS-C. That is why it is different from that repair guide. It will read only NON DX CD's
Later units will work with both DX and NON DX Travelpilot CD ROM's
http://vi.raptor.ebaydesc.com/ws/eBayISA...
Audi part number is 8D0 035 192 D
Blaupunkt number is 8 618 842 279 C
Description of that device, model usage and funktions:
-
-
-
Locate the lens inside the CD-ROM drive.
-
Dip one end of a cotton swab in rubbing alcohol.
-
Lightly dab the swab on the lens. Be very gentle.
-
Let the lens dry before putting the unit back together.
-


To reassemble your device, follow these instructions in reverse order.
To reassemble your device, follow these instructions in reverse order.
crwdns2935221:0crwdne2935221:0
crwdns2935229:07crwdne2935229:0
crwdns2947410:01crwdne2947410:0
Hi, Michael. Maybe it's too late, but:
1. Yes, the screw was very tight. I unfastened it like with an impact screwdriver: simultaneously pressed down and turned. Only a quality tool will do the job
2. When You remove the screw and the spring You can detach the white plastic ring. At that moment You need a CD to prevent the ring falling down
3. After You have tied the ring You can remove the CD and lower the ring inside the unit to gain access to the lens
4. Yes, the CD-ROM reads original disks without problem
Sorry for my english, also. TI hope that helps