crwdns2933423:0crwdne2933423:0

Asus ZenBook UX303U Motherboard Replacement

crwdns2942213:0crwdne2942213:0

  1. Asus ZenBook UX303U Motherboard Replacement, Back Panel: crwdns2935265:01crwdnd2935265:01crwdnd2935265:01crwdne2935265:0
    • Remove the two round rubber feet at the hinge-edge of the laptop.

  2. Asus ZenBook UX303U Motherboard Replacement: crwdns2935265:02crwdnd2935265:01crwdnd2935265:01crwdne2935265:0
    • Remove the eleven 4 mm Phillips #00 screws from the back panel.

  3. Asus ZenBook UX303U Motherboard Replacement: crwdns2935265:03crwdnd2935265:01crwdnd2935265:02crwdne2935265:0 Asus ZenBook UX303U Motherboard Replacement: crwdns2935265:03crwdnd2935265:02crwdnd2935265:02crwdne2935265:0
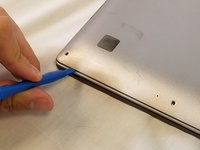
    • Using a plastic opening tool pry the back panel off of the laptop.

  4. Asus ZenBook UX303U Motherboard Replacement, Battery: crwdns2935265:04crwdnd2935265:01crwdnd2935265:02crwdne2935265:0 Asus ZenBook UX303U Motherboard Replacement, Battery: crwdns2935265:04crwdnd2935265:02crwdnd2935265:02crwdne2935265:0
    • Pull the speaker cable out of its four retaining clips with either your fingers, or a plastic opening tool.

  5. Asus ZenBook UX303U Motherboard Replacement: crwdns2935265:05crwdnd2935265:01crwdnd2935265:02crwdne2935265:0 Asus ZenBook UX303U Motherboard Replacement: crwdns2935265:05crwdnd2935265:02crwdnd2935265:02crwdne2935265:0
    • Remove all seven 2 mm Phillips #00 screws from the battery.

  6. Asus ZenBook UX303U Motherboard Replacement: crwdns2935265:06crwdnd2935265:01crwdnd2935265:02crwdne2935265:0 Asus ZenBook UX303U Motherboard Replacement: crwdns2935265:06crwdnd2935265:02crwdnd2935265:02crwdne2935265:0
    • Pull the speaker connector toward the edge of the laptop to disconnect it from its socket.

  7. Asus ZenBook UX303U Motherboard Replacement: crwdns2935265:07crwdnd2935265:01crwdnd2935265:02crwdne2935265:0 Asus ZenBook UX303U Motherboard Replacement: crwdns2935265:07crwdnd2935265:02crwdnd2935265:02crwdne2935265:0
    • Lift the battery connector straight up off its socket to disconnect it from the motherboard.

    • Do not pry on the socket itself or you risk damaging the motherboard.

  8. Asus ZenBook UX303U Motherboard Replacement: crwdns2935265:08crwdnd2935265:01crwdnd2935265:02crwdne2935265:0 Asus ZenBook UX303U Motherboard Replacement: crwdns2935265:08crwdnd2935265:02crwdnd2935265:02crwdne2935265:0
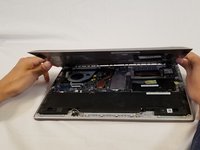
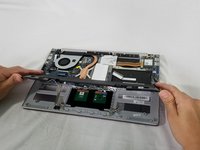
    • Lift the battery and speakers up and pull out to remove.

    • Check underneath the battery for the wire assembly connecting the touchpad to the motherboard. This connection may stick to the underside of the battery. Be careful not to damage it when removing the battery.

  9. Asus ZenBook UX303U Motherboard Replacement: crwdns2935265:09crwdnd2935265:01crwdnd2935265:01crwdne2935265:0
    • Remove the speakers from the old battery.

  10. Asus ZenBook UX303U Motherboard Replacement, Motherboard fan: crwdns2935265:010crwdnd2935265:01crwdnd2935265:02crwdne2935265:0 Asus ZenBook UX303U Motherboard Replacement, Motherboard fan: crwdns2935265:010crwdnd2935265:02crwdnd2935265:02crwdne2935265:0
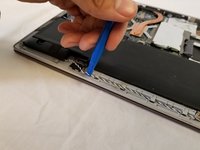
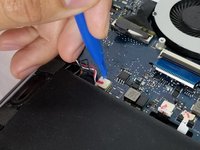
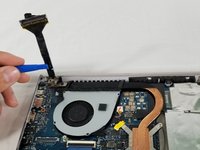
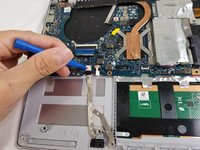
    • Disconnect the display cable from the motherboard with a plastic opening tool.

  11. Asus ZenBook UX303U Motherboard Replacement: crwdns2935265:011crwdnd2935265:01crwdnd2935265:02crwdne2935265:0 Asus ZenBook UX303U Motherboard Replacement: crwdns2935265:011crwdnd2935265:02crwdnd2935265:02crwdne2935265:0
    • Remove the three 6mm Phillips #00 screws from the hinge.

    • Remove the 2mm Phillips #00 screw from the plastic housing securing the fan into place.

  12. Asus ZenBook UX303U Motherboard Replacement: crwdns2935265:012crwdnd2935265:01crwdnd2935265:02crwdne2935265:0 Asus ZenBook UX303U Motherboard Replacement: crwdns2935265:012crwdnd2935265:02crwdnd2935265:02crwdne2935265:0
    • Lift the bottom of the laptop up slightly in order to unhinge the laptop.

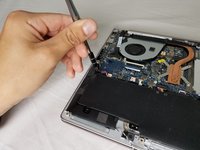
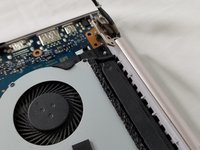
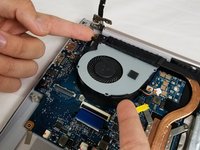
    • Lift the screen assembly hinge up and off of the motherboard fan.

  13. Asus ZenBook UX303U Motherboard Replacement: crwdns2935265:013crwdnd2935265:01crwdnd2935265:03crwdne2935265:0 Asus ZenBook UX303U Motherboard Replacement: crwdns2935265:013crwdnd2935265:02crwdnd2935265:03crwdne2935265:0 Asus ZenBook UX303U Motherboard Replacement: crwdns2935265:013crwdnd2935265:03crwdnd2935265:03crwdne2935265:0
    crwdns2935267:0crwdne2935267:0
    Tweezers
    $4.99
    crwdns2942207:0crwdne2942207:0
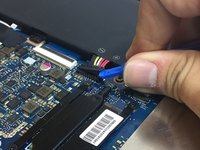
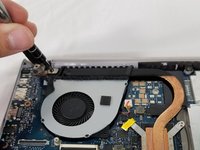
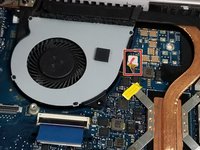
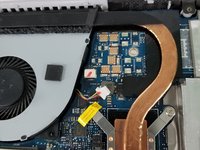
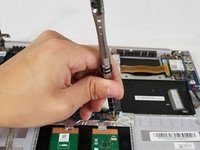
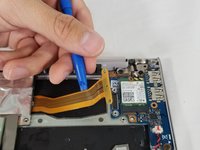
    • Using tweezers, disconnect the cable connector from the motherboard fan.

  14. Asus ZenBook UX303U Motherboard Replacement: crwdns2935265:014crwdnd2935265:01crwdnd2935265:02crwdne2935265:0 Asus ZenBook UX303U Motherboard Replacement: crwdns2935265:014crwdnd2935265:02crwdnd2935265:02crwdne2935265:0
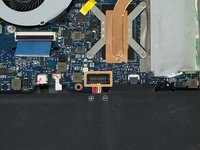
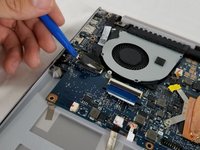
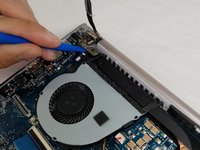
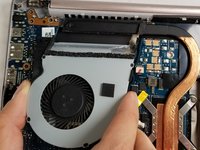
    • Lift the fan up and off of the white pegs that secure it into place.

  15. Asus ZenBook UX303U Motherboard Replacement, Motherboard: crwdns2935265:015crwdnd2935265:01crwdnd2935265:02crwdne2935265:0 Asus ZenBook UX303U Motherboard Replacement, Motherboard: crwdns2935265:015crwdnd2935265:02crwdnd2935265:02crwdne2935265:0
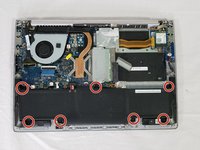
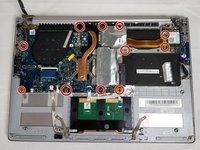
    • Remove eleven 4mm Phillips #00 screws.

  16. Asus ZenBook UX303U Motherboard Replacement: crwdns2935265:016crwdnd2935265:01crwdnd2935265:03crwdne2935265:0 Asus ZenBook UX303U Motherboard Replacement: crwdns2935265:016crwdnd2935265:02crwdnd2935265:03crwdne2935265:0 Asus ZenBook UX303U Motherboard Replacement: crwdns2935265:016crwdnd2935265:03crwdnd2935265:03crwdne2935265:0
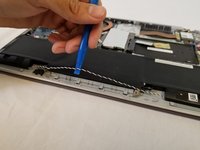
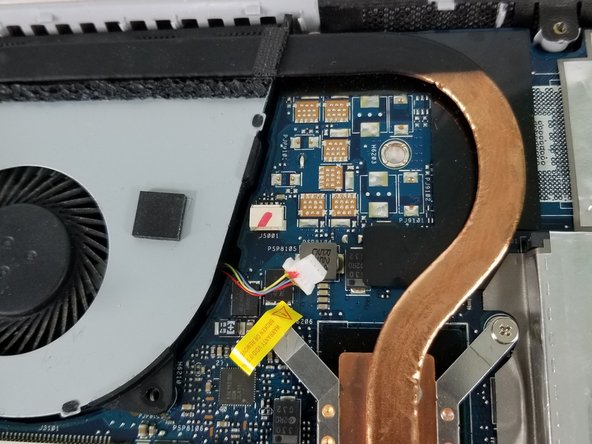
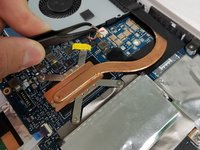
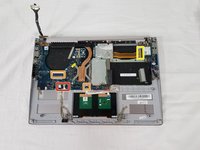
    • Disconnect all wires connecting the motherboard to the rest of the device.

    • For the two connectors marked in orange, lift the black clip up to release the wire.

    • For the wire marked in yellow, lift it straight up.

  17. Asus ZenBook UX303U Motherboard Replacement: crwdns2935265:017crwdnd2935265:01crwdnd2935265:01crwdne2935265:0
    • Lift and remove the motherboard.

    • Pull the motherboard away from the ports on the side of the device to disconnect them from the computer before lifting the motherboard.

crwdns2915888:0crwdne2915888:0

To reassemble your device, follow these instructions in reverse order.

crwdns2935229:05crwdne2935229:0

Dean Anderson

crwdns2935283:002/14/18crwdne2935283:0

624 crwdns2915208:0crwdne2915208:0

crwdns2935297:03crwdne2935297:0

crwdns2915084:0crwdne2915084:0

USF Tampa, Team S3-G5, Nance Spring 2018 crwdns2935289:0USF Tampa, Team S3-G5, Nance Spring 2018crwdne2935289:0

USFT-NANCE-S18S3G5

crwdns2931471:03crwdne2931471:0

crwdns2935297:09crwdne2935297:0

crwdns2917034:0crwdne2917034:0

The bottom of the pictured device may feature Phillips #00 screws, but I also have this laptop and the screws around the edge of the bottom panel are Torx T5s on my device.

Nick Brennan - crwdns2934203:0crwdne2934203:0

crwdns2917038:0crwdne2917038:0

crwdns2936625:0crwdne2936625:0:

crwdns2936751:024crwdne2936751:0 0

crwdns2936753:07crwdne2936753:0 3

crwdns2936753:030crwdne2936753:0 32

crwdns2942667:0crwdne2942667:0 6,354