crwdns2915892:0crwdne2915892:0
This guide will show you how to replace a dented or damaged bottom panel on an Asus ZenBook UX303U laptop.
crwdns2942213:0crwdne2942213:0
-
-
Remove the two round rubber feet at the hinge-edge of the laptop.
-
-
-
-
Remove the eleven 4 mm Phillips #00 screws from the back panel.
These screws on other models are Torx T5 or T6, not Phillips
T4 screws on all but the two under the rear rubber feet; those are Phillips PH0 (and my model had two square rubber feet).
Agree. Same as my laptop.
Moops -
-
-
-
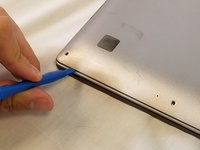
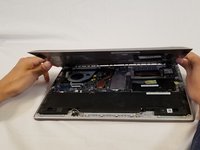
Using a plastic opening tool pry the back panel off of the laptop.
I lift more than the last photo shows. Dark rubber with plots, visible on photo are blocking the opening.
Mine was also stuck at the back with a bit of tape (for grounding?) I did my best to make sure it was replaced during re-assembly.
-


To reassemble your device, follow these instructions in reverse order.
To reassemble your device, follow these instructions in reverse order.
crwdns2935221:0crwdne2935221:0
crwdns2935229:02crwdne2935229:0
crwdns2915084:0crwdne2915084:0

USF Tampa, Team S3-G5, Nance Spring 2018 crwdns2935289:0USF Tampa, Team S3-G5, Nance Spring 2018crwdne2935289:0
USFT-NANCE-S18S3G5
crwdns2931471:03crwdne2931471:0
crwdns2935297:09crwdne2935297:0
crwdns2947410:01crwdne2947410:0
Some models may utilize Phillips #00 screws, but mine (and many others based on what I’ve now read) utilize Torx T5 screws around the edges of the panel.
The process took me about 30 minutes. If I were to have to do it again then I could probably do it in 10 minutes now that I know what is involved!
Jon Kerridge - crwdns2934203:0crwdne2934203:0