crwdns2933423:0crwdne2933423:0

Asus X401A Hard Drive Replacement

crwdns2942213:0crwdne2942213:0

  1. Asus X401A Hard Drive Replacement, Remove Screws: crwdns2935265:01crwdnd2935265:01crwdnd2935265:01crwdne2935265:0
    • Turn laptop over on flat, stable surface.

    • Remove 8 Phillips Screws

  2. Asus X401A Hard Drive Replacement, Remove Battery: crwdns2935265:02crwdnd2935265:01crwdnd2935265:03crwdne2935265:0 Asus X401A Hard Drive Replacement, Remove Battery: crwdns2935265:02crwdnd2935265:02crwdnd2935265:03crwdne2935265:0 Asus X401A Hard Drive Replacement, Remove Battery: crwdns2935265:02crwdnd2935265:03crwdnd2935265:03crwdne2935265:0
    • Slide battery lock to unlocked position on left side, then hold it in on the right side while sliding the battery out.

  3. Asus X401A Hard Drive Replacement, Remove more screws: crwdns2935265:03crwdnd2935265:01crwdnd2935265:01crwdne2935265:0
    • Under the battery are 2 hidden screws, time for them to go.

  4. Asus X401A Hard Drive Replacement, Take apart housing: crwdns2935265:04crwdnd2935265:01crwdnd2935265:03crwdne2935265:0 Asus X401A Hard Drive Replacement, Take apart housing: crwdns2935265:04crwdnd2935265:02crwdnd2935265:03crwdne2935265:0 Asus X401A Hard Drive Replacement, Take apart housing: crwdns2935265:04crwdnd2935265:03crwdnd2935265:03crwdne2935265:0
    • Turn over laptop

    • Open lid as far as it will go

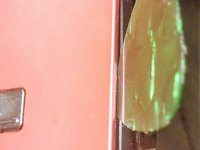
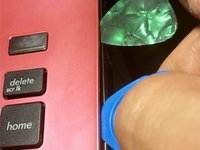
    • Insert opening pick as shown

    • Follow entirely around the laptop

    • On the underside of the keyboard are 2 flat cables, please see next step before proceeding!

  5. Asus X401A Hard Drive Replacement, Flat cables: crwdns2935265:05crwdnd2935265:01crwdnd2935265:02crwdne2935265:0 Asus X401A Hard Drive Replacement, Flat cables: crwdns2935265:05crwdnd2935265:02crwdnd2935265:02crwdne2935265:0
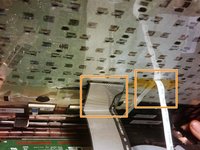
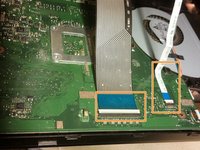
    • On the underside of the keyboard are 2 flat cables connected to the surface.

    • You can use a opening pick to pop these out of their respective slots on the main board.

  6. Asus X401A Hard Drive Replacement, Flat cable over hard drive: crwdns2935265:06crwdnd2935265:01crwdnd2935265:03crwdne2935265:0 Asus X401A Hard Drive Replacement, Flat cable over hard drive: crwdns2935265:06crwdnd2935265:02crwdnd2935265:03crwdne2935265:0 Asus X401A Hard Drive Replacement, Flat cable over hard drive: crwdns2935265:06crwdnd2935265:03crwdnd2935265:03crwdne2935265:0
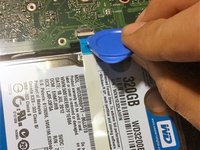
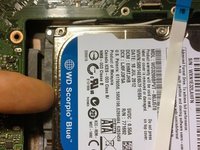
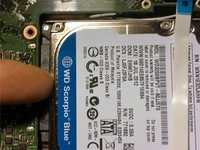
    • Using an opening pick you can now undo the connector for over the hard drive.

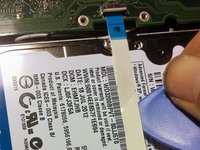
    • There is adhesive holding the flat cable to the hard drive.

    • Slide something under the flat cable to gently remove it.

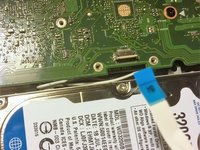
    • Slide flat cable out of socket.

  7. Asus X401A Hard Drive Replacement, Hard drive screws: crwdns2935265:07crwdnd2935265:01crwdnd2935265:01crwdne2935265:0
    • Remove 2 screws

  8. Asus X401A Hard Drive Replacement, Physically removing the hard drive: crwdns2935265:08crwdnd2935265:01crwdnd2935265:03crwdne2935265:0 Asus X401A Hard Drive Replacement, Physically removing the hard drive: crwdns2935265:08crwdnd2935265:02crwdnd2935265:03crwdne2935265:0 Asus X401A Hard Drive Replacement, Physically removing the hard drive: crwdns2935265:08crwdnd2935265:03crwdnd2935265:03crwdne2935265:0
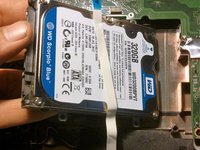
    • Using a finger you can now slide the hard drive out

crwdns2915888:0crwdne2915888:0

To reassemble your device, follow these instructions in reverse order.

crwdns2935229:06crwdne2935229:0

Eddie

crwdns2935283:009/19/15crwdne2935283:0

288 crwdns2915208:0crwdne2915208:0

crwdns2935295:0crwdne2935295:0

crwdns2944067:00crwdne2944067:0

crwdns2917038:0crwdne2917038:0

crwdns2936625:0crwdne2936625:0:

crwdns2936751:024crwdne2936751:0 0

crwdns2936753:07crwdne2936753:0 8

crwdns2936753:030crwdne2936753:0 19

crwdns2942667:0crwdne2942667:0 4,603