crwdns2933423:0crwdne2933423:0

Asus X200MA Fan Replacement

crwdns2942213:0crwdne2942213:0

  1. Asus X200MA Fan Replacement, Back Panel: crwdns2935265:01crwdnd2935265:01crwdnd2935265:01crwdne2935265:0
    • Remove the following six screws:

    • Six 4 mm screws using a Phillips #0 screwdriver.

    • Remove the following one screw:

    • One 14 mm screw using a Phillips #0 screwdriver.

    • The 14mm screw goes in the center.

  2. Asus X200MA Fan Replacement: crwdns2935265:02crwdnd2935265:01crwdnd2935265:01crwdne2935265:0
    • Take two rubber caps off the back side of the laptop.

    • Use a Phillips #0 screwdriver to remove the two 14 mm screws under the rubber caps.

  3. Asus X200MA Fan Replacement: crwdns2935265:03crwdnd2935265:01crwdnd2935265:01crwdne2935265:0
    • Use a plastic or metal spudger to separate the keyboard from the back panel and lift the keyboard out of place.

  4. Asus X200MA Fan Replacement, Battery: crwdns2935265:04crwdnd2935265:01crwdnd2935265:01crwdne2935265:0
    • Take two rubber caps off the back side of the laptop.

  5. Asus X200MA Fan Replacement: crwdns2935265:05crwdnd2935265:01crwdnd2935265:01crwdne2935265:0
    • Remove the following two screws under the rubber caps.

    • Two 14 mm screws using the Phillips #0 screw driver.

  6. Asus X200MA Fan Replacement: crwdns2935265:06crwdnd2935265:01crwdnd2935265:01crwdne2935265:0
    • Flip up the following:

    • The two latches holding the two cables shown(white and black)

    • Pull the cables free from the latches

    • Lift the keyboard from the computer

  7. Asus X200MA Fan Replacement: crwdns2935265:07crwdnd2935265:01crwdnd2935265:01crwdne2935265:0
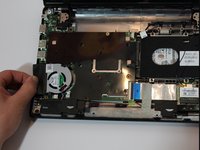
    • Remove the following screws from the inside of the laptop:

    • Two 4 mm screws using the Phillips #0 phillips screwdriver.

    • One 5 mm screw using the Phillips #0 Phillips screwdriver located in the center a little below the battery.

  8. Asus X200MA Fan Replacement: crwdns2935265:08crwdnd2935265:01crwdnd2935265:01crwdne2935265:0
    • Slide the battery up and out.

  9. Asus X200MA Fan Replacement, Fan: crwdns2935265:09crwdnd2935265:01crwdnd2935265:01crwdne2935265:0
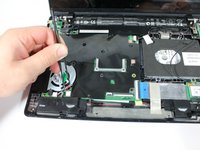
    • Remove the Two 4 mm screws using Phillips #0 phillips screwdriver.

  10. Asus X200MA Fan Replacement: crwdns2935265:010crwdnd2935265:01crwdnd2935265:02crwdne2935265:0 Asus X200MA Fan Replacement: crwdns2935265:010crwdnd2935265:02crwdnd2935265:02crwdne2935265:0
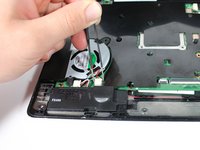
    • Unplug the set of wires located at bottom corner on fan.

  11. Asus X200MA Fan Replacement: crwdns2935265:011crwdnd2935265:01crwdnd2935265:02crwdne2935265:0 Asus X200MA Fan Replacement: crwdns2935265:011crwdnd2935265:02crwdnd2935265:02crwdne2935265:0
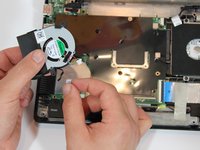
    • Lift up and out to completely the remove fan component.

crwdns2915888:0crwdne2915888:0

To reassemble your device, follow these instructions in reverse order.

crwdns2935229:03crwdne2935229:0

Vanessa Garcia

crwdns2935283:001/22/15crwdne2935283:0

1,763 crwdns2915208:0crwdne2915208:0

crwdns2935297:06crwdne2935297:0

crwdns2915084:0crwdne2915084:0

Cal Poly, Team 21-24, Maness Winter 2015 crwdns2935289:0Cal Poly, Team 21-24, Maness Winter 2015crwdne2935289:0

CPSU-MANESS-W15S21G24

crwdns2931471:04crwdne2931471:0

crwdns2935297:08crwdne2935297:0

crwdns2944067:00crwdne2944067:0

crwdns2917038:0crwdne2917038:0

crwdns2936625:0crwdne2936625:0:

crwdns2936751:024crwdne2936751:0 0

crwdns2936753:07crwdne2936753:0 6

crwdns2936753:030crwdne2936753:0 19

crwdns2942667:0crwdne2942667:0 2,385