crwdns2933423:0crwdne2933423:0

Asus Vivobook Flip 14 TP410U LCD Assembly Replacement

crwdns2942213:0crwdne2942213:0

  1. Asus Vivobook Flip 14 TP410U LCD Assembly Replacement, LCD Assembly: crwdns2935265:01crwdnd2935265:01crwdnd2935265:01crwdne2935265:0
    • Turn off the power and disconnected the AC cable from the laptop.

  2. Asus Vivobook Flip 14 TP410U LCD Assembly Replacement: crwdns2935265:02crwdnd2935265:01crwdnd2935265:02crwdne2935265:0 Asus Vivobook Flip 14 TP410U LCD Assembly Replacement: crwdns2935265:02crwdnd2935265:02crwdnd2935265:02crwdne2935265:0
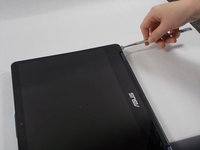
    • Remove the rubber covers for the two screws located at the bottom of the screen.

    • Use a Phillips #00 screwdriver to remove the two 6.4 mm screws outlined in the image.

  3. Asus Vivobook Flip 14 TP410U LCD Assembly Replacement: crwdns2935265:03crwdnd2935265:01crwdnd2935265:02crwdne2935265:0 Asus Vivobook Flip 14 TP410U LCD Assembly Replacement: crwdns2935265:03crwdnd2935265:02crwdnd2935265:02crwdne2935265:0
    • Excessive force may cause damage to connections.

    • Rotate the screen 360 degrees for ease of access.

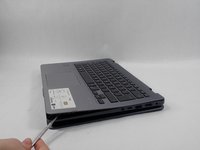
    • Place the opening tool at the corner of where the screen meets the base of the laptop.

    • Pry open the screen along the edge until it is completely off the front cover.

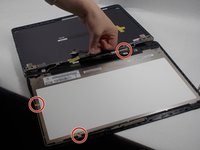
    • Disconnect each appropriate connector while opening up the laptop.

  4. Asus Vivobook Flip 14 TP410U LCD Assembly Replacement: crwdns2935265:04crwdnd2935265:01crwdnd2935265:02crwdne2935265:0 Asus Vivobook Flip 14 TP410U LCD Assembly Replacement: crwdns2935265:04crwdnd2935265:02crwdnd2935265:02crwdne2935265:0
    • Excessive force should avoided since damage may accrue.

    • Remove the cable that connects to the touch display, front camera, and motherboard.

    • Remove each piece of tape that holds down each cable.

  5. Asus Vivobook Flip 14 TP410U LCD Assembly Replacement: crwdns2935265:05crwdnd2935265:01crwdnd2935265:01crwdne2935265:0
    • Have the new LCD display fully unboxed and ready to be used.

    • Remove the old LCD display.

    • The touch screen sensor is extremely fragile, make sure to not put excessive force on the cable while assembling.

crwdns2915888:0crwdne2915888:0

To reassemble your device, follow these instructions in reverse order.

crwdns2935227:0crwdne2935227:0

Dominic Bento

crwdns2935283:003/22/22crwdne2935283:0

305 crwdns2915208:0crwdne2915208:0

crwdns2935297:02crwdne2935297:0

crwdns2944067:00crwdne2944067:0

crwdns2917038:0crwdne2917038:0

crwdns2936625:0crwdne2936625:0:

crwdns2936751:024crwdne2936751:0 1

crwdns2936753:07crwdne2936753:0 11

crwdns2936753:030crwdne2936753:0 46

crwdns2942667:0crwdne2942667:0 811