crwdns2915892:0crwdne2915892:0
The motherboard is the brain of the computer. It controls everything from image generation to file access and everything in-between. This component can get damaged due to liquid exposure, drops from tall heights, and insect infestations. Take care to make sure the motherboard is disconnected from power before starting.
crwdns2942213:0crwdne2942213:0
-
-
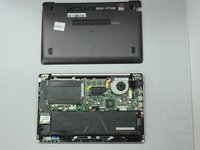
Flip the device such that the labels are on top.
-
Use a Phillips #1 screwdriver to remove the four 8mm screws near the back.
-
Use the same screwdriver to remove the four 5mm screws in the front.
-
Use the same screwdriver to remove the single 9mm screw in the center.
-
-
-
Remove the back cover by gently prying with a spudger.
-
-
-
Remove the eight 5mm screws using a Phillips #1 screwdriver.
-
-
-
Disconnect the battery ribbon cable from the motherboard.
-
-
-
Unscrew the three 4mm screws holding the hard drive to the board.
-
-
-
-
Pull on the tab on the left side of the hard drive and slowly disconnect it from the board.
-
-
-
Unplug and remove the CMOS battery.
-
-
-
Unscrew the five 5mm screws holding the left board together.
-
-
-
Unplug the two connectors on the left board.
-
-
-
Remove the single 3mm screw from the sound chip.
-
Unplug the sound chip.
-
Remove the sound chip.
-
-
-
Remove the six 4mm screws holding the fan and CPU cover.
-
-
-
Unplug the fan.
-
Remove the fan and CPU cover.
-
-
-
Unscrew the nine 4mm screws holding the right board together.
-
-
-
Remove the two remaining connectors on the board.
-


To reassemble your device, follow these instructions in reverse order.
To reassemble your device, follow these instructions in reverse order.
crwdns2935221:0crwdne2935221:0
crwdns2935227:0crwdne2935227:0

crwdns2915084:0crwdne2915084:0

Eastern Washington University, Team S1-G5, Crawford Winter 2019 crwdns2935289:0Eastern Washington University, Team S1-G5, Crawford Winter 2019crwdne2935289:0
EWU-CRAWFORD-W19S1G5
crwdns2931471:04crwdne2931471:0
crwdns2935297:07crwdne2935297:0