crwdns2933423:0crwdne2933423:0

Asus V6800V Lower Case Replacement

crwdns2942213:0crwdne2942213:0

  1. Asus V6800V Lower Case Replacement, Battery: crwdns2935265:01crwdnd2935265:01crwdnd2935265:02crwdne2935265:0 Asus V6800V Lower Case Replacement, Battery: crwdns2935265:01crwdnd2935265:02crwdnd2935265:02crwdne2935265:0
    • Place the computer upside down.

    • Using your thumbs, slide both latches away from each other (towards the outside).

    • Push the battery out with your fingers.

    • The actual battery is not pictured.

  2. Asus V6800V Lower Case Replacement, Keyboard: crwdns2935265:02crwdnd2935265:01crwdnd2935265:01crwdne2935265:0
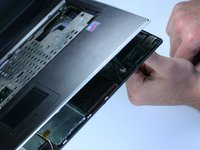
    • Using a Phillips #0 screwdriver, remove the two screws from the case.

    • These screws should have a "K" symbol next to them.

  3. Asus V6800V Lower Case Replacement: crwdns2935265:03crwdnd2935265:01crwdnd2935265:03crwdne2935265:0 Asus V6800V Lower Case Replacement: crwdns2935265:03crwdnd2935265:02crwdnd2935265:03crwdne2935265:0 Asus V6800V Lower Case Replacement: crwdns2935265:03crwdnd2935265:03crwdnd2935265:03crwdne2935265:0
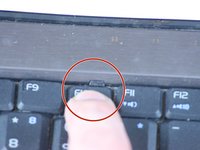
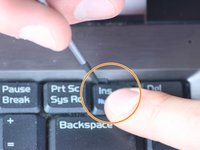
    • Locate the four tabs above the F1, F10, INSERT, and between the F5 and F6 keys.

    • Starting with the tab above the F1 key, press the tabs inward using your fingernail or spudger. Continue this process for the rest of the tabs.

    • Once all four tabs have been released, the top half of the keyboard should be free.

  4. Asus V6800V Lower Case Replacement: crwdns2935265:04crwdnd2935265:01crwdnd2935265:02crwdne2935265:0 Asus V6800V Lower Case Replacement: crwdns2935265:04crwdnd2935265:02crwdnd2935265:02crwdne2935265:0
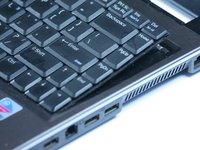
    • Pull the keyboard up from the top at a 45 degree angle. Place it upside down on the touchpad.

    • Pull the wide ribbon cable laterally from its socket on the motherboard to free the keyboard.

  5. Asus V6800V Lower Case Replacement, Lower Case: crwdns2935265:05crwdnd2935265:01crwdnd2935265:01crwdne2935265:0
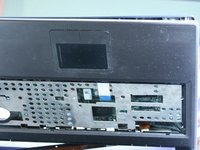
    • Using a Phillips #0 screwdriver, remove the screws at the bottom of the chassis to remove the top panel.

    • This will allow the lower case to be removed from the rest of the computer.

  6. Asus V6800V Lower Case Replacement: crwdns2935265:06crwdnd2935265:01crwdnd2935265:01crwdne2935265:0
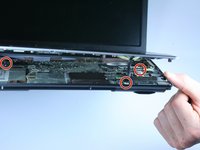
    • Remove the six screws from below the keyboard with a Phillips #0 screwdriver.

  7. Asus V6800V Lower Case Replacement: crwdns2935265:07crwdnd2935265:01crwdnd2935265:02crwdne2935265:0 Asus V6800V Lower Case Replacement: crwdns2935265:07crwdnd2935265:02crwdnd2935265:02crwdne2935265:0
    • Use your fingernails or a pry tool to gently separate both halves of the case. Begin at the front and work around the entire case.

    • Be cautious not to damage the cables that connect both sides of the case.

  8. Asus V6800V Lower Case Replacement: crwdns2935265:08crwdnd2935265:01crwdnd2935265:03crwdne2935265:0 Asus V6800V Lower Case Replacement: crwdns2935265:08crwdnd2935265:02crwdnd2935265:03crwdne2935265:0 Asus V6800V Lower Case Replacement: crwdns2935265:08crwdnd2935265:03crwdnd2935265:03crwdne2935265:0
    crwdns2935267:0crwdne2935267:0
    Tweezers
    $4.99
    crwdns2942207:0crwdne2942207:0
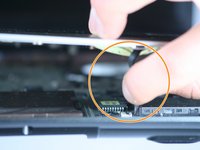
    • Remove the internal cables from front to back.

    • Use your fingers to gently remove the cables from their sockets.

    • The cables that connect the display to the main chassis are difficult to pull out using your fingers. A tool, such as tweezers, may be needed.

  9. Asus V6800V Lower Case Replacement: crwdns2935265:09crwdnd2935265:01crwdnd2935265:01crwdne2935265:0
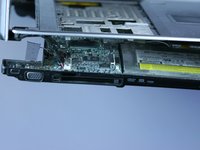
    • After separating the top and bottom halves of the case, lay them flat on the work area.

crwdns2915888:0crwdne2915888:0

To reassemble your device, follow these instructions in reverse order.

Brian Tubb

crwdns2935283:006/24/10crwdne2935283:0

272 crwdns2915208:0crwdne2915208:0

crwdns2935297:02crwdne2935297:0

crwdns2915084:0crwdne2915084:0

Cal Poly, Team 2-9, Johann Summer 2010 crwdns2935289:0Cal Poly, Team 2-9, Johann Summer 2010crwdne2935289:0

CPSU-JOHANN-R10S2G9

crwdns2931471:05crwdne2931471:0

crwdns2935297:010crwdne2935297:0

crwdns2944067:00crwdne2944067:0

crwdns2917038:0crwdne2917038:0

crwdns2936625:0crwdne2936625:0:

crwdns2936751:024crwdne2936751:0 0

crwdns2936753:07crwdne2936753:0 1

crwdns2936753:030crwdne2936753:0 12

crwdns2942667:0crwdne2942667:0 7,731