crwdns2933423:0crwdne2933423:0

Asus UL30VT-X1 Ram Replacement

crwdns2942213:0crwdne2942213:0

  1. Asus UL30VT-X1 Ram Replacement, Ram: crwdns2935265:01crwdnd2935265:01crwdnd2935265:02crwdne2935265:0 Asus UL30VT-X1 Ram Replacement, Ram: crwdns2935265:01crwdnd2935265:02crwdnd2935265:02crwdne2935265:0
    • Flip the laptop over onto the back.

  2. Asus UL30VT-X1 Ram Replacement: crwdns2935265:02crwdnd2935265:01crwdnd2935265:01crwdne2935265:0
    • Locate the two screws on the ram panel.

    • Unscrew the two screws using a Phillips Head #00 screwdriver.

  3. Asus UL30VT-X1 Ram Replacement: crwdns2935265:03crwdnd2935265:01crwdnd2935265:01crwdne2935265:0
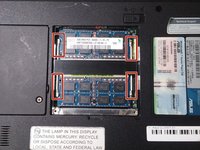
    • Locate the small cut out at the bottom of the ram panel.

    • Lift the rem panel up with your finger and remove it to expose the ram.

  4. Asus UL30VT-X1 Ram Replacement: crwdns2935265:04crwdnd2935265:01crwdnd2935265:02crwdne2935265:0 Asus UL30VT-X1 Ram Replacement: crwdns2935265:04crwdnd2935265:02crwdnd2935265:02crwdne2935265:0
    • locate the white clips on the sides of the ram.

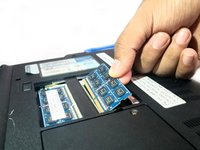
    • Push the white clips to the side so the ram pops out

    • Afterword use your fingers to pull the ram towards you.

crwdns2915888:0crwdne2915888:0

To reassemble your device, follow these instructions in reverse order.

antonio robledo

crwdns2935283:009/20/17crwdne2935283:0

101 crwdns2915208:0crwdne2915208:0

crwdns2935295:0crwdne2935295:0

crwdns2915084:0crwdne2915084:0

University of North Texas, Team S6-G7, Thomas Fall 2017 crwdns2935289:0University of North Texas, Team S6-G7, Thomas Fall 2017crwdne2935289:0

UNT-THOMAS-F17S6G7

crwdns2931471:03crwdne2931471:0

crwdns2935297:05crwdne2935297:0

crwdns2944067:00crwdne2944067:0

crwdns2917038:0crwdne2917038:0

crwdns2936625:0crwdne2936625:0:

crwdns2936751:024crwdne2936751:0 2

crwdns2936753:07crwdne2936753:0 3

crwdns2936753:030crwdne2936753:0 11

crwdns2942667:0crwdne2942667:0 190