crwdns2933423:0crwdne2933423:0

Asus ROG Strix GL702VM-BHI7N09 Solid State Drive Replacement

crwdns2942213:0crwdne2942213:0

  1. Asus ROG Strix GL702VM-BHI7N09 Solid State Drive Replacement, Back Panel: crwdns2935265:01crwdnd2935265:01crwdnd2935265:02crwdne2935265:0 Asus ROG Strix GL702VM-BHI7N09 Solid State Drive Replacement, Back Panel: crwdns2935265:01crwdnd2935265:02crwdnd2935265:02crwdne2935265:0
    • Flip the laptop over to the back panel, with the serial numbers facing up.

    • Using a Phillips #1 screwdriver, remove the ten 12 mm screws from the back panel.

  2. Asus ROG Strix GL702VM-BHI7N09 Solid State Drive Replacement: crwdns2935265:02crwdnd2935265:01crwdnd2935265:03crwdne2935265:0 Asus ROG Strix GL702VM-BHI7N09 Solid State Drive Replacement: crwdns2935265:02crwdnd2935265:02crwdnd2935265:03crwdne2935265:0 Asus ROG Strix GL702VM-BHI7N09 Solid State Drive Replacement: crwdns2935265:02crwdnd2935265:03crwdnd2935265:03crwdne2935265:0
    • The snap seals don't need a lot of pressure to open, and may break if forced. Be gentle with the opening tool.

    • Wedge the sharp edge of the plastic opening tool into the seam between the back panel and the rest of the laptop, then gently pry the panel up.

    • There will be a snapping sound as you remove the back panel, but that is just the seal loosening.

    • Continue breaking the seals by sliding the plastic opening tool around the entire laptop under the seam until the back panel is free.

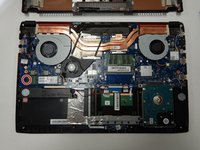
    • Once you have broken all the seals, carefully lift the panel off.

  3. Asus ROG Strix GL702VM-BHI7N09 Solid State Drive Replacement, Battery: crwdns2935265:03crwdnd2935265:01crwdnd2935265:01crwdne2935265:0
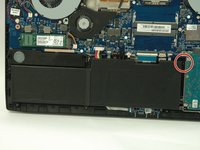
    • Unplug the battery from the motherboard.

  4. Asus ROG Strix GL702VM-BHI7N09 Solid State Drive Replacement: crwdns2935265:04crwdnd2935265:01crwdnd2935265:03crwdne2935265:0 Asus ROG Strix GL702VM-BHI7N09 Solid State Drive Replacement: crwdns2935265:04crwdnd2935265:02crwdnd2935265:03crwdne2935265:0 Asus ROG Strix GL702VM-BHI7N09 Solid State Drive Replacement: crwdns2935265:04crwdnd2935265:03crwdnd2935265:03crwdne2935265:0
    • Unscrew the 3.8 mm Phillips #1 screw on the top right hand corner of the battery.

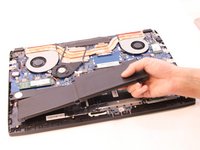
    • Lift battery from laptop frame.

  5. Asus ROG Strix GL702VM-BHI7N09 Solid State Drive Replacement, Solid State Drive: crwdns2935265:05crwdnd2935265:01crwdnd2935265:03crwdne2935265:0 Asus ROG Strix GL702VM-BHI7N09 Solid State Drive Replacement, Solid State Drive: crwdns2935265:05crwdnd2935265:02crwdnd2935265:03crwdne2935265:0 Asus ROG Strix GL702VM-BHI7N09 Solid State Drive Replacement, Solid State Drive: crwdns2935265:05crwdnd2935265:03crwdnd2935265:03crwdne2935265:0
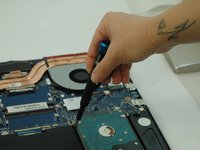
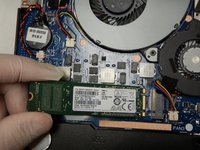
    • Using a Phillips #1 screwdriver, remove the 4mm screw holding down the SSD.

    • Slide the SSD out from the connection slot.

crwdns2915888:0crwdne2915888:0

To reassemble your device, follow these instructions in reverse order.

Cameron Richard

crwdns2935283:009/16/20crwdne2935283:0

76 crwdns2915208:0crwdne2915208:0

crwdns2935295:0crwdne2935295:0

crwdns2915084:0crwdne2915084:0

The Citadel Military College of South Carolina, Team S1-G3, Eggleston Fall 2020 crwdns2935289:0The Citadel Military College of South Carolina, Team S1-G3, Eggleston Fall 2020crwdne2935289:0

CMCSC-EGGLESTON-F20S1G3

crwdns2931471:03crwdne2931471:0

crwdns2935297:03crwdne2935297:0

crwdns2944067:00crwdne2944067:0

crwdns2917038:0crwdne2917038:0

crwdns2936625:0crwdne2936625:0:

crwdns2936751:024crwdne2936751:0 0

crwdns2936753:07crwdne2936753:0 1

crwdns2936753:030crwdne2936753:0 14

crwdns2942667:0crwdne2942667:0 899