crwdns2915892:0crwdne2915892:0
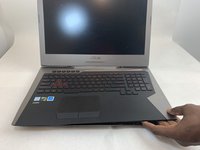
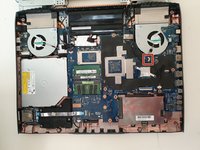
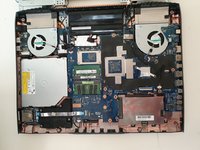
If your computer is overheating it may be due to a dirty or old fan. This guide will show you how to clean or replace the fan of Asus ROG G752V laptop.
Look at our Asus Rog G752V Troubleshooting page to identify the symptoms of a dirty or old fan. If your symptoms match, follow this guide to clean or replace your fan.
Before you start working, make sure that your Asus ROG G752V laptop charger is disconnected, and your laptop is turned off. In addition, follow the warnings that are attached to images in this guide.
crwdns2942213:0crwdne2942213:0
-
crwdns2935267:0crwdne2935267:0Tweezers$4.99
-
Pick out all 11 rubber plugs off of the back cover with a pair of tweezers.
-
-
-
Using the Phillips #0 screwdriver, unscrew all twelve 5.2 mm screws on the back of the laptop.
In my case, the 4 screws alongside the touchpad are smaller than the others.
-
-
-
Pull up the rubber seal and the service cover will come off.
-
-
-
Using the Phillips #00 screwdriver, remove the six 5.2 mm screws under the service cover.
-
-
-
Using your hands, pull the optical drive out.
You will need a small safety pin or similar to release the CD drive tray so it can open. Look for a small hole and insert the pin into the hole and push, it should normally open the tray.
Once open, look for 3 small screws that are attached to the cover. These have to be removed so the cover can come off.
-
-
-
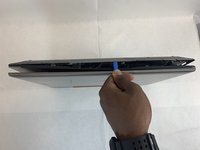
Use the iFixit Opening Tool to pry apart the back panel from the main body of the laptop.
-
-
-
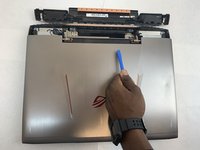
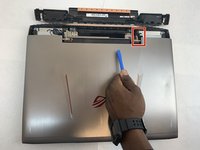
Remove the hinge on the back of the laptop cover using the iFixit Opening Tool. The piece should pop off.
-
-
-
-
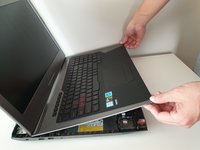
Slowly pull out the keyboard while lifting it about an inch.
-
-
-
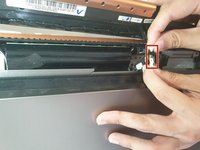
Using an ESD safe tool, detach all 3 ribbon cables securing the keyboard to the laptop.
Do you do the same thing in Reverse lift the flap up place the ribbon down and then it's snaps?
I didn't need to disconnect the ribbons, just slide the keyboard forward a few inches for the following steps
-
-
-
Once the cables are detached, lift the keyboard about 2 inches up and remove it from the rest of the body.
-
-
-
Disconnect the battery cable from its motherboard socket by gently pulling it towards the left of the socket.
-
-
-
Remove two 5.8 mm screws holding the screen and the laptop located at the hinge.
-
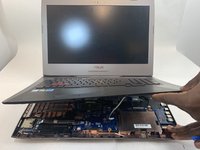
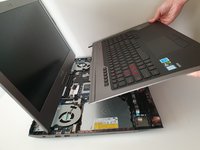
Remove the screen.
In my case, 6 x M2.4x9,6mm screws near the center - indicated with X stamp - and 2 x M1,9x6,6mm screws, 1 on the left hand side and the other on the right hand side.
Mine same as Jonathan’s. Total of 8 screws to remove the screen
Same here, 8 screws. Also… must disconnect screen!
-
-
-
Remove the four 5.8 mm screws securing the battery to the laptop.
There are two different lengths of screw holding the battery. When putting it back together, the longer screws go to the rear of the computer.
-
-
-
Use your hands to remove the battery.
The second set of wires going to the battery (shown on the right side between the tech's thumb and forefinger) are attached to a strip glued to the back of the battery. I believe it is a temperature sensor of some kind. Carefully peel it off the old battery, being careful not to bend it and press it to onto the new battery. There are two holes in the sensor strip, on at the right in the corner, another at the left end in the center. On the battery, there are two very small, hard to see alignment points to fit into those holes.
-
-
-
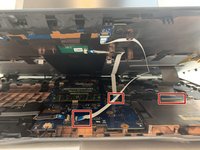
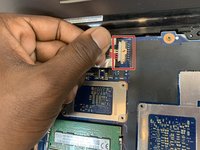
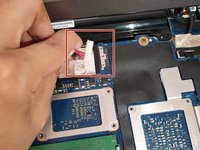
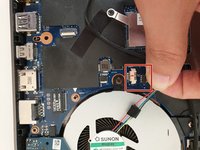
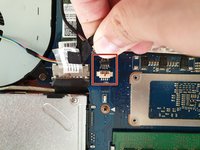
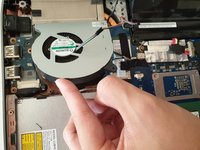
Unplug the fan-motherboard connection cable.
-
-
-
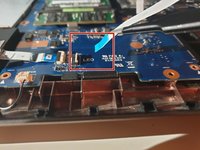
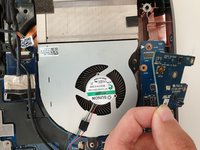
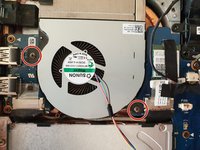
Unscrew and remove the three 5.8mm screws on the small circuit board to the right of the right side fan with a Phillips #00 screwdriver.
-
Lift up the small circuit board covering the fan and put it aside.
-
-
-
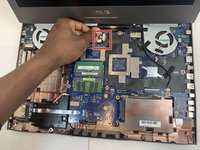
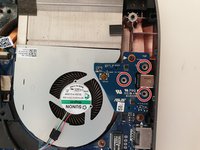
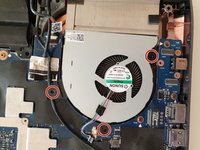
Using a Phillips #00 screwdriver, remove the three 5.2 mm screws that connect the fan to the motherboard.
-
-
-
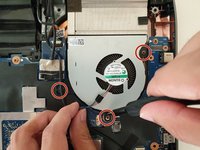
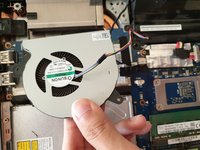
With your hands, slowly and carefully lift up the right side fan.
-
-
-
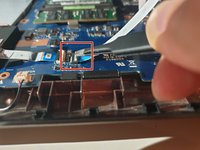
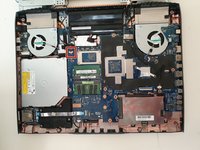
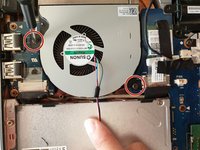
Carefully unlatch the left side fan cable from the motherboard.
-
-
-
Using a Phillips #00 screwdriver, remove the two 5.8mm screws that connect the left fan to the motherboard.
-
-
-
With your hands, carefully lift the left fan and unlatch the fan from the motherboard.
-


To reassemble your device, follow these instructions in reverse order.
To reassemble your device, follow these instructions in reverse order.
crwdns2935221:0crwdne2935221:0
crwdns2935229:04crwdne2935229:0
crwdns2915084:0crwdne2915084:0

Embry-Riddle Aeronautical University, Team S2-G36, Watkins Fall 2019 crwdns2935289:0Embry-Riddle Aeronautical University, Team S2-G36, Watkins Fall 2019crwdne2935289:0
ERAU-WATKINS-F19S2G36
crwdns2931471:04crwdne2931471:0
crwdns2935297:07crwdne2935297:0
crwdns2947410:01crwdne2947410:0
Awesome! Epic guide thank you!