crwdns2933423:0crwdne2933423:0

Asus ROG G74SX-DH73-3D Disc/Optical Drive Replacement

crwdns2942213:0crwdne2942213:0

  1. Asus ROG G74SX-DH73-3D Disc/Optical Drive Replacement, Disc/Optical Drive: crwdns2935265:01crwdnd2935265:01crwdnd2935265:02crwdne2935265:0 Asus ROG G74SX-DH73-3D Disc/Optical Drive Replacement, Disc/Optical Drive: crwdns2935265:01crwdnd2935265:02crwdnd2935265:02crwdne2935265:0
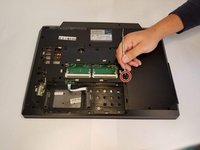
    • Place the device upside-down. Unscrew the screw at the top of the cover and remove the cover by using a plastic opening tool.

  2. Asus ROG G74SX-DH73-3D Disc/Optical Drive Replacement: crwdns2935265:02crwdnd2935265:01crwdnd2935265:01crwdne2935265:0
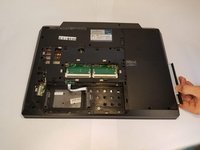
    • Remove the screw that is located on the right edge of the removed cover. The screw is in a small opening.

  3. Asus ROG G74SX-DH73-3D Disc/Optical Drive Replacement: crwdns2935265:03crwdnd2935265:01crwdnd2935265:02crwdne2935265:0 Asus ROG G74SX-DH73-3D Disc/Optical Drive Replacement: crwdns2935265:03crwdnd2935265:02crwdnd2935265:02crwdne2935265:0
    • Inside the opening that the screw was in, use a nylon spudger or any thin tool to push against the inside edge of the disc/optical drive.

    • With the disc/optical drive slightly popped out of the socket, pull the rest of it out by hand.

crwdns2915888:0crwdne2915888:0

To reassemble your device, follow these instructions in reverse order.

Jackson Reynolds

crwdns2935283:009/18/18crwdne2935283:0

346 crwdns2915208:0crwdne2915208:0

crwdns2935297:03crwdne2935297:0

crwdns2915084:0crwdne2915084:0

University of North Texas, Team S3-G7, Raign Fall 2018 crwdns2935289:0University of North Texas, Team S3-G7, Raign Fall 2018crwdne2935289:0

UNT-RAIGN-F18S3G7

crwdns2931471:03crwdne2931471:0

crwdns2935297:04crwdne2935297:0

crwdns2944067:00crwdne2944067:0

crwdns2917038:0crwdne2917038:0

crwdns2936625:0crwdne2936625:0:

crwdns2936751:024crwdne2936751:0 0

crwdns2936753:07crwdne2936753:0 1

crwdns2936753:030crwdne2936753:0 9

crwdns2942667:0crwdne2942667:0 239