crwdns2933423:0crwdne2933423:0

Asus ROG G55VW-DH71 Hard Drive Replacement

crwdns2942213:0crwdne2942213:0

  1. Asus ROG G55VW-DH71 Hard Drive Replacement, Hard Drive: crwdns2935265:01crwdnd2935265:01crwdnd2935265:01crwdne2935265:0
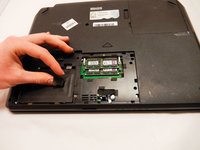
    • Using the Phillips size 0 head screwdriver, remove the 2 3.6 mm screws on the back plate located on the bottom left portion of the back of the laptop.

  2. Asus ROG G55VW-DH71 Hard Drive Replacement: crwdns2935265:02crwdnd2935265:01crwdnd2935265:01crwdne2935265:0
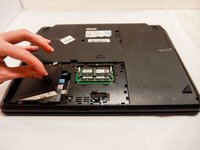
    • Lift up and remove the back plate that is located in the back, bottom left portion of the laptop.

  3. Asus ROG G55VW-DH71 Hard Drive Replacement: crwdns2935265:03crwdnd2935265:01crwdnd2935265:01crwdne2935265:0
    • Using the Phillips size 0 remove both 4.6 mm screws from the metal tabs.

  4. Asus ROG G55VW-DH71 Hard Drive Replacement: crwdns2935265:04crwdnd2935265:01crwdnd2935265:02crwdne2935265:0 Asus ROG G55VW-DH71 Hard Drive Replacement: crwdns2935265:04crwdnd2935265:02crwdnd2935265:02crwdne2935265:0
    • Grab the plastic tab.

    • Gently pull towards the outer edge of the device.

    • Lift out to fully remove.

crwdns2915888:0crwdne2915888:0

To reassemble your device, follow these instructions in reverse order.

Savanna Stockman

crwdns2935283:001/16/19crwdne2935283:0

641 crwdns2915208:0crwdne2915208:0

crwdns2935297:05crwdne2935297:0

crwdns2915084:0crwdne2915084:0

Eastern Washington University, Team S1-G2, Crawford Winter 2019 crwdns2935289:0Eastern Washington University, Team S1-G2, Crawford Winter 2019crwdne2935289:0

EWU-CRAWFORD-W19S1G2

crwdns2931471:04crwdne2931471:0

crwdns2935297:05crwdne2935297:0

crwdns2944067:00crwdne2944067:0

crwdns2917038:0crwdne2917038:0

crwdns2936625:0crwdne2936625:0:

crwdns2936751:024crwdne2936751:0 4

crwdns2936753:07crwdne2936753:0 7

crwdns2936753:030crwdne2936753:0 20

crwdns2942667:0crwdne2942667:0 708