crwdns2933423:0crwdne2933423:0

Asus Q551L Screen Replacement

crwdns2942213:0crwdne2942213:0

  1. Asus Q551L Screen Replacement, Back Panel: crwdns2935265:01crwdnd2935265:01crwdnd2935265:02crwdne2935265:0 Asus Q551L Screen Replacement, Back Panel: crwdns2935265:01crwdnd2935265:02crwdnd2935265:02crwdne2935265:0
    • Unscrew the 10 screws around the edge of the back panel. Eight of the screws are 0.0793mm T5 , two of them are 0.0793 JIS #0.

  2. Asus Q551L Screen Replacement: crwdns2935265:02crwdnd2935265:01crwdnd2935265:01crwdne2935265:0
    • Use the plastic opening tool to pry the back panel off the base of the laptop.

  3. Asus Q551L Screen Replacement, Battery: crwdns2935265:03crwdnd2935265:01crwdnd2935265:02crwdne2935265:0 Asus Q551L Screen Replacement, Battery: crwdns2935265:03crwdnd2935265:02crwdnd2935265:02crwdne2935265:0
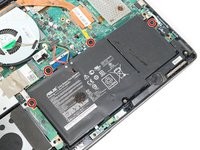
    • Unscrew the four screws to remove the battery.

  4. Asus Q551L Screen Replacement: crwdns2935265:04crwdnd2935265:01crwdnd2935265:02crwdne2935265:0 Asus Q551L Screen Replacement: crwdns2935265:04crwdnd2935265:02crwdnd2935265:02crwdne2935265:0
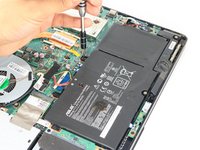
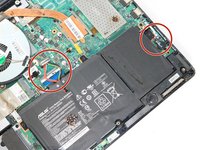
    • Un-clip both wire clips on the upper and right side of the battery.

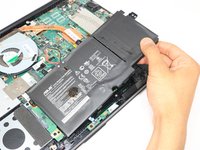
    • Lift the battery out of the device.

  5. Asus Q551L Screen Replacement, Screen: crwdns2935265:05crwdnd2935265:01crwdnd2935265:02crwdne2935265:0 Asus Q551L Screen Replacement, Screen: crwdns2935265:05crwdnd2935265:02crwdnd2935265:02crwdne2935265:0
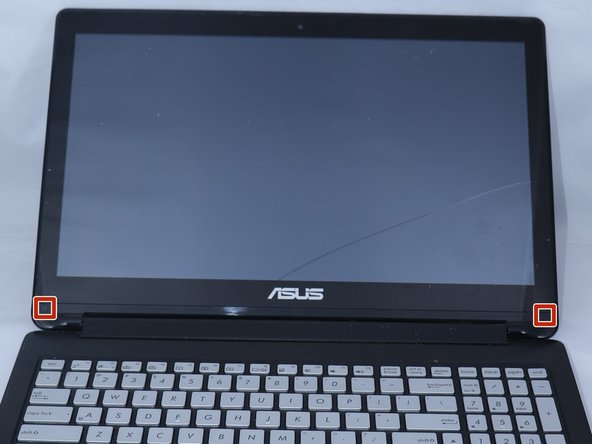
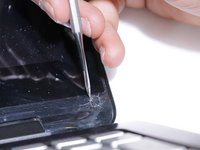
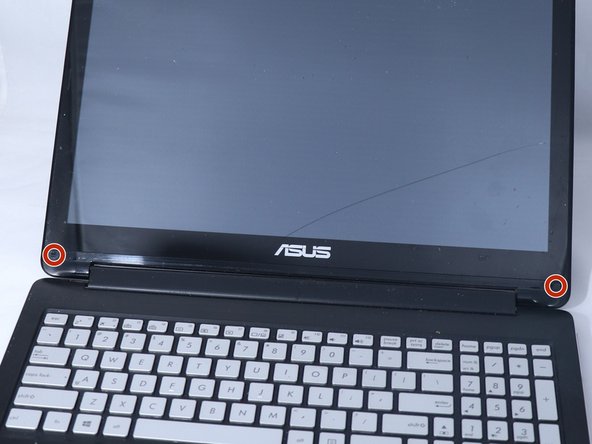
    • Use the metal spudger to gently lift the two plastic squares off the screen.

  6. Asus Q551L Screen Replacement: crwdns2935265:06crwdnd2935265:01crwdnd2935265:02crwdne2935265:0 Asus Q551L Screen Replacement: crwdns2935265:06crwdnd2935265:02crwdnd2935265:02crwdne2935265:0
    • Unscrew the two PH0 screws and set them aside.

  7. Asus Q551L Screen Replacement: crwdns2935265:07crwdnd2935265:01crwdnd2935265:01crwdne2935265:0
    • Use the plastic opening tool to pry the front edges of the screen off of the back.

  8. Asus Q551L Screen Replacement: crwdns2935265:08crwdnd2935265:01crwdnd2935265:01crwdne2935265:0
    • Take off the tapes.

    • Gently pry the LCD from the front frame.

crwdns2915888:0crwdne2915888:0

To reassemble your device, follow these instructions in reverse order.

crwdns2935229:04crwdne2935229:0

Colleen Ford

crwdns2935283:004/09/18crwdne2935283:0

327 crwdns2915208:0crwdne2915208:0

crwdns2935297:02crwdne2935297:0

crwdns2915084:0crwdne2915084:0

Eastern Washington University, Team S3-G2, Rowley Spring 2018 crwdns2935289:0Eastern Washington University, Team S3-G2, Rowley Spring 2018crwdne2935289:0

EWU-ROWLEY-S18S3G2

crwdns2931471:03crwdne2931471:0

crwdns2935297:04crwdne2935297:0

crwdns2944067:00crwdne2944067:0

crwdns2917038:0crwdne2917038:0

crwdns2936625:0crwdne2936625:0:

crwdns2936751:024crwdne2936751:0 3

crwdns2936753:07crwdne2936753:0 5

crwdns2936753:030crwdne2936753:0 26

crwdns2942667:0crwdne2942667:0 3,075