crwdns2915892:0crwdne2915892:0
This guide will show you how to remove the heat sink from the Asus Q504UA-BHI5T13.
The heat sink is a vital part of a laptop that ensures proper CPU cooling. In cases of heat sink fan damage, the part will need to be replaced. It is recommended to have some experience with electronics before attempting this guide.
Note:
When removing the screws attached to the heat sink, follow the proper order, provided by the guide at that step, to avoid damage to the heat sink. Further, handle the heat sink with care; the copper coils may be easy to damage.
Before attempting this guide, power down the device and remove all external peripherals and charging cords.
crwdns2942213:0crwdne2942213:0
-
-
Use the T5 Torx screwdriver to remove the ten 1mm screws located around the back cover.
-
-
-
Remove the two rubber pads nearest to you using the metal spudger.
-
-
-
Use the Phillips #0 screwdriver to remove the two 4mm screws that are under the rubber pads.
-
-
-
-
Insert any of the plastic opening tools into the seam to separate the back cover (it is recommended to start at the corner of the hinges). If you did it right, then the cover should pop off.
-
-
-
Once the back cover is removed, have the laptop facing upside down with the hinges facing nearest to you.
-
-
-
Using a Phillips #0 screwdriver, remove the three black 4mm screws located around the heat sink fan.
-
-
-
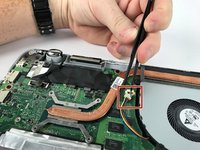
Using the same screwdriver, remove the four 4mm black screws around the copper lining
-
First remove the screw in the red circle.
-
Then remove the screw in the orange circle.
-
Next remove the screw in the yellow circle.
-
Finally, remove the screw in the green circle.
-
-
crwdns2935267:0crwdne2935267:0Tweezers$4.99
-
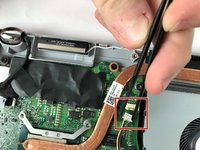
Use a pair of tweezers to pull and disconnect the cable located to the right of the heat sink fan.
-
-
-
Carefully unravel the cables (two black and one white) to the left of the heat sink fan.
-
-
-
Remove the heat sink from the device.
-


To reassemble your device, follow these instructions in reverse order.
To reassemble your device, follow these instructions in reverse order.
crwdns2935221:0crwdne2935221:0
crwdns2935227:0crwdne2935227:0
crwdns2915084:0crwdne2915084:0

USF Tampa, Team S10-G4, Thompson Fall 2017 crwdns2935289:0USF Tampa, Team S10-G4, Thompson Fall 2017crwdne2935289:0
USFT-THOMPSON-F17S10G4
crwdns2931471:04crwdne2931471:0
crwdns2935297:05crwdne2935297:0
crwdns2947410:01crwdne2947410:0
Where did you buy the ''heat sink from.