crwdns2933423:0crwdne2933423:0

Asus Q502LA-BSI5T14 Keyboard Replacement

crwdns2942213:0crwdne2942213:0

  1. Asus Q502LA-BSI5T14 Keyboard Replacement, Battery: crwdns2935265:01crwdnd2935265:01crwdnd2935265:01crwdne2935265:0
    • Ensure your device is powered off before starting.

    • Flip the laptop over and remove the ten 10 mm Phillips #1 screws securing the back panel.

  2. Asus Q502LA-BSI5T14 Keyboard Replacement: crwdns2935265:02crwdnd2935265:01crwdnd2935265:01crwdne2935265:0
    • Carefully insert a plastic opening tool under one corner of the back panel.

    • Slide the tool along the seam to gently pry the panel up and away from the device.

  3. Asus Q502LA-BSI5T14 Keyboard Replacement: crwdns2935265:03crwdnd2935265:01crwdnd2935265:02crwdne2935265:0 Asus Q502LA-BSI5T14 Keyboard Replacement: crwdns2935265:03crwdnd2935265:02crwdnd2935265:02crwdne2935265:0
    • The battery is the large L-shaped block.

    • Remove the five 5.5 mm Phillips #1 screws securing it.

  4. Asus Q502LA-BSI5T14 Keyboard Replacement: crwdns2935265:04crwdnd2935265:01crwdnd2935265:02crwdne2935265:0 Asus Q502LA-BSI5T14 Keyboard Replacement: crwdns2935265:04crwdnd2935265:02crwdnd2935265:02crwdne2935265:0
    • Using a plastic opening tool, lift the battery straight upward to remove it.

    • There are a series of eight small wires connecting the battery to the motherboard. Make sure you gently lift the battery straight up to disconnect these wires and prevent damage.

  5. Asus Q502LA-BSI5T14 Keyboard Replacement, Motherboard: crwdns2935265:05crwdnd2935265:01crwdnd2935265:02crwdne2935265:0 Asus Q502LA-BSI5T14 Keyboard Replacement, Motherboard: crwdns2935265:05crwdnd2935265:02crwdnd2935265:02crwdne2935265:0
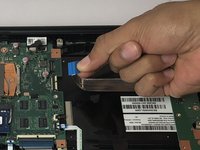
    • Remove the four ribbons connected to the motherboard.

  6. Asus Q502LA-BSI5T14 Keyboard Replacement: crwdns2935265:06crwdnd2935265:01crwdnd2935265:02crwdne2935265:0 Asus Q502LA-BSI5T14 Keyboard Replacement: crwdns2935265:06crwdnd2935265:02crwdnd2935265:02crwdne2935265:0
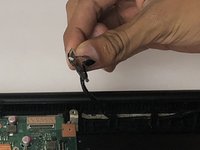
    • Disconnect the five wires attached to the motherboard by pulling gently. There are three thin wires in the upper left corner.

  7. Asus Q502LA-BSI5T14 Keyboard Replacement: crwdns2935265:07crwdnd2935265:01crwdnd2935265:01crwdne2935265:0
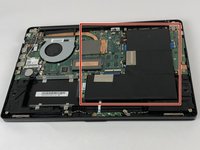
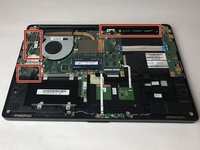
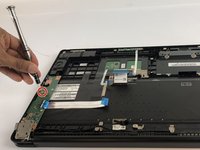
    • Remove the two 5 mm Phillips #1 screws attaching the stabilizer to the motherboard

  8. Asus Q502LA-BSI5T14 Keyboard Replacement: crwdns2935265:08crwdnd2935265:01crwdnd2935265:01crwdne2935265:0
    • Remove the four 5 mm Phillips #1 screws around the perimeter of the motherboard.

  9. Asus Q502LA-BSI5T14 Keyboard Replacement: crwdns2935265:09crwdnd2935265:01crwdnd2935265:02crwdne2935265:0 Asus Q502LA-BSI5T14 Keyboard Replacement: crwdns2935265:09crwdnd2935265:02crwdnd2935265:02crwdne2935265:0
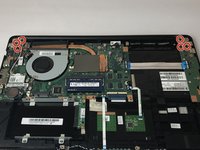
    • Remove the six 5 mm Phillips #1 screws securing the silver plates to the motherboard.

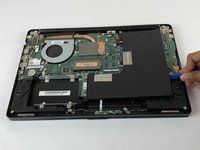
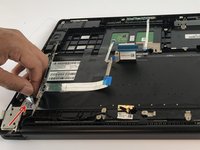
    • Open the laptop approximately 1/2" to loosen the hinge and release the motherboard.

  10. Asus Q502LA-BSI5T14 Keyboard Replacement: crwdns2935265:010crwdnd2935265:01crwdnd2935265:01crwdne2935265:0
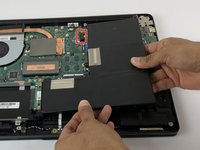
    • Gently lift the motherboard out and away from the laptop.

  11. Asus Q502LA-BSI5T14 Keyboard Replacement, Keyboard: crwdns2935265:011crwdnd2935265:01crwdnd2935265:02crwdne2935265:0 Asus Q502LA-BSI5T14 Keyboard Replacement, Keyboard: crwdns2935265:011crwdnd2935265:02crwdnd2935265:02crwdne2935265:0
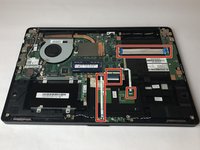
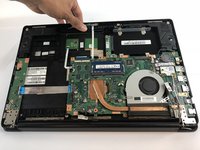
    • Remove the one 5 mm Phillips #1 screw.

    • Pull out the green plastic in order to free the keyboard underneath.

    • It is not necessary to unattach the green plastic completely .

  12. Asus Q502LA-BSI5T14 Keyboard Replacement: crwdns2935265:012crwdnd2935265:01crwdnd2935265:02crwdne2935265:0 Asus Q502LA-BSI5T14 Keyboard Replacement: crwdns2935265:012crwdnd2935265:02crwdnd2935265:02crwdne2935265:0
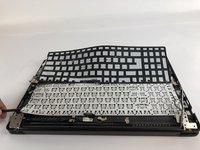
    • Start peeling the black cover from the bottom left corner gently.

    • Continue until the black cover is fully removed.

  13. Asus Q502LA-BSI5T14 Keyboard Replacement: crwdns2935265:013crwdnd2935265:01crwdnd2935265:02crwdne2935265:0 Asus Q502LA-BSI5T14 Keyboard Replacement: crwdns2935265:013crwdnd2935265:02crwdnd2935265:02crwdne2935265:0
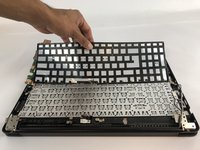
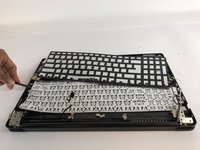
    • Insert black Spudger in bottom left corner and lift the keyboard up.

    • Slide the black Spudger underneath the keyboard to loosen it.

    • Little black pieces that hold the keyboard in place will pop out while you lift the keyboard up.

    • This part is difficult and requires a gentle but forceful movement.

  14. Asus Q502LA-BSI5T14 Keyboard Replacement: crwdns2935265:014crwdnd2935265:01crwdnd2935265:01crwdne2935265:0
    • Lift up the keyboard once it is loosened to remove it.

crwdns2915888:0crwdne2915888:0

To reassemble your device, follow these instructions in reverse order.

crwdns2935227:0crwdne2935227:0

Mary Kounelas

crwdns2935283:009/25/17crwdne2935283:0

715 crwdns2915208:0crwdne2915208:0

crwdns2935297:05crwdne2935297:0

crwdns2915084:0crwdne2915084:0

USF Tampa, Team S4-G1, Eyestone Fall 2017 crwdns2935289:0USF Tampa, Team S4-G1, Eyestone Fall 2017crwdne2935289:0

USFT-EYESTONE-F17S4G1

crwdns2931471:04crwdne2931471:0

crwdns2935297:05crwdne2935297:0

crwdns2917034:0crwdne2917034:0

Step 4 was misleading. It should have unplugged the cable before lifting the battery. I broke my battery connector off the mobo by following these directions. Lift straight up? That’s silly given how short the battery connection cable is.

Stevo Dumpert - crwdns2934203:0crwdne2934203:0

crwdns2917038:0crwdne2917038:0

crwdns2936625:0crwdne2936625:0:

crwdns2936751:024crwdne2936751:0 0

crwdns2936753:07crwdne2936753:0 5

crwdns2936753:030crwdne2936753:0 14

crwdns2942667:0crwdne2942667:0 953