crwdns2915892:0crwdne2915892:0
Asus Q302UA-BHI5T20 is a good laptop, but someday you'll need to fix something difficult like a motherboard. This repair may be needed if the motherboard is malfunctioning or damaged. Some common sign that it needs repair is that the laptop is not powering on or charging, no display or failure to boot, random shutdowns, or damaged ports caused by drops, spills, or overheating. Replacing the motherboard can restore full functionality when other fixes fail. While no advanced skills like soldering are required, you should be comfortable disassembling and reassembling the laptop, handling delicate components, and using basic tools. The process can be time-consuming and requires careful attention to detail, including transferring parts such as the RAM, SSD/HDD, and Wi-Fi card from the old board. To prevent static damage, use an anti-static wrist strap and ensure the replacement motherboard is compatible with your exact model. In this guide you'll see step by step in how to replace your motherboard.
crwdns2942213:0crwdne2942213:0
-
-
Place laptop upside down.
-
Use a Phillips #0 screwdriver to remove the ten 1 cm case screws from the bottom of the laptop.
-
-
-
Disconnect the CPU fan by carefully pulling out the small black connector(plug) located in the corner (redbox)
-
Use a Phillips #0 screwdriver to remove the three 4 mm screws that secure the fan in place.
-
-
-
Use a Phillips #0 screwdriver to remove the four 3 mm screws that secure the heat sink.
-
Carefully loosen the screws in a crisscross pattern (diagonally) to evenly release pressure and avoid damaging the processor.
-
Once the screws are removed, gently lift the heat sink straight up from the motherboard. If it feels stuck, slightly twist it back and forth to break the seal created by the thermal paste.
-
-
-
Use a Phillips #0 screwdriver to unscrew the five 5 mm screws that secure the battery.
-
Disconnect the battery's bundled cable connector and lift the battery up and out of the laptop.
-
-
-
Disconnect the WiFi antennae by gently pulling up at each antenna's connector. Use a spudger to help lift each antenna free from the WiFi card if needed.
-
-
-
Speaker Data Connector.
-
Gently pry it out.
-
Use a plastic tool to avoid damaging the connector or surrounding components.
-
-
-
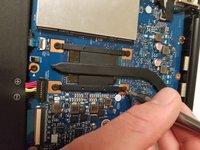
Pull up the ZIF connector tabs and then pull out the ribbon cables.
-
For the orange boxes, you pull the little black tab up to remove connector.
-
Identify the ribbon cables attached to the circuit board. These are usually flat, flexible cables connected to white or black plastic connectors (ZIF connectors).
-
-
-
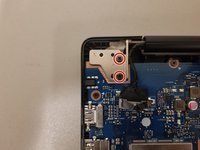
Display Connector.
-
Pull tab, and pull up.
-
When pulling up on the display connector tab, gently wiggle it side to side to help loosen the connection and avoid damaging the cable or connector.
-
-
-
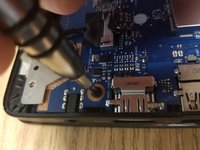
Unscrew the two 6 mm screws.
-
After removing the screws, lift the hinge up slightly to give clearance to the motherboard.
-
Find the two 6 mm screws securing the metal hinge support to the laptop chassis near the edge of the motherboard.
-
-
-
Remove the six 4 mm screws.
-
Gently pick up the motherboard without applying any unnecessary force. Disconnect any cables attached to the motherboard before lifting it out.
-


To reassemble your device, follow these instructions in reverse order.
crwdns2935221:0crwdne2935221:0
crwdns2935227:0crwdne2935227:0

crwdns2935287:0crwdne2935287:0

University of North Texas, Team S5-G4, Thomas Fall 2017 crwdns2935289:0University of North Texas, Team S5-G4, Thomas Fall 2017crwdne2935289:0
UNT-THOMAS-F17S5G4
crwdns2931471:04crwdne2931471:0
crwdns2935297:02crwdne2935297:0