crwdns2915892:0crwdne2915892:0
Display problems can be caused by a cracked screen. Cracks can appear as jagged lines or look like a spider's web. These cracks can affect just a portion of your display or disable your display completely. Follow this guide to replace your screen and restore your display.
crwdns2942213:0crwdne2942213:0
-
-
Power off and unplug your laptop, then turn it over.
-
-
-
Slide the battery release latch all the way to the right. This will cause the battery to "pop" out slightly.
-
-
-
Remove the battery from its compartment.
-
-
-
Place your laptop in the upright and open position.
-
-
-
-
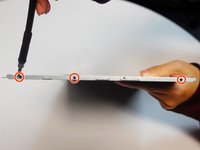
Remove the four 4mm Phillips #00 screws from the four corners of the display.
-
-
-
Gently pry the front bezel away from the screen and back bezel with an opening tool.
-
-
-
Remove the six 6mm Phillips #00 screws across the top of the screen and the four 6mm Phillips #00 screws at the bottom of the screen.
-
-
-
Remove the top bracket by pulling upwards on the tabs.
-
-
-
Remove the four 3mm Phillips #00 screws from the sides of the screen.
-
-
-
With the screen free, tilt it gently forward to reveal the display data cable.
-
Unplug the display data cable by peeling off the clear sticker covering its connector, then pulling this connector out of its socket.
-
-
-
Remove the two side brackets from the sides of the screen by removing the six 3mm Phillips #00 screws attaching it. There are three screws on either side of the screen.
-


To reassemble your device, follow these instructions in reverse order.
crwdns2935221:0crwdne2935221:0
crwdns2935229:05crwdne2935229:0