crwdns2915892:0crwdne2915892:0
This guide will teach you how to reach the hard drive of your Asus. The hard drive is required for the computer to function, so knowing how to replace your hard drive is vital to computer repair. If you're looking to upgrade the storage capabilities of your computer or your computer's hard drive isn't functioning, the guide will give you the tools to do so.
crwdns2942213:0crwdne2942213:0
-
-
Using a flathead screwdriver, spudger, or large coin such as a quarter, remove the large screw on the bottom of the laptop.
-
After the screw is removed, take off the back panel.
-
-
-
Locate the hard drive in the lower left corner.
-
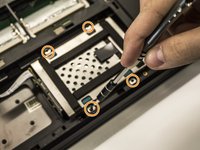
Unscrew four 6mm Phillip #0 screws from the hard drive mounting.
-
-
-
-
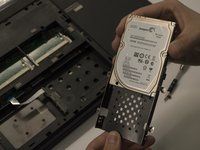
Unplug and remove the hard drive by pulling up on the black tab on top of the hard drive.
-
-
-
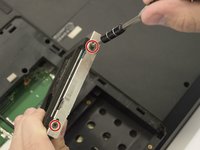
Unscrew two 3mm Phillips #0 screws to remove the casing on the hard drive.
-


To reassemble your device, follow these instructions in reverse order.
To reassemble your device, follow these instructions in reverse order.
crwdns2935221:0crwdne2935221:0
crwdns2935227:0crwdne2935227:0
crwdns2915084:0crwdne2915084:0

Cal Poly, Team 5-10, Maness Spring 2015 crwdns2935289:0Cal Poly, Team 5-10, Maness Spring 2015crwdne2935289:0
CPSU-MANESS-S15S5G10
crwdns2931471:04crwdne2931471:0
crwdns2935297:06crwdne2935297:0