crwdns2933423:0crwdne2933423:0

Asus F554LA-WS52 Disc Drive

crwdns2942213:0crwdne2942213:0

  1. Asus F554LA-WS52 Disc Drive, Disc Drive: crwdns2935265:01crwdnd2935265:01crwdnd2935265:02crwdne2935265:0 Asus F554LA-WS52 Disc Drive, Disc Drive: crwdns2935265:01crwdnd2935265:02crwdnd2935265:02crwdne2935265:0
    • Make sure the notebook is off and has been unplugged from any power source.

    • Flip the notebook over and remove the 10 screws from the back plate with a #0 Phillips head screwdriver.

    • Six (6) will be 9.6mm and four (4) will be 12.7mm.

  2. Asus F554LA-WS52 Disc Drive: crwdns2935265:02crwdnd2935265:01crwdnd2935265:03crwdne2935265:0 Asus F554LA-WS52 Disc Drive: crwdns2935265:02crwdnd2935265:02crwdnd2935265:03crwdne2935265:0 Asus F554LA-WS52 Disc Drive: crwdns2935265:02crwdnd2935265:03crwdnd2935265:03crwdne2935265:0
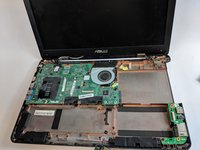
    • With a plastic opening tool, gently lift and remove the back cover to expose the internal components.

    • (Not pictured) Remove the three cables attached to the keyboard and one touch-pad.

  3. Asus F554LA-WS52 Disc Drive: crwdns2935265:03crwdnd2935265:01crwdnd2935265:02crwdne2935265:0 Asus F554LA-WS52 Disc Drive: crwdns2935265:03crwdnd2935265:02crwdnd2935265:02crwdne2935265:0
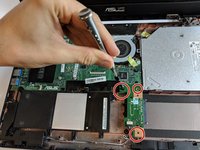
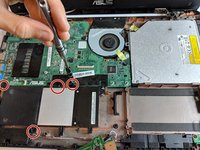
    • Unscrew the three 5.7 mm hard drive-motherboard connection screws with a #0 Phillips head screwdriver.

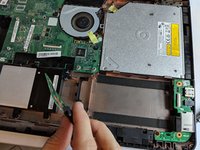
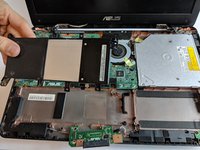
    • Remove the small rectangular hard drive-motherboard connection board.

    • (Not pictured) Remove the hard drive.

  4. Asus F554LA-WS52 Disc Drive: crwdns2935265:04crwdnd2935265:01crwdnd2935265:02crwdne2935265:0 Asus F554LA-WS52 Disc Drive: crwdns2935265:04crwdnd2935265:02crwdnd2935265:02crwdne2935265:0
    • Unscrew the four 5.7 mm battery screws with a #0 Phillips head screwdriver.

    • Remove the battery.

  5. Asus F554LA-WS52 Disc Drive: crwdns2935265:05crwdnd2935265:01crwdnd2935265:03crwdne2935265:0 Asus F554LA-WS52 Disc Drive: crwdns2935265:05crwdnd2935265:02crwdnd2935265:03crwdne2935265:0 Asus F554LA-WS52 Disc Drive: crwdns2935265:05crwdnd2935265:03crwdnd2935265:03crwdne2935265:0
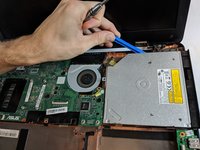
    • Unscrew the two 2.7 mm and one 5.7 mm CD drive screws with the Phillips #00 screwdriver.

    • With the plastic opening tool, gently pry the drive out from the metal brackets that hold it in place.

crwdns2915888:0crwdne2915888:0

To reassemble your device, follow these instructions in reverse order.

crwdns2935229:02crwdne2935229:0

Aaron Ratliff

crwdns2935283:010/09/18crwdne2935283:0

527 crwdns2915208:0crwdne2915208:0

crwdns2935297:04crwdne2935297:0

crwdns2915084:0crwdne2915084:0

USF Tampa, Team S1-G2, Leahy Fall 2018 crwdns2935289:0USF Tampa, Team S1-G2, Leahy Fall 2018crwdne2935289:0

USFT-LEAHY-F18S1G2

crwdns2931471:04crwdne2931471:0

crwdns2935297:06crwdne2935297:0

crwdns2944067:00crwdne2944067:0

crwdns2917038:0crwdne2917038:0

crwdns2936625:0crwdne2936625:0:

crwdns2936751:024crwdne2936751:0 0

crwdns2936753:07crwdne2936753:0 0

crwdns2936753:030crwdne2936753:0 10

crwdns2942667:0crwdne2942667:0 559