crwdns2933423:0crwdne2933423:0

Asus Eee PC 1005HA Screen Replacement

crwdns2942213:0crwdne2942213:0

  1. Asus Eee PC 1005HA Screen Replacement, Battery: crwdns2935265:01crwdnd2935265:01crwdnd2935265:01crwdne2935265:0
    • Lay the laptop upside down.

    • Locate the two battery lock tabs.

  2. Asus Eee PC 1005HA Screen Replacement: crwdns2935265:02crwdnd2935265:01crwdnd2935265:03crwdne2935265:0 Asus Eee PC 1005HA Screen Replacement: crwdns2935265:02crwdnd2935265:02crwdnd2935265:03crwdne2935265:0 Asus Eee PC 1005HA Screen Replacement: crwdns2935265:02crwdnd2935265:03crwdnd2935265:03crwdne2935265:0
    • Slide the tabs outward to unlock the battery.

    • The left tab will remain unlocked, while the right tab must be held.

    • Holding the right tab open, slide the battery out of the laptop.

  3. Asus Eee PC 1005HA Screen Replacement, Screen: crwdns2935265:03crwdnd2935265:01crwdnd2935265:03crwdne2935265:0 Asus Eee PC 1005HA Screen Replacement, Screen: crwdns2935265:03crwdnd2935265:02crwdnd2935265:03crwdne2935265:0 Asus Eee PC 1005HA Screen Replacement, Screen: crwdns2935265:03crwdnd2935265:03crwdnd2935265:03crwdne2935265:0
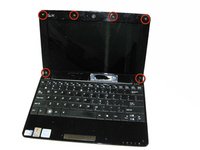
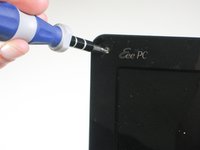
    • Using tweezers, remove the six screw covers on the screen bezel.

    • Remove the six 4.6 mm screws from the bezel.

  4. Asus Eee PC 1005HA Screen Replacement: crwdns2935265:04crwdnd2935265:01crwdnd2935265:01crwdne2935265:0
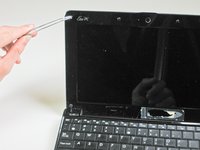
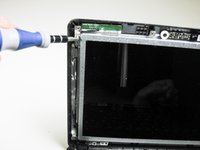
    • Use a plastic opening tool to disengage the plastic clips that secure the screen bezel to the display.

    • Carefully remove the bezel from the display.

  5. Asus Eee PC 1005HA Screen Replacement: crwdns2935265:05crwdnd2935265:01crwdnd2935265:03crwdne2935265:0 Asus Eee PC 1005HA Screen Replacement: crwdns2935265:05crwdnd2935265:02crwdnd2935265:03crwdne2935265:0 Asus Eee PC 1005HA Screen Replacement: crwdns2935265:05crwdnd2935265:03crwdnd2935265:03crwdne2935265:0
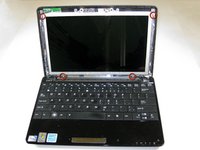
    • Remove the four 3.6 mm screws securing the screen.

    • Slowly lift the screen up from the rest of the laptop.

    • The screen is still attached to the laptop by a set of cables. Be careful not to damage them while removing the screen.

  6. Asus Eee PC 1005HA Screen Replacement: crwdns2935265:06crwdnd2935265:01crwdnd2935265:02crwdne2935265:0 Asus Eee PC 1005HA Screen Replacement: crwdns2935265:06crwdnd2935265:02crwdnd2935265:02crwdne2935265:0
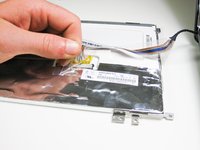
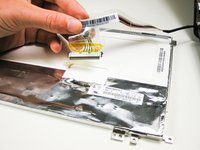
    • Remove the plastic tape securing the display cables to the back of the screen.

    • Slide the display cable connector out its socket on the back of the screen.

  7. Asus Eee PC 1005HA Screen Replacement: crwdns2935265:07crwdnd2935265:01crwdnd2935265:02crwdne2935265:0 Asus Eee PC 1005HA Screen Replacement: crwdns2935265:07crwdnd2935265:02crwdnd2935265:02crwdne2935265:0
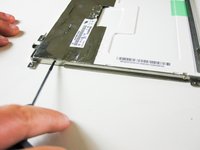
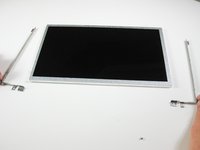
    • Remove the four 3.1 mm housing screws on the sides of the display housing frame

    • Remove the housing frame.

crwdns2915888:0crwdne2915888:0

To reassemble your device, follow these instructions in reverse order.

crwdns2935229:013crwdne2935229:0

Mitchell Cesare

crwdns2935283:001/31/12crwdne2935283:0

784 crwdns2915208:0crwdne2915208:0

crwdns2935297:04crwdne2935297:0

crwdns2915084:0crwdne2915084:0

Cal Poly, Team 11-22, Maness Winter 2012 crwdns2935289:0Cal Poly, Team 11-22, Maness Winter 2012crwdne2935289:0

CPSU-MANESS-W12S11G22

crwdns2931471:03crwdne2931471:0

crwdns2935297:012crwdne2935297:0

crwdns2944067:00crwdne2944067:0

crwdns2917038:0crwdne2917038:0

crwdns2936625:0crwdne2936625:0:

crwdns2936751:024crwdne2936751:0 1

crwdns2936753:07crwdne2936753:0 10

crwdns2936753:030crwdne2936753:0 22

crwdns2942667:0crwdne2942667:0 21,235