crwdns2915892:0crwdne2915892:0
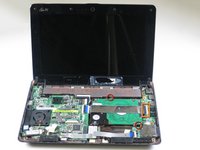
Use this guide to replace or upgrade the hard drive in the Asus Eee PC 1005HA.
crwdns2942213:0crwdne2942213:0
-
-
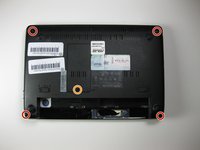
Lay the laptop upside down.
-
Locate the two battery lock tabs.
-
-
-
Slide the tabs outward to unlock the battery.
-
Holding the right tab open, slide the battery out of the laptop.
-
-
-
Use a plastic opening tool to pull up the four metal latches in the battery cavity that is located on the bottom of the laptop.
-
-
-
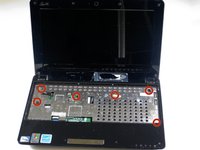
Flip the laptop over, and open the display.
-
Use a plastic opening tool to lift the edge of the keyboard that is nearest to the screen.
-
Gently lift the keyboard and slide it toward the screen.
It must be mentioned that you need to put the plastic opening tool above the F1, F6, between F10 and F11 and the Insert (Num Lock) Keys . It has 4 clips in total.
-
-
-
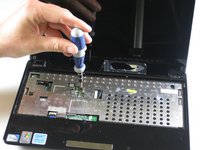
Use a spudger tool to release the tabs on the ribbon cable ZIF connector that is attached to the underside of the keyboard.
-
Once the ZIF connector tabs have been released, remove the keyboard.
Step is missing. you also suppose to remove back screws, then rf shield screws, disconnect touchpad cable and then unclip and lift sides.
-
-
-
-
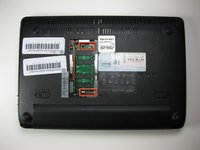
Flip the laptop over.
-
Remove the four 5.65 mm screws from the bottom of the case.
-
Loosen the captive screw in the RAM compartment cover.
-
-
-
Remove the panel covering the RAM.
-
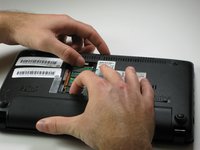
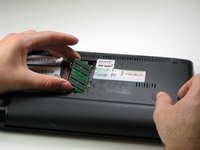
Pull the two RAM retaining arms away from the center of the RAM chip.
-
Gently pull the RAM chip out of its socket.
-
-
-
Remove the single 6.65 mm screw next to the RAM socket.
-
-
-
Flip the laptop back over and open the display.
-
Remove the six 5.5 mm screws from the metal plate beneath the keyboard.
-
-
-
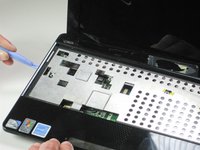
Using a plastic opening tool, carefully detach the five plastic clips securing the upper case.
-
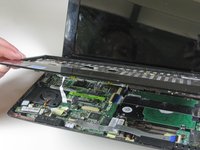
Carefully lift the upper case and flip it towards the front of the laptop.
-
-
-
Flip up the retaining flap on the trackpad ribbon cable ZIF connector.
-
Slide the trackpad ribbon cable from its socket.
-
-
-
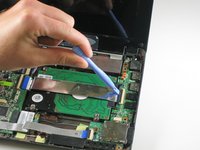
Flip up the retaining flaps on each end of the I/O board ribbon cable ZIF connector.
-
Carefully pull the the I/O board ribbon cable from its sockets.
-
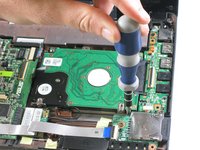
Remove the two 4.6 mm screws holding the hard drive in place.
The connector for the hard drive ribbon is easy to break if you're not careful (as I have learned the hard way). The computer is dead if that cable isn't seated properly, so I'm stuck trying to figure out where to get a replacement for it. Any help would be appreciated and consider yourself warned.
There are only one 4.6 mm screw holding the hard drive, the second one are unscrewed/fastened on step 9 under the warranty-label.
-
-
-
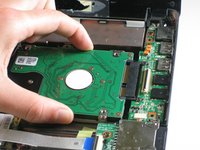
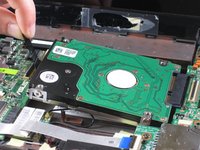
Carefully slide the hard drive away from its socket.
-
Use the attached pull tab to lift the hard drive up and out of the case.
-
-
-
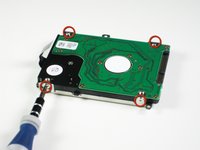
Remove the four 3.6 mm screws from the hard drive tray.
-
Remove the hard drive from the tray.
-


To reassemble your device, follow these instructions in reverse order.
To reassemble your device, follow these instructions in reverse order.
crwdns2935221:0crwdne2935221:0
crwdns2935229:049crwdne2935229:0
crwdns2915084:0crwdne2915084:0

Cal Poly, Team 11-22, Maness Winter 2012 crwdns2935289:0Cal Poly, Team 11-22, Maness Winter 2012crwdne2935289:0
CPSU-MANESS-W12S11G22
crwdns2931471:03crwdne2931471:0
crwdns2935297:012crwdne2935297:0
crwdns2947412:010crwdne2947412:0
Good guide! Thx!
What's the biggest hard drive that will work on this netbook?
If I remember correctly, from the manufacturer, 500 GB should work. I had a WD 320 GB in it.
Great tutorial, thanks, I wouldn't have managed to change the drive without it, I couldn't figure out how to remove the keyboard, those latches are tricky...
On the 1005HAB there is a piece of double sided tape under the backspace key on the keyboard. Other than that this guide works on the 1005HAB.
Total time about an hour and a half, to remove and put it back together. And I knew what I was doing as this is the second time I did this. Shame on Asus for subjecting people to this monstrosity. The only thing that pretty much didn't need to be removed is the motherboard. The intent from manufacturers, like Asus, was clear: don't bother with upgrading/replacing, just buy a new netbook.
A couple of points: I would change the sequence of steps, from Step 2 go to Step 6-7-8, THEN to Step 3-4-5, so you don't have a loose fumbling keyboard to deal with.
Also, yes, on mine too, only one screw securing the hard drive tray to motherboard, the other one is missing. It never made a difference.
Removing the upper case is tricky. Pry it open with the smallest plastic tool or screwdriver you can find, at the top near the hinges, and insert a small plastic card (ie a supermarket/drugstore key card) working your way down and around.
Having blasted Asus though, one comment is in order, the craftsmanship is very good.
Brilliant. I just removed an SSD I had installed some time ago using these instructions both times. Thanks!
what about bios drivers etc?
BIOS drivers? Not sure what you mean exactly, but to all intents and purposes one hard drive is the same as another, at the hardware level (and pretty much at the OS level too). There should be no issues whatsoever with recognising and using a different HDD (or even SSD) in your computer.
If you are talking about reinstalling the OS, and needing hardware drivers for the rest of the machine, then that is a different discussion. For the most part, if your existing disk is still working, you should be able to clone the existing installation (I'm thinking CloneZilla) but if not, plug in your Windows disk (USB flash drive or external DVD) and install. Once done, look in the Device Manager to see what components haven't been correctly identified / don't have drivers, and look on the Asus website for them. Not hard.
Or install Ubuntu. Works great, at least as fast as XP was when the computer was new. Needed no hw drivers at all, everything worked right from the get-go.
Thank you for your great tutorial! You explained it perfectly!