crwdns2933423:0crwdne2933423:0

Asus Chromebook C523N Touchpad Replacement

crwdns2942213:0crwdne2942213:0

  1. Asus Chromebook C523N Touchpad Replacement, Back Cover: crwdns2935265:01crwdnd2935265:01crwdnd2935265:02crwdne2935265:0 Asus Chromebook C523N Touchpad Replacement, Back Cover: crwdns2935265:01crwdnd2935265:02crwdnd2935265:02crwdne2935265:0
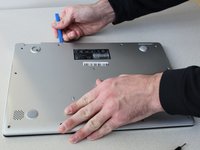
    • Remove the four 0.5mm JIS #00 screws from the bottom edge of the Chromebook and one in the center.

    • Remove the six 1.7mm JIS #00 screws from the sides and top edge of the Chromebook.

  2. Asus Chromebook C523N Touchpad Replacement: crwdns2935265:02crwdnd2935265:01crwdnd2935265:02crwdne2935265:0 Asus Chromebook C523N Touchpad Replacement: crwdns2935265:02crwdnd2935265:02crwdnd2935265:02crwdne2935265:0
    • Using a spudger, lift the top left base pad and remove it to reveal a final screw underneath.

    • Remove the one 0.5mm JIS #00 screw underneath the base pad.

  3. Asus Chromebook C523N Touchpad Replacement: crwdns2935265:03crwdnd2935265:01crwdnd2935265:02crwdne2935265:0 Asus Chromebook C523N Touchpad Replacement: crwdns2935265:03crwdnd2935265:02crwdnd2935265:02crwdne2935265:0
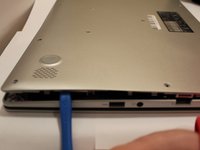
    • Use an opening tool to gently pry the base enclosure up and remove from the laptop.

  4. Asus Chromebook C523N Touchpad Replacement, Battery: crwdns2935265:04crwdnd2935265:01crwdnd2935265:03crwdne2935265:0 Asus Chromebook C523N Touchpad Replacement, Battery: crwdns2935265:04crwdnd2935265:02crwdnd2935265:03crwdne2935265:0 Asus Chromebook C523N Touchpad Replacement, Battery: crwdns2935265:04crwdnd2935265:03crwdnd2935265:03crwdne2935265:0
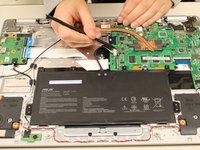
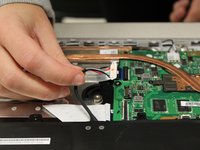
    • To disconnect the cable, use the tip of a spudger or your fingernail to flip up the small locking flap.

    • Gently disconnect the battery cable from the motherboard.

  5. Asus Chromebook C523N Touchpad Replacement: crwdns2935265:05crwdnd2935265:01crwdnd2935265:02crwdne2935265:0 Asus Chromebook C523N Touchpad Replacement: crwdns2935265:05crwdnd2935265:02crwdnd2935265:02crwdne2935265:0
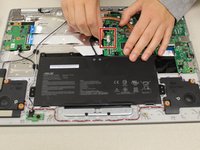
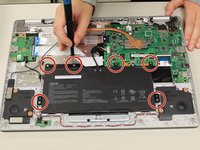
    • Remove six 1.4 mm JIS #00 screws from the battery.

  6. Asus Chromebook C523N Touchpad Replacement: crwdns2935265:06crwdnd2935265:01crwdnd2935265:01crwdne2935265:0
    • Remove the battery from the laptop.

  7. Asus Chromebook C523N Touchpad Replacement, Touchpad: crwdns2935265:07crwdnd2935265:01crwdnd2935265:01crwdne2935265:0
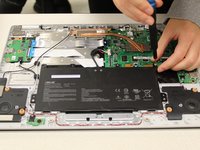
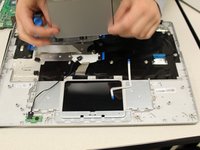
    • Pull gently on the touchpad cable connector to disconnect.

  8. Asus Chromebook C523N Touchpad Replacement: crwdns2935265:08crwdnd2935265:01crwdnd2935265:01crwdne2935265:0
    • Carefully, remove the tape from the touch pad only.

  9. Asus Chromebook C523N Touchpad Replacement: crwdns2935265:09crwdnd2935265:01crwdnd2935265:01crwdne2935265:0
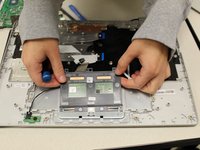
    • Remove the three 1.4 mm JIS #00 screws.

  10. Asus Chromebook C523N Touchpad Replacement: crwdns2935265:010crwdnd2935265:01crwdnd2935265:02crwdne2935265:0 Asus Chromebook C523N Touchpad Replacement: crwdns2935265:010crwdnd2935265:02crwdnd2935265:02crwdne2935265:0
    • Lift at the far edge of the touchpad to remove it.

crwdns2915888:0crwdne2915888:0

To reassemble your device, follow these instructions in reverse order.

crwdns2935229:02crwdne2935229:0

Charlotte Arkwright

crwdns2935283:010/17/19crwdne2935283:0

169 crwdns2915208:0crwdne2915208:0

crwdns2935295:0crwdne2935295:0

crwdns2915084:0crwdne2915084:0

Grand Valley State University, Team S4-G2, DeVasto Fall 2019 crwdns2935289:0Grand Valley State University, Team S4-G2, DeVasto Fall 2019crwdne2935289:0

GVSU-DEVASTO-F19S4G2

crwdns2931471:04crwdne2931471:0

crwdns2935297:06crwdne2935297:0

crwdns2944067:03crwdne2944067:0

Where do i buy the replacement touch pad

Anthony hughs - crwdns2934203:0crwdne2934203:0

Very precise and clear. Thank you.

Raymond Trail - crwdns2934203:0crwdne2934203:0

very clear instructions and photos. It was Easy, as described! One repairer had advised I buy a new Chromebook, bought an unused touchpad for £11. It took me a bit longer than the estimated 15 minutes, but this was the first time I’ve ever had the back off a laptop and attempted a repair/replacement, so took loads of photo’s on the way and took my time. I’ll definitely consider another DIY repair in the future.

John Outhwaite - crwdns2934203:0crwdne2934203:0

crwdns2917038:0crwdne2917038:0

crwdns2936625:0crwdne2936625:0:

crwdns2936751:024crwdne2936751:0 4

crwdns2936753:07crwdne2936753:0 8

crwdns2936753:030crwdne2936753:0 11

crwdns2942667:0crwdne2942667:0 866