crwdns2933423:0crwdne2933423:0

Asus Chromebook C300MA-BBCLN12 Display Replacement

crwdns2942213:0crwdne2942213:0

  1. Asus Chromebook C300MA-BBCLN12 Display Replacement, Display: crwdns2935265:01crwdnd2935265:01crwdnd2935265:03crwdne2935265:0 Asus Chromebook C300MA-BBCLN12 Display Replacement, Display: crwdns2935265:01crwdnd2935265:02crwdnd2935265:03crwdne2935265:0 Asus Chromebook C300MA-BBCLN12 Display Replacement, Display: crwdns2935265:01crwdnd2935265:03crwdnd2935265:03crwdne2935265:0
    • Wedge the tip of the plastic spudger between the outer display casing and the inner display panel liner.

    • Separate the outer display casing from the inner display panel by sliding the plastic spudger around the perimeter of the display.

    • It is necessary to pull the inner display panel firmly when separating it from the outer display casing along the bottom of the device.

  2. Asus Chromebook C300MA-BBCLN12 Display Replacement: crwdns2935265:02crwdnd2935265:01crwdnd2935265:03crwdne2935265:0 Asus Chromebook C300MA-BBCLN12 Display Replacement: crwdns2935265:02crwdnd2935265:02crwdnd2935265:03crwdne2935265:0 Asus Chromebook C300MA-BBCLN12 Display Replacement: crwdns2935265:02crwdnd2935265:03crwdnd2935265:03crwdne2935265:0
    • Remove the four 3.0mm PH00 screws from the four corners of the display.

    • Grip the edges of the display and tip it forward until it rests on the keyboard.

    • A cable connects the display to the display casing at the bottom. Separate the display panel slowly to prevent damaging the cable.

  3. Asus Chromebook C300MA-BBCLN12 Display Replacement: crwdns2935265:03crwdnd2935265:01crwdnd2935265:03crwdne2935265:0 Asus Chromebook C300MA-BBCLN12 Display Replacement: crwdns2935265:03crwdnd2935265:02crwdnd2935265:03crwdne2935265:0 Asus Chromebook C300MA-BBCLN12 Display Replacement: crwdns2935265:03crwdnd2935265:03crwdnd2935265:03crwdne2935265:0
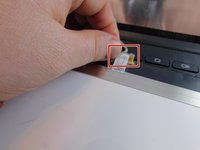
    • Locate the gold cable connector that attaches the display to the bottom of the display housing.

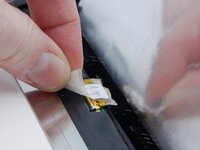
    • Peel back the protective tape that covers the gold connector.

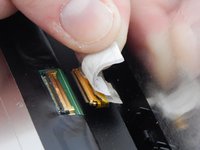
    • Disconnect the display from the display housing by gripping the sides of the gold display cable connector and pulling away from the bottom of the display.

crwdns2915888:0crwdne2915888:0

To reassemble your device, follow these instructions in reverse order.

Brooke Austin

crwdns2935283:010/05/17crwdne2935283:0

419 crwdns2915208:0crwdne2915208:0

crwdns2935297:04crwdne2935297:0

crwdns2915084:0crwdne2915084:0

Portland State University, Team S1-G2, Read Fall 2017 crwdns2935289:0Portland State University, Team S1-G2, Read Fall 2017crwdne2935289:0

PSUN-READ-F17S1G2

crwdns2931471:04crwdne2931471:0

crwdns2935297:010crwdne2935297:0

crwdns2944067:00crwdne2944067:0

crwdns2917038:0crwdne2917038:0

crwdns2936625:0crwdne2936625:0:

crwdns2936751:024crwdne2936751:0 0

crwdns2936753:07crwdne2936753:0 0

crwdns2936753:030crwdne2936753:0 6

crwdns2942667:0crwdne2942667:0 210