crwdns2933423:0crwdne2933423:0
crwdns2947577:0crwdnd2947577:0crwdne2947577:0

Asus 1015E-DS03 Screen Replacement

crwdns2942213:0crwdne2942213:0

    1. Asus 1015E-DS03 Screen Replacement, Battery: crwdns2935265:01crwdnd2935265:01crwdnd2935265:01crwdne2935265:0
      • Hold the laptop using both hands with the battery facing upwards.

      crwdns2952109:0crwdne2952109:0

      crwdns2917038:0crwdne2917038:0

    2. Asus 1015E-DS03 Screen Replacement: crwdns2935265:02crwdnd2935265:01crwdnd2935265:01crwdne2935265:0
      • Push the two tabs located below the battery in towards each other using your thumbs.

      crwdns2952109:0crwdne2952109:0

      crwdns2917038:0crwdne2917038:0

    3. Asus 1015E-DS03 Screen Replacement: crwdns2935265:03crwdnd2935265:01crwdnd2935265:01crwdne2935265:0
      • Push the battery upwards and out of the laptop as shown.

      crwdns2952109:0crwdne2952109:0

      crwdns2917038:0crwdne2917038:0

    4. Asus 1015E-DS03 Screen Replacement: crwdns2935265:04crwdnd2935265:01crwdnd2935265:01crwdne2935265:0
      • Continue to push the battery upwards until it is completely separated from the laptop as shown.

      crwdns2952109:0crwdne2952109:0

      crwdns2917038:0crwdne2917038:0

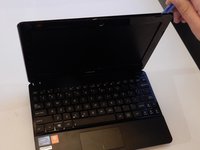
    1. Asus 1015E-DS03 Screen Replacement, Front Screen Case: crwdns2935265:05crwdnd2935265:01crwdnd2935265:01crwdne2935265:0
      • Push up on the back of the tabs that cover the hinges connecting the screen to the base of the laptop.

      • While pushing up on the back of the tabs, insert the spudger into the opening created from pushing on the tabs until the tab detaches.

      crwdns2952109:0crwdne2952109:0

      crwdns2917038:0crwdne2917038:0

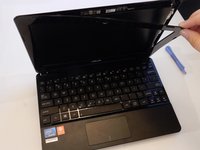
    2. Asus 1015E-DS03 Screen Replacement: crwdns2935265:06crwdnd2935265:01crwdnd2935265:02crwdne2935265:0 Asus 1015E-DS03 Screen Replacement: crwdns2935265:06crwdnd2935265:02crwdnd2935265:02crwdne2935265:0
      • Once the case has been separated from the laptop, pull the case off completely, using the plastic opening tool or your fingers.

      • You will hear popping noises which are to be expected.

      crwdns2952109:0crwdne2952109:0

      crwdns2917038:0crwdne2917038:0

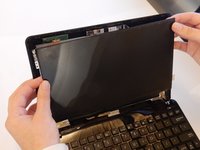
    3. Asus 1015E-DS03 Screen Replacement: crwdns2935265:07crwdnd2935265:01crwdnd2935265:01crwdne2935265:0
      • When the screen case has been successfully removed, the laptop should resemble the photo shown here.

      crwdns2952109:0crwdne2952109:0

      crwdns2917038:0crwdne2917038:0

    1. Asus 1015E-DS03 Screen Replacement, Screen: crwdns2935265:08crwdnd2935265:01crwdnd2935265:01crwdne2935265:0
      • Unscrew the 3 mm screws (4) using a #0 Phillips head screwdriver.

      crwdns2952109:0crwdne2952109:0

      crwdns2917038:0crwdne2917038:0

    2. Asus 1015E-DS03 Screen Replacement: crwdns2935265:09crwdnd2935265:01crwdnd2935265:02crwdne2935265:0 Asus 1015E-DS03 Screen Replacement: crwdns2935265:09crwdnd2935265:02crwdnd2935265:02crwdne2935265:0
      • Lift the screen away from the computer.

      • Be careful removing the screen, as the left side is still connected to the computer.

      crwdns2952109:0crwdne2952109:0

      crwdns2917038:0crwdne2917038:0

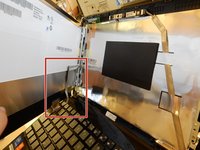
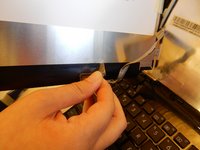
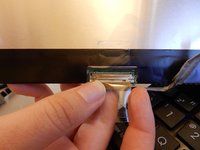
    3. Asus 1015E-DS03 Screen Replacement: crwdns2935265:010crwdnd2935265:01crwdnd2935265:02crwdne2935265:0 Asus 1015E-DS03 Screen Replacement: crwdns2935265:010crwdnd2935265:02crwdnd2935265:02crwdne2935265:0
      • Remove the wire that is glued to the back of the screen with your fingers.

      • Remove the tape covering the connection port.

      crwdns2952109:0crwdne2952109:0

      crwdns2917038:0crwdne2917038:0

    4. Asus 1015E-DS03 Screen Replacement: crwdns2935265:011crwdnd2935265:01crwdnd2935265:01crwdne2935265:0
      • Separate the screen from the computer by gently pulling it out.

      crwdns2952109:0crwdne2952109:0

      crwdns2917038:0crwdne2917038:0

    5. Asus 1015E-DS03 Screen Replacement: crwdns2935265:012crwdnd2935265:01crwdnd2935265:01crwdne2935265:0
      • Upon removal, the computer should look like this picture.

      crwdns2952109:0crwdne2952109:0

      crwdns2917038:0crwdne2917038:0

crwdns2915888:0crwdne2915888:0

To reassemble your device, follow these instructions in reverse order.

crwdns2935221:0crwdne2935221:0

crwdns2935229:02crwdne2935229:0

Becca Day

crwdns2935283:003/23/16crwdne2935283:0

321 crwdns2915208:0crwdne2915208:0

crwdns2935297:02crwdne2935297:0

crwdns2935287:0crwdne2935287:0

Clemson, Team 7-4, Benson Spring 2016 crwdns2935289:0Clemson, Team 7-4, Benson Spring 2016crwdne2935289:0

CLEM-BENSON-S16S7G4

crwdns2931471:05crwdne2931471:0

crwdns2935297:028crwdne2935297:0

crwdns2947412:00crwdne2947412:0

crwdns2917038:0crwdne2917038:0

crwdns2936625:0crwdne2936625:0:

crwdns2936751:024crwdne2936751:0 0

crwdns2936753:07crwdne2936753:0 5

crwdns2936753:030crwdne2936753:0 28

crwdns2942667:0crwdne2942667:0 1,121